ENGLISH ESPAÑOL OWNER’S MANUAL BOTTOM FREEZER REFRIGERATOR Please read this manual carefully before operating your set and retain it for future reference. MANUAL DE USUARIO REFRIGERADOR CON CONGELADOR INFERIOR Lea detenidamente este manual antes de empezar a utilizar el refrigerador y guárdelo como referencia para el futuro. Model Name/Nombre de Modelo **=color number/número de color LFD22786** GM-F223R*XM P/No. MFL67851603 www.lg.
TABLE OF CONTENTS Important Safety Instructions Requirements for Ground Connection Parts and Features Freezer Section Durabase Durabase Divider Pullout Drawer 2-3 3 4 Water filter Refrigerator Installation Unpacking Installation How to remove and Install the Refrigerator Doors, handle and drawers Leveling and Door Alignment 5-12 5 5 Care and cleaning General cleaning tips 6-11 12 Connecting the Water Line Using your Refrigerator Adjusting Control Settings Automatic Icemaker Food Storage Guide Refr
IMPORTANT IMPORTANT SAFETY SAFETY INSTRUCTIONS INSTRUCTIONS SAFETY MESSAGES This manual contains several important safety notices. Always read and obey all of the following safety messages. This is the safety alert symbol. This symbol is a warning to potential dangers that could cause death, injury or damage to you, others or the product. All safety messages will follow after this warning symbol and the word “DANGER”, “CAUTION” or “WARNING”.
CAUTION This appliance is not intended for use by children, persons with physical or mental disabilities, persons with reduced sensory or mental capacity, or persons with lack of experience or know-how, unless they have supervision or instruction in relation to the use of the appliance by the person responsible for their safety. Children should be supervised to assure that they do not play with the appliance.
PARTS AND FEATURES A N B C M D E F G L H K I J O Use this page to become more familiar with the parts and features of your refrigerator. NOTE: This guide covers several different models. The refrigerator you have purchased may have some or all of the items listed below. The locations of the features shown below may not match your model.
REFRIGERATOR INSTALLATION “This appliance is intended to be used in household and similar applications such as: -Staff kitchen areas in shops, offices and other working environments; farms houses and by clients in hotel, motels and others residential type environments. -Bed and breakfast type environments; catering and similar non-reatil applications.” WARNING EXCESSIVE WEIGHT HAZARD Use the assistance of two or more persons to move or install the refrigerator.
REFRIGERATOR INSTALLATION HOW TO REMOVE AND INSTALL THE REFRIGERATOR DOORS For moving the refrigerator through a house door, it might be necessary to remove refrigerator and freezer door handles. NOTE: Removing the doors is always recommended when it is necessary to move the refrigerator through a narrow opening. If it is necessary to remove the handles, follow the directions below.
REFRIGERATOR INSTALLATION NOTE: Removing the doors is always recommended when it is necessary to move the refrigerator through a narrow opening. If it is necessary to remove the handles, follow the directions below. HOW TO REMOVE FREEZER DOOR HANDLE NOTE: Handle appearance may vary from illustrations on this page. Loosen the set screws located on the lower side of the handle with a 1/8 in (3,1 mm). Allen wrench and remove the handle.
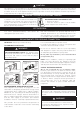
REFRIGERATOR REFRIGERATOR INSTALLATION INSTALLATION CAUTION: Before you begin, remove food and bins from the doors. REMOVING AND REPLACING REFRIGERATOR DOORS WARNING (1) (2) Excessive Weight Hazard: Use two or more people to remove and install the refrigerator doors. Failure to do so can result in back or other injury. (3) (4) (7) (5) WARNING (6) Electrical Shock Hazard • Disconnect the electrical supply to the refrigerator before installing.
REFRIGERATOR REFRIGERATOR INSTALLATION INSTALLATION Reinstalling the Refrigerator Door Right Door Left Door 1. Lower the door onto middle hinge pin (9). 2. Line up the holes in the top hinge with the holes in the top of the refrigerator. Insert and tighten the three Bolts (6) in the hinge. 3. Hook the tabs on right side of hinge cover (2) under the edge of the top hinge (4) and position the cover in place. Insert and tighten the cover screw (1). 1. Lower the door onto middle hinge pin (10). 2.
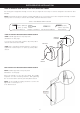
REFRIGERATOR REFRIGERATOR INSTALLATION INSTALLATION HOW TO REMOVE THE FREEZER DRAWER WARNING: Use two or more people to remove and install the freezer drawer. Failure to do so can result in back or other injury. Remove the screws (2) of the rail on both sides. 2 CAUTION: Do not hold the handle when removing or replacing the drawer. The handle may come off, causing personal injury. To remove, pull the drawer out to full extension. Lift the drawer up and out, making sure to clear the rail system.
REFRIGERATOR REFRIGERATOR INSTALLATION INSTALLATION HOW TO REPLACE THE FREEZER DRAWER With the drawer pulled out to full extension, insert the lower basket 4 in the rail assembly. Pull out each rail to full extension. 4 • Hook thethe door support into side the rail tabs (2) on both Grasp drawer on(1) each and hook door supports 1 into the rail tabs 2 located on both sides. To replace, with the drawer pulled out to full extension, insert the drawer in the rail assembly.
REFRIGERATOR INSTALLATION LEVELING AND DOOR ALIGNMENT Door Alignment Leveling If the space between your doors is uneven, follow the instructions below to align the doors: After installing, plug the refrigerator’s power cord into a 3-prong grounded outlet and push the refrigerator into the final position. Your refrigerator has two front leveling legs—one on the right and one on the left. Adjust the legs to alter the tilt from frontto-back or side-to-side.
USING USING YOUR YOUR REFRIGERATOR REFRIGERATOR SETTING THE CONTROLS NOTE: When changing control settings, wait 24 hours before making additional adjustments. The controls are set correctly when milk or juice is as cold as you would like and when ice cream is firm. If the temperature in either compartment is too cold or too warm, change the setting one increment at a time. Wait 24 hours for the change to stabilize before adjusting again.
USING YOUR REFRIGERATOR Articulating Mullion Lock This feature is a metal strip attached to the left door that articulates (rotates) 90 degrees as the door is closed, forming a mullion (base) for the left and right door gaskets to seal against. •When power is initially connected to the refrigerator, the Lock function is off. •If you want to activate the Lock function to lock other buttons, press and hold the Door Alarm button for three seconds or more.
USING USING YOUR YOUR REFRIGERATOR REFRIGERATOR AUTOMATIC ICEMAKER WARNING The icemaker will produce approximately 70-210 cubes in a 24-hour period, depending on freezer compartment temperature, room temperature, number of door openings and other operating conditions. Personal Injury Hazard DO NOT place fingers or hands on the automatic ice making mechanism while the refrigerator is plugged in. • It takes about 12 to 24 hours for a newly installed refrigerator to begin making ice.
USING USING YOUR YOUR REFRIGERATOR REFRIGERATOR FOOD STORAGE GUIDE Wrap or store food in the refrigerator in airtight and moisture-proof material unless otherwise noted. This prevents food odor and taste transfer throughout the refrigerator. For dated products, check date code to ensure freshness. Items How to Butter or margarine Keep opened butter in a covered dish or closed compartment. When storing an extra supply, wrap in freezer packaging and freeze.
USING USING YOUR YOUR REFRIGERATOR REFRIGERATOR WARNING: DO NOT STORE ELECTRCAL APPLIANCES, do not use electrical appliances inside the food storage compartment, unless they are recommended by the manufacturer. To replace the tray, slightly tilt up the front of the tray and snap the tabs into the holes. REFRIGERATOR SECTION WATER DISPENSER r to era ress Expeze r Fre Filte . ter 3sec WaHold frig Re r eze Fre To dispense cold water, push on the dispenser switch with a glass.
USING USING YOUR YOUR REFRIGERATOR REFRIGERATOR REFRIGERATOR SHELVES HUMIDITY CONTROLLED CRISPER The shelves in your refrigerator are adjustable to meet your individual storage needs. Your model may have full or split shelves. The crispers provide fresher tasting fruit and vegetables by letting you easily control humidity inside the drawer.
USING YOUR REFRIGERATOR PANTRY DRAWER FREEZER SECTION This drawer can be used for large party trays, deli items and beverages. (Do not use this drawer for vegetables or items that require high humidity.) ICE BIN 1. Pull the Freezer Drawer and the Pullout Drawer out as far as possible to remove the Extra Ice Bin. Pull forward to open. Lift slightly and pull out to remove. 2. Gently lift and pull out the ice bin. 3.
USING YOUR REFRIGERATOR DURABASE REMOVAL AND REPLACEMENT PULLOUT DRAWER 1. To remove the Durabase, open the drawer to full extension 1 . Push the Durabse to the back as much as possible, tilt the front of the Durabase up, and then lift it up and out 2 . 1. To remove, pull the drawer out to full extension. Lift the drawer up and out, making sure to clear the rail system. 2. To replace, tilt the back of the Durabase into the drawer, then lower it down and into the rail assembly. 1 2 2.
WATER WATER FILTER FILTER WATER FILTER •Rotate the water er up into position and close the cover. The cover will click when closed correctly. It is recommended that you replace the water filter: •Approximately every 6 months. •When the water er indicator turns on. •When the water dispenser output decreases. •When the ice cubes are smaller than normal. 1. Remove the old water filter. •Lower or remove the top left shelf to allow the water filter to rotate all the way down.
WATER FILTER Performance Data Sheet The concentration of the indicated substances in water entering the system was reduced to a concentration less than or equal to the permissible limit for water leaving the system as specified in NSF/ANSI Standard 42 and Standard 53. System tested and by NSF International against NSF/ANSI Standard 42 and Standard 53 for the reduction of substances listed below.
WATER FILTER WARNING Application Guidelines/Water Supply Parameters Service Flow 0.5 gpm (1.9 lpm) Water Supply Potable Water Water Pressure 40-120 psi (0,28 - 0,83 MPa) Water Temperature 33°F - 100°F (0.6°C - 38°C) To reduce the risk associated with ingestion of contaminants: Do not use with water that is microbiologically unsafe or of unknown quality without adequate disinfection before and after of the system.
WATER FILTER State of California Department of Public Health Water Treatment Device Certificate Number 09 - 2018 Date Issued: December 15, 2009 Trademark/Model Designation ADQ36006101-S Replacement Elements ADQ36006101 Manufacturer: Cuno Inc.
CARE AND CLEANNING INSIDE WALLS (allow freezer to warm up so the cloth will not stick) WARNING To help remove odors, you can wash the inside of the refrigerator with a mixture of baking soda and warm water. Mix 2 tablespoons of baking soda to 1 quart of water (26 g soda to 1 liter water.) Be sure the baking soda is completely dissolved so it does not scratch the surfaces of the refrigerator. Explosion Hazard CAUTION: While cleaning the inside, do not spray water. Use non-flammable cleaner.
CARE AND CLEANNING REPLACING REFRIGERATOR AND FREEZER LIGHTS WHEN YOU MOVE NOTE: All refrigerators use LED lighting in refrigerator and freezer, for this reason must be replaced by a qualified service technician. When you are moving your refrigerator to a new home, follow these steps to prepare it for the move. 1. Remove all food from the refrigerator and pack all frozen food in dry ice. WARNING 2. Unplug the refrigerator.
CONNECTING THETHE WATER LINE CONNECTING WATER LINE BEFORE YOU BEGIN WHAT YOU WILL NEED • Copper Tubing, ¼ in. outer diameter, to connect the refrigerator to the water supply. Be sure both ends of the tubing are cut square. This water line installation is not covered by the refrigerator warranty. Follow these instructions carefully to minimize therisk of expensive water damage.
CONNECTING THETHE WATER LINE CONNECTING WATER LINE 5. TIGHTEN THE PIPE CLAMP Tighten the clamp screws until the sealing washer begins to swell. INSTALLATION INSTRUCTIONS Install the shutoff valve on the nearest frequently used drinking water line. NOTE: Do not overtighten the clamp or you may crush the tubing. 1. SHUT OFF THE MAIN WATER SUPPLY Turn on the nearest faucet to relieve the pressure on the line. Washer Pipe Clamp 2.
TROUBLESHOOTING GUIDE 10. TURN THE WATER ON AT THE SHUTOFF VALVE Tighten any connections that leak. 8. FLUSH OUT THE TUBING Turn the main water supply on and flush out the tubing until the water is clear. Shut the water off at the water valve after about one quart of water has been fl ushed through the tubing. 9. CONNECT THE TUBING TO THE REFRIGERATOR NOTE: Before making the connection to the refrigerator, be sure that the refrigerator power cord is not plugged into the wall outlet. a.
TROUBLESHOOTING GUIDE TROUBLESHOOTING GUIDE Before conducting troubleshooting, make sure that the following basic requirements are met: Service Flow 0.5 gpm (1.9 lpm) Water Supply Potable Water Water Pressure 40-120 psi (0,28 - 0,83 MPa) Operating Ambient Temperature Limits 55°F - 110°F (13°C - 43°C) Electrical Ratings 115 or 127 Volts, AC and fused at 15 A or 10 A to 220 Volts. COOLING Problem Possible Causes Solutions The refrigerator control is set to OFF (some Turn the control ON.
TROUBLESHOOTING GUIDE COOLING Problem Refrigerator or Freezer section is too warm. Possible Causes Solutions Refrigerator is installed in a hot location. The compressor will run longer under warm conditions. At normal room temperatures 70°F (21°C) expect your compressor to run about 40% to 80% of the time. Under warmer conditions, expect it to run even more often. The refrigerator should not be operated above 110°F (43°C ). Condenser / back cover is clogged.
TROUBLESHOOTING GUIDE COOLING/ ICE & WATER Problem Possible Causes Solutions Doors are opened often or for long periods of time. When the doors are opened often or for long periods of time, warm, humid air enters the compartment. This raises the temperature and moisture level within the compartment. To lessen the effect, reduce the frequency and duration of door openings. Doors not closed correctly. See the Doors will not close correctly section in the Troubleshooting section. Weather is humid.
REFRIGERATOR CARE AND CLEANING TROUBLESHOOTING GUIDE Problem Possible Causes Solutions Refrigerator or Freezer section is too cold. Incorrect temperature control settings. If the temperature is too cold, adjust the control one increment at a time and wait for the temperature to stabilize. Refer to the Setting the Controls section for more information. Frost or ice crystals on frozen food (inside of sealed package).
TROUBLESHOOTING GUIDE TROUBLESHOOTING GUIDE ICE & WATER Problem Icemaker is not making enough ice (continued). Dispensing water slowly. Possible Causes Solutions Doors are opened often or for long periods of time. If the doors of the unit are opened often, ambient air will warm the refrigerator which will prevent the unit from maintaining the set temperature. Lowering the refrigerator temperature can help, as well as not opening the doors as frequently. Doors are not closed completely.
TROUBLESHOOTING GUIDE TROUBLESHOOTING GUIDE Problem Icemaker is not making ice. Possible Causes Solutions Refrigerator was recently installed or icemaker recently connected. It may take up to 24 hours for each compartment to reach the desired temperature and for the icemaker to begin making ice. Icemaker not turned on. Locate the icemaker ON/OFF switch and confirm that it is in the ON (I) position. The ice detecting sensor is obstructed.
TROUBLESHOOTING GUIDE Problem Possible Causes Solutions Water supply contains minerals such as sulfur. A water filter may need to be installed to eliminate taste and odor problems. NOTE: In some cases, a filter may not help. It may not be possible to remove all minerals / odor / taste in all water supplies. Icemaker was recently installed. Discard the first few batches of ice to avoid discolored or bad tasting ice. Ice has been stored for too long.
TROUBLESHOOTING GUIDE TROUBLESHOOTING GUIDE NOISE Problem Clicking Rattling Whooshing Possible Causes Solutions The defrost control will click when the Normal Operation automatic defrost cycle begins and ends. The thermostat control (or refrigerator control on some models) will also click when cycling on and off. Rattling noises may come from the flow of refrigerant, the water line on the back of the unit, or items stored on top of or around the refrigerator.
TROUBLESHOOTING GUIDE PARTS & FEATURES Problem Possible Causes Solutions Food packages are blocking the door open. Doors will not close correctly or pop open. Ice bin, crisper cover, pans, shelves, door Push bins all the way in and put crisper cover, bins, or baskets are out of position. pans, shelves and baskets into their correct positions. See the Using Your Refrigerator section for more information. The doors were removed during product installation and not properly replaced.
WARRANTY LG ELECTRONICS U.S.A., INC. LG REFRIGERATOR LIMITED WARRANTY - U.S.A. Should your LG Refrigerator (“Product”) fail due to a defect in materials or workmanship under normal home use, during the warranty period set forth below, LG will at its option repair or replace the product. This limited warranty is valid only to the original retail purchaser of the product and applies only when purchased and used within the United States including U.S. Territories.
WARRANTY LG ELECTRONICS CANADA, INC. LG REFRIGERATOR LIMITED WARRANTY - Canada WARRANTY: Should your LG Refrigerator (“Product”) fail due to a defect in material or workmanship under normal home use during the warranty period set forth below, LG Canada will at its option repair or replace the Product upon receipt of proof of original retail purchase.
SMART DIAGNOSIS SMART DIAGNOSIS (In some models). Should you experience any problems with your refrigerator, it has the capability of transmitting data via your telephone to the LG service center. This gives you the capability of speaking directly to our trained specialists. The specialist records the data transmitted from your machine and uses it to analyze the issue, providing a fast and effective diagnosis. 4.
LG Customer Information Center 1-800-243-0000 1-888-865-3026 1-888-542-2623 USA, Consumer User USA, Commercial User CANADA Register your Product Online! www.lg.