ENGLISH ESPAÑOL OWNER’S MANUAL BOTTOM FREEZER REFRIGERATOR Please read this manual carefully before operating your set and retain it for future reference. MANUAL DE USUARIO REFRIGERADOR CON CONGELADOR INFERIOR Lea detenidamente este manual antes de empezar a utilizar el refrigerador y guárdelo como referencia para el futuro. Model Name/Nombre de Modelo **=color number/número de color LFD22786** GM-F223RSXM GF22WGS LFDS22520* LM22SGPK GF22BGSK P/No.
TABLE OF CONTENTS Important Safety Instructions Requirements for Ground Connection Parts and Features Refrigerator Installation Unpacking Installation How to remove and Install the Refrigerator Doors, handle and drawers Leveling and Door Alignment Using your Refrigerator Adjusting Control Settings Automatic Icemaker Food Storage Guide Refrigerator Section Water Dispenser Refrigerator Shelves Humidity Controlled Crisper Glide ‘N’ Serve Door Bins Dairy Bin Freezer Section Durabase Durabase Divider Pullou
IMPORTANT SAFETY INSTRUCTIONS SAFETY MESSAGES This manual contains several important safety notices. Always read and obey all of the following safety messages. This is the safety alert symbol. This symbol is a warning to potential dangers that could cause death, injury or damage to you, others or the product. All safety messages will follow after this warning symbol and the word “DANGER”, “CAUTION” or “WARNING”. These words mean: You may be killed or suffer fatal damage if you do not follow instructions.
CAUTION This appliance is not intended for use by children, persons with physical or mental disabilities, persons with reduced sensory or mental capacity, or persons with lack of experience or know-how, unless they have supervision or instruction in relation to the use of the appliance by the person responsible for their safety. Children should be supervised to assure that they do not play with the appliance.
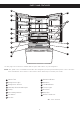
PARTS AND FEATURES A N B C M D E F G L H K I J O Use this page to become more familiar with the parts and features of your refrigerator. NOTE: This guide covers several different models. The refrigerator you have purchased may have some or all of the items listed below. The locations of the features shown below may not match your model.
REFRIGERATOR INSTALLATION “This appliance is intended to be used in household and similar applications such as: -Staff kitchen areas in shops, offices and other working environments; farms houses and by clients in hotel, motels and others residential type environments. -Bed and breakfast type environments; catering and similar non-retail applications.” WARNING EXCESSIVE WEIGHT HAZARD Use the assistance of two or more persons to move or install the refrigerator.
REFRIGERATOR INSTALLATION HOW TO REMOVE AND INSTALL THE REFRIGERATOR DOORS For moving the refrigerator through a house door, it might be necessary to remove refrigerator and freezer door handles. NOTE: Removing the doors is always recommended when it is necessary to move the refrigerator through a narrow opening. If it is necessary to remove the handles, follow the directions below.
REFRIGERATOR INSTALLATION NOTE: Removing the doors is always recommended when it is necessary to move the refrigerator through a narrow opening. If it is necessary to remove the handles, follow the directions below. HOW TO REMOVE FREEZER DOOR HANDLE NOTE: Handle appearance may vary from illustrations on this page. Loosen the set screws located on the lower side of the handle with a 3/32 in (2,5 mm). Allen wrench and remove the handle.
REFRIGERATOR INSTALLATION CAUTION: Before you begin, remove food and bins from the doors. REMOVING AND REPLACING REFRIGERATOR DOORS WARNING (1) (2) Excessive Weight Hazard: Use two or more people to remove and install the refrigerator doors. Failure to do so can result in back or other injury. (3) (4) (7) (5) WARNING (6) Electrical Shock Hazard ţ Disconnect the electrical supply to the refrigerator before installing. Failure to do so could result in serious injury or death.
REFRIGERATOR INSTALLATION Reinstalling the Refrigerator Door Right Door Left Door 1. Lower the door onto middle hinge pin (9). 2. Line up the holes in the top hinge with the holes in the top of the refrigerator. Insert and tighten the three Bolts (6) in the hinge. 3. Hook the tabs on right side of hinge cover (2) under the edge of the top hinge (4) and position the cover in place. Insert and tighten the cover screw (1). 1. Lower the door onto middle hinge pin (10). 2.
REFRIGERATOR INSTALLATION HOW TO REMOVE THE FREEZER DRAWER WARNING: Use two or more people to remove and install the freezer drawer. Failure to do so can result in back or other injury. Remove the screws (2) of the rail on both sides. 2 CAUTION: Do not hold the handle when removing or replacing the drawer. The handle may come off, causing personal injury. To remove, pull the drawer out to full extension. Lift the drawer up and out, making sure to clear the rail system.
REFRIGERATOR INSTALLATION HOW TO REPLACE THE FREEZER DRAWER With the drawer pulled out to full extension, insert the lower basket 4 in the rail assembly. Pull out each rail to full extension. 4 Grasp the drawer on each side and hook door supports 1 into the rail tabs 2 located on both sides. To replace, with the drawer pulled out to full extension, insert the drawer in the rail assembly. 1 2 Lower the door into its final position and tighten the screws 3 located on both sides.
REFRIGERATOR INSTALLATION LEVELING AND DOOR ALIGNMENT Door Alignment Leveling If the space between your doors is uneven, follow the instructions below to align the doors: After installing, plug the refrigerator’s power cord into a 3-prong grounded outlet and push the refrigerator into the final position. Your refrigerator has two front leveling legs—one on the right and one on the left. Adjust the legs to alter the tilt from frontto-back or side-to-side.
USING YOUR REFRIGERATOR SETTING THE CONTROLS NOTE: When changing control settings, wait 24 hours before making additional adjustments. The controls are set correctly when milk or juice is as cold as you would like and when ice cream is firm. If the temperature in either compartment is too cold or too warm, change the setting one increment at a time. Wait 24 hours for the change to stabilize before adjusting again.
USING YOUR REFRIGERATOR Articulating Mullion Lock This feature is a metal strip attached to the left door that articulates (rotates) 90 degrees as the door is closed, forming a mullion (base) for the left and right door gaskets to seal against. ţ8IFO power is initially connected to the refrigerator, the Lock function is off. ţ*G you want to activate the Lock function to lock other buttons, press and hold the Door Alarm button for three seconds or more.
USING YOUR REFRIGERATOR AUTOMATIC ICEMAKER *on some models WARNING The icemaker will produce approximately 70-210 cubes in a 24-hour period, depending on freezer compartment temperature, room temperature, number of door openings and other operating conditions. Personal Injury Hazard DO NOT place fingers or hands on the automatic ice making mechanism while the refrigerator is plugged in. It takes about 12 to 24 hours for a newly installed refrigerator to begin making ice.
USING YOUR REFRIGERATOR FOOD STORAGE GUIDE Wrap or store food in the refrigerator in airtight and moisture-proof material unless otherwise noted. This prevents food odor and taste transfer throughout the refrigerator. For dated products, check date code to ensure freshness. Items How to Butter or margarine ,eep opened butter in a covered dish or closed compartment. When storing an extra supply, wrap in freezer packaging and freeze. Cheese Store in the original wrapping until you are ready to use it.
USING YOUR REFRIGERATOR WARNING: DO NOT STORE ELECTRICAL APPLIANCES, do not use electrical appliances inside the food storage compartment, unless they are recommended by the manufacturer. To replace the tray, slightly tilt up the front of the tray and snap the tabs into the holes. REFRIGERATOR SECTION WATER DISPENSER To dispense cold water, push on the dispenser switch with a glass. )PMFT %JTQFOTFS 4XJUDI 1VTI Some dripping may occur after dispensing.
USING YOUR REFRIGERATOR REFRIGERATOR SHELVES The shelves in your refrigerator are adjustable to meet your individual storage needs. Your model may have full or split shelves. HUMIDITY CONTROLLED CRISPER The crispers provide fresher tasting fruit and vegetables by letting you easily control humidity inside the drawer.
USING YOUR REFRIGERATOR PANTRY DRAWER FREEZER SECTION This drawer can be used for large party trays, deli items and beverages. (Do not use this drawer for vegetables or items that require high humidity.) ICE BIN 1. Pull the Freezer Drawer and the Pullout Drawer out as far as possible to remove the Extra Ice Bin. Pull forward to open. Lift slightly and pull out to remove. 2. Gently lift and pull out the ice bin. 3.
USING YOUR REFRIGERATOR DURABASE REMOVAL AND REPLACEMENT PULLOUT DRAWER 1. To remove the Durabase, open the drawer to full extension 1 . Push the Durabase to the back as much as possible, tilt the front of the Durabase up, and then lift it up and out 2 . 1. To remove, pull the drawer out to full extension. Lift the drawer up and out, making sure to clear the rail system. 2. To replace, tilt the back of the Durabase into the drawer, then lower it down and into the rail assembly. 1 2 2.
WATER WATER FILTER FILTER WATER FILTER Swing the filter up into place in the enclosure. Close the cover until it clicks into place. REPLACING THE WATER FILTER (ADQ36006101) *NOTE: The number of the cartridge depends on the model. It is recommended that you replace the water filter: roximately every 6 months. the water er indicator turns on. the water dispenser output decreases. the ice cubes are smaller than normal. 1. Remove the old water filter. 3. fter the water filter is replaced, dispense 2.
REFRIGERATOR CARE AND CLEANING Type 2 REPLACING THE WATER FILTER (ADQ74793501) *NOTE: The number of the cartridge depends on the model. It is recommended that you replace the filter approximately every 6 months, when the water filter indicator reaches 0 months, or when the ice and water dispenser noticeably decreases out-put and when the ice cubes are smaller than normal. Replace with a new cartridge. Remove the old cartridge. 1.
REFRIGERATOR CARE AND CLEANING Performance Data Sheet Replacement Cartridge TYPE 1: ADQ36006101 The concentration of the indicated substances in water entering the system was reduced to a concentration less than or equal to the permissible limit for water leaving the system as specified in NSF/ANSI Standard 42 and Standard 53. System tested and certified by NSF International against NSF/ANSI Standard 42 and Standard 53 for the reduction of substances listed below.
REFRIGERATOR CARE AND CLEANING WARNING Application Guidelines/Water Supply Parameters Service Flow 0.5 gpm (1.9 lpm) Water Supply Water Pressure Potable Water No Filter: 20-120PSI (138-827kPa) Filter: 40-120PSI (276-827kPa) Water Temperature 33°F ~ 100°F (0.6°C ~38°C) To reduce the risk associated with ingestion of contaminants: Do not use with water that is microbiologically unsafe or of unknown quality without adequate disinfection before and after the system.
WATER FILTER State of California Department of Public Health Water Treatment Device Certificate Number 09 - 2018 Date Issued: December 15, 2009 Trademark/Model Designation ADQ36006101-S Replacement Elements ADQ36006101 Manufacturer: Cuno Inc.
CARE AND CLEANNING INSIDE WALLS (allow freezer to warm up so the cloth will not stick) WARNING To help remove odors, you can wash the inside of the refrigerator with a mixture of baking soda and warm water. Mix 2 tablespoons of baking soda to 1 quart of water (26 g soda to 1 liter water.) Be sure the baking soda is completely dissolved so it does not scratch the surfaces of the refrigerator. Explosion Hazard CAUTION: While cleaning the inside, do not spray water. Use non-flammable cleaner.
CARE AND CLEANNING WHEN YOU MOVE LIGHT (LED) REPLACEMENT NOTE: Do not remove the LED, it is only to be removed When you are moving your refrigerator to a new home, follow these steps to prepare it for the move. by a qualified technician. WARNING 1. Remove all food from the refrigerator and pack all frozen food in dry ice. In case of replacement, the new LED must has the same specification of the original. 2. Unplug the refrigerator. POWER INTERRUPTIONS 3. Clean, wipe and dry thoroughly. 1.
CONNECTING THE WATER LINE BEFORE YOU BEGIN WHAT YOU WILL NEED ¼ in. outer diameter, to connect the refrigerator to the water supply. Be sure both ends of the tubing are cut square. This water line installation is not covered by the refrigerator warranty. Follow these instructions carefully to minimize the risk of expensive water damage. To determine how much tubing you need: measure the distance from the water valve on the back of the refrigerator to the water supply pipe. Then, add 8 feet (2.4 m).
CONNECTING THE WATER LINE 5. TIGHTEN THE PIPE CLAMP Tighten the clamp screws until the sealing washer begins to swell. INSTALLATION INSTRUCTIONS Install the shutoff valve on the nearest frequently used drinking water line. NOTE: Do not overtighten the clamp or you may crush the tubing. 1. SHUT OFF THE MAIN WATER SUPPLY Turn on the nearest faucet to relieve the pressure on the line. Washer Pipe Clamp 2. CHOOSE THE VALVE LOCATION Choose a location for the valve that is easily accessible.
TROUBLESHOOTING GUIDE 10. TURN THE WATER ON AT THE SHUTOFF VALVE Tighten any connections that leak. 8. FLUSH OUT THE TUBING Turn the main water supply on and flush out the tubing until the water is clear. Shut the water off at the water valve after about one quart of water has been flushed through the tubing. 9. CONNECT THE TUBING TO THE REFRIGERATOR NOTE: Before making the connection to the refrigerator, be sure that the refrigerator power cord is not plugged into the wall outlet. a.
TROUBLESHOOTING GUIDE Before conducting troubleshooting, make sure that the following basic requirements are met: Service Flow 0.5 gpm (1.9 lpm) Water Supply Potable Water Water Pressure 40-120 psi (0,28 - 0,83 MPa) Operating Ambient Temperature Limits 55°F - 110°F (13°C - 43°C) Electrical Ratings 115 or 127 Volts, AC and fused at 15 A or 10 A to 220 Volts. COOLING Problem Possible Causes Solutions A fuse in your home may be blown or the circuit breaker tripped.
TROUBLESHOOTING GUIDE COOLING Problem Refrigerator or Freezer section is too warm. Possible Causes Solutions Refrigerator is installed in a hot location. The compressor will run longer under warm conditions. At normal room temperatures 70°F (21°C) expect your compressor to run about 40% to 80% of the time. Under warmer conditions, expect it to run even more often. The refrigerator should not be operated above 110°F (43°C ). Condenser / back cover is clogged.
TROUBLESHOOTING GUIDE COOLING/ ICE & WATER Problem Possible Causes Solutions Doors are opened often or for long periods of time. When the doors are opened often or for long periods of time, warm, humid air enters the compartment. This raises the temperature and moisture level within the compartment. To lessen the effect, reduce the frequency and duration of door openings. Doors not closed correctly. See the Doors will not close correctly section in the Troubleshooting section. Weather is humid.
REFRIGERATOR CARE AND CLEANING TROUBLESHOOTING GUIDE Problem Refrigerator or Freezer section is too cold. Frost or ice crystals on frozen food (inside of sealed package). Possible Causes Solutions Incorrect temperature control settings. If the temperature is too cold, adjust the control one increment at a time and wait for the temperature to stabilize. Refer to the Setting the Controls section for more information.
TROUBLESHOOTING GUIDE ICE & WATER Problem Icemaker is not making enough ice (continued). Dispensing water slowly. Possible Causes Solutions Doors are opened often or for long periods of time. If the doors of the unit are opened often, ambient air will warm the refrigerator which will prevent the unit from maintaining the set temperature. Lowering the refrigerator temperature can help, as well as not opening the doors as frequently. Doors are not closed completely.
TROUBLESHOOTING GUIDE Problem Icemaker is not making ice. Possible Causes Solutions Refrigerator was recently installed or icemaker recently connected. It may take up to 24 hours for each compartment to reach the desired temperature and for the icemaker to begin making ice. Icemaker not turned on. Locate the icemaker ON/OFF switch and confirm that it is in the ON (I) position. The ice detecting sensor is obstructed.
TROUBLESHOOTING GUIDE Problem Possible Causes Solutions Water supply contains minerals such as sulfur. A water filter may need to be installed to eliminate taste and odor problems. NOTE: In some cases, a filter may not help. It may not be possible to remove all minerals / odor / taste in all water supplies. Icemaker was recently installed. Discard the first few batches of ice to avoid discolored or bad tasting ice. Ice has been stored for too long.
TROUBLESHOOTING GUIDE NOISE Problem Clicking Rattling Whooshing Possible Causes Solutions The defrost control will click when the Normal Operation automatic defrost cycle begins and ends. The thermostat control (or refrigerator control on some models) will also click when cycling on and off. Rattling noises may come from the flow of refrigerant, the water line on the back of the unit, or items stored on top of or around the refrigerator.
TROUBLESHOOTING GUIDE PARTS & FEATURES Problem Possible Causes Solutions Food packages are blocking the door open. Doors will not close correctly or pop open. Ice bin, crisper cover, pans, shelves, door Push bins all the way in and put crisper cover, bins, or baskets are out of position. pans, shelves and baskets into their correct positions. See the Using Your Refrigerator section for more information. The doors were removed during product installation and not properly replaced.
LIMITED WARRANTY LG ELECTRONICS U.S.A., INC. LG REFRIGERATOR LIMITED WARRANTY - U.S.A. ARBITRATION NOTICE: THIS LIMITED WARRANTY CONTAINS AN ARBITRATION PROVISION THAT REQUIRES YOU AND LG TO RESOLVE DISPUTES BY BINDING ARBITRATION INSTEAD OF IN COURT, UNLESS YOU CHOOSE TO OPT OUT. IN ARBITRATION, CLASS ACTIONS AND JURY TRIALS ARE NOT PERMITTED. PLEASE SEE THE SECTION TITLED “PROCEDURE FOR RESOLVING DISPUTES” BELOW.
LIMITED WARRANTY PROCEDURE FOR RESOLVING DISPUTES: ALL DISPUTES BETWEEN YOU AND LG ARISING OUT OF OR RELATING IN ANY WAY TO THIS LIMITED WARRANTY OR THE PRODUCT SHALL BE RESOLVED EXCLUSIVELY THROUGH BINDING ARBITRATION, AND NOT IN A COURT OF GENERAL JURISDICTION. BINDING ARBITRATION MEANS THAT YOU AND LG ARE EACH WAIVING THE RIGHT TO A JURY TRIAL AND TO BRING OR PARTICIPATE IN A CLASS ACTION. Definitions. For the purposes of this section, references to “LG” mean LG Electronics U.S.A., Inc.
LIMITED WARRANTY LG ELECTRONICS CANADA, INC.
LIMITED WARRANTY ENGLISH ţ"OZ OPJTFT BTTPDJBUFE XJUI OPSNBM PQFSBUJPO PG UIF 1SPEVDU ţ3FQMBDFNFOU PG MJHIU CVMCT żMUFST GVTFT PS BOZ PUIFS DPOTVNable parts; ţ3FQMBDFNFOU PG BOZ QBSU UIBU XBT OPU PSJHJOBMMZ JODMVEFE XJUI the Product; ţ$PTUT BTTPDJBUFE XJUI SFNPWBM BOE PS SFJOTUBMMBUJPO PG UIF 1SPduct for repairs; and ţ4IFMWFT door bins, drawers, handle and accessories to the Product, except for internal/functional parts covered under this Limited Warranty.
LIMITED WARRANTY by the applicable arbitration rules. If your claim exceeds $25,000, the right to a hearing will be determined by the applicable arbitration rules. Any in-person arbitration hearings will be held at the nearest, most mutually-convenient arbitration location available within the province or territory in which you reside unless you and LG both agree to another location or agree to a telephonic arbitration. Severability and Waiver.
SMART DIAGNOSIS SMART FUNCTIONS Using Audible Diagnosis to Diagnose Issues LG ThinQ Application Follow the instructions below to use the audible diagnosis method. This feature is only available on models with the or logo. • Launch the LG ThinQ application and select the Smart Diagnosis feature in the menu. Follow the instructions for audible diagnosis provided in the LG ThinQ application. The LG ThinQ application allows you to communicate with the appliance using a smartphone.
ESPAÑOL MANUAL DE USUARIO REFRIGERADOR CON CONGELADOR INFERIOR Lea detenidamente este manual antes de empezar a utilizar el refrigerador y guárdelo como referencia para el futuro. www.lg.com Copyright © 2014 - 2020 LG Electronics Inc.
TABLA DE CONTENIDO Instrucciones de seguridad importantes Requisitos eléctricos y de conexión a tierra Componentes y características Instalación del refrigerador Desempaque Instalación Desmontaje y colocación de las Manijas y puertas del congelador Nivelación y alineación de las puertas Sección congelador Durabase Divisor Durabase Gaveta extraíble 2-3 3 4 5-12 5 5 Filtro de agua 22-26 Cuidado y limpieza 27-28 Sugerencias generales de limpieza 6-11 12 Como conectar la tubería de agua Uso del refri
INSTRUCCIONES IMPORTANTES DE SEGURIDAD MENSAJES DE SEGURIDAD Hemos incluido muchos mensajes importantes de seguridad en este manual. Lea y obedezca siempre todos los mensajes de seguridad. Este es el símbolo de advertencia de seguridad. Este símbolo le llama la atención sobre peligros potenciales que pueden ocasionar la muerte o una lesión a usted y a los demás, así como daños al producto.
PRECAUCIÓN Este aparato no está destinado para su uso por las personas (incluidos niños) con capacidad física, sensorial o mental reducida, falta de experiencia y conocimientos, a menos que se les haya dado la supervisión o instrucción en relación con el uso del aparato por la persona responsable de su seguridad. Los niños deben ser supervisados para asegurar que no jueguen con el aparato.
PARTES Y CARACTERÍSTICAS A N B C M D E F G L H K I J O Use esta página para familiarizarse con los componentes y funciones del refrigerador. NOTA: Esta guía cubre varios modelos distintos. El refrigerador que ha adquirido puede tener algunos o todos los componentes que se enumeran a continuación. Es posible que las ubicaciones de las funciones que se indican no coincidan con su modelo.
INSTALACIÓN DEL REFRIGERADOR en favor de las manecillas del reloj ( ) para levantar la unidad o en contra de las manecillas ( ) para bajarla. 3. Instale el refrigerador en un área que se encuentre entre 55°F (13°C) y 110° F (43°C). Si la temperatura se encuentra fuera de estos rangos, el enfriamiento del aparato puede afectarse.
INSTALACIÓN DEL REFRIGERADOR NOTA :Siempre se recomienda desmontar las puertas cuando sea necesario desplazar el refrigerador a través de un espacio estrecho. Si es necesario desmontar las manijas, siga las instrucciones que se indican a continuación.
INSTALACIÓN DEL REFRIGERADOR NOTA: Siempre se recomienda desmontar las puertas cuando sea necesario desplazar el refrigerador a través de un espacio estrecho. Si es necesario desmontar las manijas, siga las instrucciones que se indican a continuación. CÓMO DESMONTAR LA MANIJA DE LA PUERTA DEL CONGELADOR NOTA: El aspecto de la manija puede ser distinto del que aparece en las ilustraciones de esta página.
INSTALACIÓN DEL REFRIGERADOR PRECAUCIÓN: Antes de comenzar, saque los alimentos y quite las bandejas de las puertas. DESMONTAJE Y SUSTITUCIÓN DE LAS PUERTAS DEL REFRIGERADOR (1) (2) ADVERTENCIA Riesgo de peso excesivo: Use la ayuda de dos o más personas para mover e instalar el refrigerador, no seguir estas instrucciones puede ocasionar lesiones en la espalda u otras partes del cuerpo.
INSTALACIÓN DEL REFRIGERADOR Reinstalación de la puerta del refrigerador Puerta derecha Puerta izquierda 1. Baje la puerta hasta insertarla en el pasador de la bisagra central (9). 2.Alinee los agujeros de la bisagra superior con los agujeros de la parte superior del refrigerador. Inserte y ajuste tres pernos (6) en la bisagra. 3. Enganche las pestañas situadas en el lado derecho de la tapa de la bisagra (2) situada debajo del borde de la bisagra superior (4) y coloque la tapa en su sitio.
INSTALACIÓN DEL REFRIGERADOR Retire el tornillo 2 del riel de ambos lados. CÓMO DESMONTAR EL CAJÓN DEL CONGELADOR 2 ADVERTENCIA: El desplazamiento e instalación del cajón del congelador deben realizarse entre dos o más personas. Si no se respeta esta advertencia, se podrán producir lesiones en la espalda o de otro tipo. PRECAUCIÓN: No agarre la manija mientras desmonta ó vuelve a colocar el cajón. La manija podría salirse y provocar lesiones personales.
INSTALACIÓN DEL REFRIGERADOR Con el cajón completamente sacado, inserte la cesta inferior 4 en la estructura de rieles. CÓMO INSTALAR EL CAJÓN DEL CONGELADOR Saque cada riel hacia afuera todo lo posible. 4 Para volver a colocarlo, con el cajón completamente sacado, inserte el mismo en la estructura de rieles. Sujete el cajón por cada lado y enganche los soportes de la puerta 1 para introducirlos en las pestañas de los rieles 2 que hay a ambos lados.
INSTALACIÓN DEL REFRIGERADOR 2. 7uelva a abrir ambas puertas y compruebe que se cierran con facilidad. Si no es así, incline el refrigerador ligeramente hacia atrás girando ambos pies de nivelación en sentido anti-horario. Puede que sean necesarios varios giros y debería girar ambos pies de nivelación el mismo número de giros.
USO DEL REFRIGERADOR El rango del control de temperatura del congelador es de -21 °C a -13 °C (-6 °F a 8 °F). Pulse el botón de Freezer para alternar entre los ajustes de temperatura disponibles con incrementos de un grado en cada pulsación. AJUSTE DE LOS CONTROLES FLUJO DE AIRE El control del refrigerador funciona como termostato para todo el electrodoméstico (secciones refrigerador y congelador). Cuando más frío sea el ajuste, más tiempo funcionará el compresor para mantener la temperatura más fría.
USO DEL REFRIGERADOR Parteluz articulado Lock (Bloqueo) Esta característica es una tira de metal situada en la puerta izquierda que se articula (gira) 90 grados al cerrarse la puerta y forma un parteluz (base) para que se sellen los sellos de las puertas izquierda y derecha. ţCuando se conecta inicialmente el refrigerador a la corriente, la función de bloqueo (Lock) está desactivada.
USO DEL REFRIGERADOR MÁQUINA DE HIELO AUTOMÁTICA *en algunos modelos ADVERTENCIA PELIGRO DE DAÑOS PERSONALES La máquina de hielo puede producir aproximadamente 70 a 210 cubitos en un período de 24 horas, dependiendo de la temperatura del compartimiento del congelador, de la temperatura ambiente, de las veces que se abren las puertas y de otras condiciones de funcionamiento. NO introduzca los dedos o las manos en el mecanismo de producción automática de hielo con el refrigerador enchufado.
USO DEL REFRIGERADOR GUÍA PARA EL ALMACENAMIENTO DE ALIMENTOS Envuelva o almacene los alimentos en el refrigerador dentro de materiales herméticos y antihumedad, a menos que se indique lo contrario. Esto evitará que el olor y sabor de los alimentos se transfiera por todo el refrigerador. Para productos con fecha de caducidad, compruebe el código de fecha para garantizar la frescura. Elementos Cómo Mantequilla o margarina Conserve la mantequilla abierta en un plato cubierto o en un compartimiento cerrado.
USO DEL REFRIGERADOR No usar ţEnvoltorios de pan ţContenedores de plástico que no sean de polietileno ţContenedores sin tapas herméticas ţPapel de cera o envoltorio para congelador revestidos de cera y semipermeable ţEnvoltorio ALMACENAMIENTO DE ALIMENTOS CONGELADOS NOTA: Consulte una guía de congelación o un libro de cocina fiable para obtener más información sobre la forma de preparar los alimentos para su congelación o sobre los tiempos de almacenamiento de los alimentos congelados.
USO DEL REFRIGERADOR SECCIÓN REFRIGERADOR BANDEJA DE AGUA DISPENSADOR DE AGUA Presione hacia abajo en una de las esquinas delanteras para desmontar la bandeja. Para dispensar agua fría, empuje el interruptor del dispensador con un vaso. Nota: No hay ningún sistema de drenaje por debajo de la bandeja. Puede que tenga que vaciar líquidos que recoge la bandeja. D espachador D Empuje Es posible que tras la dispensación se produzca un goteo.
USO DEL REFRIGERADOR ESTANTES DEL REFRIGERADOR Los estantes del refrigerador son ajustables para satisfacer sus necesidades personales de almacenamiento. Dependiendo del modelo, los estantes pueden ser de vidrio o de rejilla metálica. Organizar los estantes para que se ajusten a las diferentes alturas de los artículos hará que le resulte más fácil encontrar lo que busca. Con ello también reducirá el tiempo que permanece la puerta del refrigerador abierta y ahorrará energía.
USO DEL REFRIGERADOR CAJÓN CON CONTROL DE TEMPERATURA SECCIÓN DEL CONGELADOR Este cajón se puede usar para grandes bandejas de fi esta, productos de delicatesen y bebidas. (No utilice este cajón para verduras o productos que requieran un alto nivel de humedad). DEPÓSITO DE HIELO 1. Tire del cajón del congelador y del cajón extraíble hacia afuera lo máximo posible para retirar el depósito de hielo adicional. Tire hacia afuera para abrir el cajón. Levántelo suavemente y tire hacia afuera para extraerlo.
USO DEL REFRIGERADOR EXTRACCIÓN Y COLOCACIÓN DEL DURABASE CAJÓN EXTRAÍBLE 1. Para desmontar el Durabase, abra el cajón en su totalidad 1 . Empuje el Durabase hacia el fondo todo lo posible, incline la parte delantera del Durabase hacia arriba, y luego levántelo y sáquelo hacia afuera 2 . 1. Para desmontarlo, saque el cajón todo lo posible. Levante el cajón y tire del mismo hacia afuera, asegurándose de dejar libre el sistema de riel. 2.
FILTRO DE AGUA Gire el filtro hacia arriba hasta que embone en su lugar. Cierre la tapa hasta que encaje en su lugar. FILTRO DE AGUA CÓMO CAMBIAR EL FILTRO DE AGUA (ADQ36006101) *NOTA: El número del cartucho depende del modelo. Se recomienda reemplazar el filtro de agua: roximadamente cada 6 meses. Cuando el indicador del o del agua se encienda. Cuando disminuya el caudal del dispensador de agua. Cuando los cubitos de hielo sean más pequeños de lo normal. 1. Quite el antiguo filtro de agua.
CUIDADO DE SU REFRIGERADOR Tipo 2 CÓMO CAMBIAR EL FILTRO DE AGUA (ADQ74793501) *NOTA: El número del cartucho depende del modelo. Reemplace con un cartucho nuevo. Es recomendable que cambie el filtro cada 6 meses cuando el indicador del filtro alcance los 0 meses o cuando el dispensador de agua y de hielo reduzca sustancialmente el rendimiento. Extracción del cartucho usado. 1. Extraiga el nuevo cartucho del embalaje y retire la cubierta de protección de la junta tórica.
CUIDADO DE SU REFRIGERADOR Hoja de datos de rendimiento Reemplazo de cartucho TIPO 1: ADQ36006101 La concentración de las sustancias indicadas en el agua que entra en el sistema se redujo a una concentración menor o igual al límite permisible para el agua de salida según las especificaciones de los estándares NSF/ANSI 42 y 53. Sistema probado y certificado por NSF International según los estándares NSF/ANSI 42 y 53 para la reducción de las sustancias siguientes.
CUIDADO DE SU REFRIGERADOR Guías de Uso/Parámetros de Suministro de Agua Flujo de servicio 0.5 gpm (1.9 lpm) Suministro de agua Agua potable Presión de agua Sin Filtro: 138-827kPa I (20-120PSI) Con Filtro: 276-827kPa (40-120PSI) Temperatura del agua 0.6°C ~ 38°C (33°F ~ 100°F) ADVERTENCIA Para reducir el riesgo asociado con la ingestión de contaminantes: No use agua que no es microbiológicamente segura o de calidad desconocida sin haberle desinfectado adecuadamente antes y después del sistema.
FILTRO DE AGUA State of California Department of Public Health Water Treatment Device Certificate Number 09 - 2018 Date Issued: December 15, 2009 Trademark/Model Designation ADQ36006101-S Replacement Elements ADQ36006101 Manufacturer: Cuno Inc.
CUIDADO Y LIMPIEZA PARTES INTERIORES (deje que el congelador se caliente para que el trapo no se quede pegado) ADVERTENCIA Para ayudarle a eliminar los olores, puede lavar el interior del refrigerador con una mezcla de bicarbonato sódico y agua templada. Mezcle 2 cucharadas soperas de bicarbonato sódico (unos 26 g) en 1 litro de agua. Asegúrese de que el bicarbonato sódico esté completamente disuelto para que no raye las superficies del refrigerador. Riesgo de explosión Use un limpiador no inflamable.
CUIDADO Y LIMPIEZA CAMBIO DE LUZ (LED) NOTA: No remueva el LED, sólo debe de ser removido por un técnico calificado. ADVERTENCIA CUANDO SE MUDA Cuando vaya a trasladar su refrigerador a una nueva casa, siga estos pasos para prepararlo para la mudanza. 1. Saque todos los alimentos del refrigerador y empaquete todos los alimentos congelados en hielo seco. En caso de reemplazo, el nuevo LED debe ser de la misma especificación que el original. 2. Desenchufe el refrigerador. INTERRUPCIONES DE ALIMENTACIÓN 3.
COMO CONECTAR LA TUBERÍA DE AGUA ANTES DE EMPEZAR QUÉ NECESITARÁ Esta instalación de la tubería de agua no está cubierta por la garantía del refrigerador. Siga estas instrucciones con cuidado para minimizar el riesgo de costosos daños debidos al agua. El golpe de ariete (golpeteo del agua en las tuberías) en la fontanería de la casa podría dañar componentes del refrigerador y provocar una fuga o una inundación de agua.
COMO CONECTAR LA TUBERÍA DE AGUA INSTRUCCIONES PARA LA INSTALACIÓN 5. APRIETE LA ABRAZADERA PARA TUBOS Instale la válvula de corte cerca de la tubería de agua potable que más se usa. Apriete los tornillos de la abrazadera hasta que la arandela de sellado comience a hincharse. NOTA: Tenga cuidado de no sobreapretar la abrazadera, ya que podría romper la tubería. 1. CORTE EL SUMINISTRO DE AGUA PRINCIPAL Abra el grifo más cercano para liberar la presión de la línea. Arandela Abrazadera para tubos 2.
COMO CONECTAR LA TUBERÍA DE AGUA 10. ABRA EL PASO DE AGUA EN LA VÁLVULA DE CORTE Apriete las conexiones que goteen. 8. ACLARE EL INTERIOR DE LA TUBERÍA Active el suministro de agua principal y deje correr el agua por la tubería hasta que salga agua limpia. Corte la válvula de agua después de que haya pasado aproximadamente un litro de agua a través de la tubería. 9.
GUÍA DE SOLUCIÓN DE PROBLEMAS Antes de proceder a la guia de solucion de problemas, asegúrese de cumplir con los siguientes requisitos basicos: Flujo de servicio 0.5 gpm (1.9 lpm) Suministro de agua Agua Potable Presión del agua 0,28 - 0,83 MPa (40-120 psi) Límites de temperatura ambiente para el funcionamiento eléctricas 13°C - 43°C (55°F - 110°F ) 115 o 127 voltios, AC fusionado a 15 A o 10 A para 220 V. ENFRIADO Problema Las secciones del refrigerador y del congelador no enfrían.
GUÍA DE SOLUCIÓN DE PROBLEMAS ENFRIADO Problema Causas posibles Soluciones Las puertas no están completamente cerradas La sección del REFRIGERADOR o del CONGELADOR está demasiado caliente. Empuje firmemente para cerrar las puertas. Si éstas no se cierran por completo, consulte el apartado “Las puertas no se cierran completamente o quedan abiertas en la sección Componentes y Características de la Guía de resolución de problemas. El refrigerador está instalado en un lugar caluroso.
GUÍA DE SOLUCIÓN DE PROBLEMAS ENFRIADO/ HIELO Y AGUA Problema Causas posibles Soluciones Las puertas se abren seguido o por largos períodos de tiempo. Cada vez que las puertas se abren seguido o por largos períodos de tiempo, ingresa aire caliente y húmedo al compartimiento. Esto aumenta la temperatura y el nivel de humedad dentro de compartimiento. Para disminuir el efecto, reduzca la frecuencia y duración de apertura de la puerta. Las puertas no cierran correctamente.
GUÍA DE SOLUCIÓN DE PROBLEMAS Problema Causas posibles Soluciones La sección del REFRIGERADOR o del CONGELADOR está demasiado fría. Los ajustes de control de temperatura son Si la temperatura está demasiado fría, ajuste el control incorrectos. de a un punto a la vez y espere a que la temperatura se estabilice. Consulte la sección Ajuste de los controles para obtener mayor información. Se forman cristales de hielo o escarcha en los alimentos congelados (dentro de paquetes sellados).
GUÍA DE SOLUCIÓN DE PROBLEMAS HIELO Y AGUA Problema La máquina de hielo no hace suficiente hielo (continuación). Se dispensa agua lentamente. Causas posible Soluciones Las puertas se abren seguido o por largos períodos de tiempo. Si las puertas de la unidad se abren a menudo, el aire ambiental calentará el refrigerador e impedirá que la unidad pueda mantener la temperatura establecida.
GUÍA DE SOLUCIÓN DE PROBLEMAS Problema Causas posibles Soluciones El refrigerador se instaló recientemente o la Puede tomar hasta 24 horas para que cada compartimiento máquina de hielo se conectó recientemente. alcance la temperatura deseada y para que la máquina de hielo comience a fabricar hielo. La máquina de hielo no hace hielo La máquina de hielo no está encendida. Localice el interruptor de ON/OFF (encendido/apagado) de la máquina de hielo y confirme que está en la posición ON (encendido).
GUÍA DE SOLUCIÓN DE PROBLEMAS Problema Causas posibles Soluciones El suministro de agua contiene minerales tales como el azufre. Es posible que deba reemplazar el filtro de agua para eliminar los problemas de olor y sabor. NOTA: En algunos casos, un filtro podría no ser de ayuda. Puede no resultar posible quitar todo mineral/ olor/sabor en todos los suministros de agua.. El hielo huele o sabe mal. El agua del dispensador está caliente. La máquina de hielo se instaló hace poco tiempo.
GUÍA DE SOLUCIÓN DE PROBLEMAS RUIDO Problema Causas posibles Soluciones El control de descongelación emitirá un “clic” al comenzar y al finalizar el ciclo de descongelación. El control del termostato (o control del refrigerador en algunos modelos) también emitirá un “clic” al iniciar o finalizar un ciclo. Funcionamiento normal.
GUÍA DE SOLUCIÓN DE PROBLEMAS COMPONENTES Y CARACTERĺSTICAS Problema Las puertas no se cierran completamente o quedan abiertas. Las puertas se abren con gran dificultad. El refrigerador se bambolea o parece inestable. Causas posibles Soluciones Hay paquetes de alimentos bloqueando la puerta que impiden que se cierre. Reorganice los envases de alimentos para liberar la puerta y los estantes de la puerta.
GARANTÍA LIMITADA LG ELECTRONICS U.S.A., INC. LG REFRIGERATOR LIMITED WARRANTY - U.S.A. AVISO DE ARBITRAJE: ESTA GARANTÍA LIMITADA CONTIENE UNA CLÁUSULA DE ARBITRAJE QUE LE DEMANDA A USTED Y A LG RESOLVER CONFLICTOS A TRAVÉS DE UN ARBITRAJE VINCULANTE EN LUGAR DE HACERLO EN LA CORTE, A MENOS QUE USTED DECIDA NO PARTICIPAR. EN EL ARBITRAJE NO ESTÁN PERMITIDAS LAS ACCIONES COLECTIVAS NI LOS JUICIOS CON JURADO. POR FAVOR, VEA A CONTINUACIÓN LA SECCIÓN TITULADA “PROCEDIMIENTO PARA RESOLVER CONFLICTOS”.
GARANTÍA LIMITADA PROCEDIMIENTO PARA RESOLVER CONFLICTOS: TODOS LOS CONFLICTOS ENTRE USTED Y LG QUE SURJAN FUERA DE O RELACIONADOS DE ALGUNA MANERA CON ESTA GARANTÍA LIMITADA O CON EL PRODUCTO, SE RESOLVERÁN EXCLUSIVAMENTE A TRAVÉS DE UN ARBITRAJE VINCULANTE Y NO EN UNA CORTE DE JURISDICCIÓN GENERAL. ARBITRAJE VINCULANTE SIGNIFICA QUE USTED Y LG RENUNCIAN AL DERECHO DE UN JUICIO CON JURADO Y A REALIZAR O PARTICIPAR EN UNA DEMANDA COLECTIVA. Definiciones.
SMART DIAGNOSIS FUNCIONES SMART Uso de diagnóstico audible para diagnosticar problemas Aplicación LG ThinQ Siga las instrucciones a continuación para usar el método de diagnóstico audible. Esta función está solo disponible en los modelos con el logo o . • Ejecute la aplicación LG ThinQ y seleccione la función Smart Diagnosis en el menú. Siga las instrucciones para diagnóstico audible que se proporcionan en la aplicación LG ThinQ.
LG Customer Information Center 1-800-243-0000 1-888-865-3026 1-888-542-2623 USA, Consumer User USA, Commercial User CANADA Register your Product Online! www.lg.