ENGLISH FRANÇAIS ESPAÑOL OWNER'S MANUAL FRENCH DOOR REFRIGERATOR Read this owner's manual thoroughly before operating the appliance and keep it handy for reference at all times. LFXS30726* LFXC24726* LFXS30766* LFXS30786* LFXC24766* MFL69497006 Rev.03_121817 www.lg.com Copyright © 2017 LG Electronics. All Rights Reserved.
TABLE OF CONTENTS PRODUCT FEATURES 41 SMART FUNCTIONS 4 SAFETY INSTRUCTIONS 41 44 45 4 IMPORTANT SAFETY INSTRUCTIONS 3 8 PRODUCT SPECIFICATIONS 9 PRODUCT OVERVIEW 9 10 Exterior Interior 12 INSTALLATION 12 13 13 15 16 22 25 26 Installation Overview Unpacking the Refrigerator Choosing the Proper Location Removing/Assembling Handles Removing/Assembling the Doors and Drawers Connecting the Water Line Leveling and Door Alignment Turning on the Power 27 OPERATION 27 28 30 32 33 34 36 37 37 37 3
PRODUCT FEATURES 3 PRODUCT FEATURES Depending on the model, some of the following functions may not be available. The water dispenser dispenses fresh, chilled water. The ice dispenser dispenses cubed and crushed ice. DOOR ALARM The Door Alarm function is designed to prevent refrigerator malfunctioning that could occur if a refrigerator door or freezer drawer remains open. If a refrigerator door or freezer drawer is left open for more than 60 seconds, a warning alarm sounds at 30-second intervals.
SAFETY INSTRUCTIONS SAFETY INSTRUCTIONS READ ALL INSTRUCTIONS BEFORE USE Your safety and the safety of others are very important. We have provided many important safety messages in this manual and on your appliance. Always read and follow all safety messages. This is the safety alert symbol. This symbol alerts you to potential hazards that can kill or injure you and others. All safety messages will follow the safety alert symbol and either the word WARNING or CAUTION.
SAFETY INSTRUCTIONS 5 x Keep packing materials out of the reach of children. Packaging material can be dangerous for children. There is a risk of suffocation. x Do not install the refrigerator in a damp or dusty place where insulation on electrical parts may deteriorate. x Do not bend or pinch the power cord excessively or place heavy objects on it. OPERATION x This product is not to be used for special purposes such as the storage of medicine or test materials or for use on ships, etc.
SAFETY INSTRUCTIONS x If connected to a circuit protected by fuses, use time delay fuse. MAINTENANCE x Do not use a hair dryer to dry the inside of the refrigerator. x Do not light a candle to remove odors in the refrigerator. x ,Q WKH HYHQW RI D UHIULJHUDQW OHDN PRYH ÀDPPDEOH REMHFWV DZD\ IURP WKH UHIULJHUDWRU (QVXUH WKH DUHD LV adequately ventilated and contact an authorized service center. x .
SAFETY INSTRUCTIONS 7 CAUTION x Do not hang on to or place heavy objects on the refrigerator’s dispenser. INSTALLATION x Do not install the refrigerator where there may be a danger of the unit falling. x The refrigerator must be properly installed in accordance with the Installation Instructions. OPERATION x Do not use aerosols near the refrigerator. x This appliance is intended to be used only in domestic and similar applications. x Do not strike or apply excessive force to any glass surface.
PRODUCT SPECIFICATIONS PRODUCT SPECIFICATIONS 7KH DSSHDUDQFH DQG VSHFL¿FDWLRQV OLVWHG LQ WKLV PDQXDO PD\ YDU\ GXH WR FRQVWDQW SURGXFW LPSURYHPHQWV Electrical requirements: 115 V, 60 Hz Min. / Max.
PRODUCT OVERVIEW 9 PRODUCT OVERVIEW Exterior 5 1 6 2 8 7 3 9 4 1 Filtered Water and Ice Dispenser 6 Opens the Door-in-Door Compartment. 'LVSHQVHV SXUL¿HG ZDWHU DQG LFH 2 LED Display 7 Displays the refrigerator and freezer temperature, WKH ZDWHU ¿OWHU FRQGLWLRQ DQG WKH GLVSHQVHU PRGH 3 Control Panel Sets the refrigerator and freezer temperatures, WKH ZDWHU ¿OWHU FRQGLWLRQ DQG WKH GLVSHQVHU PRGH 4 EZ Handle Easily opens the freezer door.
PRODUCT OVERVIEW Interior Standard Door : LFXS30726* / LFXC24726* 1 6 2 7 3 11 4 5 12 13 Door-in-Door : LFXS30766* / LFXS30786*/ LFXC24766* 1 14 2 8 9 7 10 3 4 5 11 12 13
PRODUCT OVERVIEW 11 1 LED interior lamps Light up the inside of the refrigerator. :DWHU ¿OWHU Purify water. NOTE x 7KH ¿OWHU VKRXOG EH UHSODFHG HYHU\ months. See the Replacing the Water Filter section in this manual for details. 3 Crisper Interchangeable bins can be arranged to suit storage needs. 11 Glide‘N’Serve Store food items at a different temperature than the regular refrigerator area. 12 Pullout Drawer Provide extra storage within the freezer compartment.
INSTALLATION INSTALLATION Installation Overview 3OHDVH UHDG WKH IROORZLQJ LQVWDOODWLRQ LQVWUXFWLRQV ¿UVW DIWHU SXUFKDVLQJ WKLV SURGXFW RU WUDQVSRUWLQJ LW WR DQRWKHU location. Unpacking the Refrigerator Connecting the Water Line Choosing the Proper Location Leveling and Door Alignment CAUTION x Connect to a potable water supply only.
INSTALLATION 13 Unpacking the Refrigerator Water x Use two or more people to move and install the refrigerator. Failure to do so can result in back injury or other injury. Water supply must be easily connected for the automatic icemaker. x 7KH UHIULJHUDWRU LV KHDY\ 3URWHFW WKH ÀRRU ZKHQ moving the refrigerator for cleaning or service. Always pull the refrigerator straight out when moving it. Do not wiggle or walk the refrigerator ZKHQ WU\LQJ WR PRYH LW DV ÀRRU GDPDJH FRXOG occur.
INSTALLATION Dimensions and Clearances x &KHFN WKH GLPHQVLRQV RI WKH DSSOLDQFH DQG WKH LQVWDOODWLRQ SDWK WR HQVXUH WKHUH LV VXI¿FLHQW URRP WR PRYH WKH refrigerator through doors or narrow openings. x ,I DQ RSHQLQJ LV WRR QDUURZ WR ¿W WKH UHIULJHUDWRU WKURXJK UHPRYH WKH UHIULJHUDWRU GRRUV 6HH 5HPRYLQJ Assembling the Doors and Drawers in this manual.
INSTALLATION 15 Removing/Assembling Handles x The appearance of the handles may vary from what is shown. 1 Loosen the set screws (1) with a 3/32 in. Allen wrench and remove the handle. 2 Loosen the mounting fasteners (2) that connect to the refrigerator door and handle using a 1/4 in. Allen wrench, and remove the mounting fasteners. WARNING When assembling or disassembling the refrigerator handles: x *UDVS WKH KDQGOH ¿UPO\ WR DYRLG GURSSLQJ LW x Do not swing the handle into nearby people or animals.
INSTALLATION Removing the Freezer Drawer Handle 1 Loosen the set screws (1) located on the lower side of the handle with a 1/8 in. Allen wrench and remove the handle. 2 Loosen the mounting fasteners (2) with a 1/4 in. Allen wrench, and remove the mounting fasteners. Removing/Assembling the Doors and Drawers If the entrance door is too narrow for the refrigerator to pass through, remove the refrigerator doors and move the refrigerator sideways through the doorway.
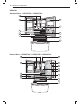
INSTALLATION 17 2 5 Lift the door from the middle hinge pin and remove the door. ENGLISH Remove the screw (1) from the hinge cover at the top of the refrigerator. Lift the hook (not visible), located at the bottom of the front side of the cover ZLWK D ÀDW KHDG VFUHZGULYHU CAUTION x Place the door, inside facing up, on a nonscratching surface. 3 Remove the cover and pull out the tube (1). Disconnect all wire harnesses (2). Unscrew the ground wire (3).
INSTALLATION 2 Detach the wire harness (1). Assembling the Right Refrigerator Door ,QVWDOO WKH ULJKW VLGH GRRU ¿UVW 3 1 Make sure that the plastic sleeve is inserted in the bottom of the door. Lower the door onto the PLGGOH KLQJH SLQ DV VKRZQ LQ WKH ¿JXUH 2 Fit the hinge (1) over the hinge lever latch and slot it into place. Rotate the lever (2) counterclockwise to secure the hinge. Rotate the hinge lever (1) clockwise. Lift the top hinge (2) free of the hinge lever latch.
INSTALLATION 19 Assembling the Left Refrigerator Door 5 1 Make sure that the plastic sleeve is inserted in the bottom of the door. Install the refrigerator door onto the middle hinge. Collet 6 2 Place the cover (1) in place. Insert and tighten the cover screw (2). Fit the hinge (1) over the hinge lever latch and slot it into place. Rotate the lever clockwise (2) and fasten the hinge. Hinge Lever Latch 3 Connect all the wire harnesses.
INSTALLATION Removing the Freezer Drawers The Pullout Drawer located above the freezer drawer is not shown for clarity. 3 2Q WKH OHIW UDLO XVH D ÀDW EODGH VFUHZGULYHU WR push in on the tab to release the drawer from the rail, as shown below. Once the left side is loose, SXVK WKH WDE RQ WKH ULJKW VLGH ZLWK \RXU ¿QJHU WR release the drawer. Lift the front of the drawer up, then pull it straight out. 4 Remove the Durabase basket from the rails. Remove the screws from the rails at both ends.
INSTALLATION 21 6 Hold both rails and push them in simultaneously. /RZHU WKH GRRU LQWR LWV ¿QDO SRVLWLRQ DQG WLJKWHQ the screws located on both sides. 4 Insert the drawer into the frame, and push the drawer back until it clicks into place. 5 Replace the ice bin in the drawer. Insert the Durabase basket in the rail assembly. ENGLISH 3 Assembling the Freezer Drawer 1 2 Pull out both rails simultaneously, until they are fully extended.
INSTALLATION Connecting the Water Line Before Beginning If the water pressure from the reverse osmosis system is less than 20 psi or 138 kPa or 1.4 kgf/ cm2 WDNHV PRUH WKDQ VHFRQGV WR ¿OO D FXS RI R] RU 198 cc capacity): This water line installation is not covered by the refrigerator warranty. Follow these instructions carefully to minimize the risk of expensive water damage. x &KHFN WR VHH LI WKH VHGLPHQW ¿OWHU LQ WKH UHYHUVH RVPRVLV V\VWHP LV EORFNHG 5HSODFH WKH ¿OWHU LI necessary.
INSTALLATION 23 NOTE x A self-piercing saddle type water valve should not be used. Water Line Installation Instructions WARNING 3 NOTE x The hookup line cannot be white, plastic tubing. Licensed plumbers must use only copper tubing (NDA tubing #49595 or #49599) or Cross Link Polyethylene (PEX) tubing.
INSTALLATION 6 Route the tubing. Route the tubing between the cold water line and the refrigerator. Route the tubing through a hole drilled in the wall RU ÀRRU EHKLQG WKH UHIULJHUDWRU RU DGMDFHQW EDVH cabinet) as close to the wall as possible. NOTE x %H VXUH WKHUH LV VXI¿FLHQW H[WUD WXELQJ DERXW IW coiled into three turns of about 10 in. diameter) to allow the refrigerator to move out from the wall after installation. 7 Connect the tubing to the valve.
INSTALLATION 25 Leveling and Door Alignment Leveling 1 Turn the leveling leg to the left to raise that side of the refrigerator or to the right to lower it. It may take several turns of the leveling leg to adjust the tilt of the refrigerator. The left refrigerator door has an adjustable nut, located on the bottom hinge, to raise and lower the door for proper alignment.
INSTALLATION Turning on the Power x After installing, plug the refrigerator’s power cord into a 3-prong grounded outlet and push the UHIULJHUDWRU LQWR WKH ¿QDO SRVLWLRQ CAUTION x Connect to a rated power outlet. x +DYH D FHUWL¿HG HOHFWULFLDQ FKHFN WKH ZDOO RXWOHW and wiring for proper grounding. x Do not damage or cut off the ground terminal of the power plug. Position the Rrigerator x Arrange the coil of tubing so that it does not vibrate against the back of the refrigerator or against the wall.
OPERATION 27 OPERATION Before Use CAUTION x Do not scratch the refrigerator with a sharp object or use a detergent that contains DOFRKRO D ÀDPPDEOH OLTXLG RU DQ DEUDVLYH ZKHQ UHPRYLQJ DQ\ WDSH RU DGKHVLYH IURP the refrigerator. Remove adhesive residue by wiping it off with your thumb or dish detergent. x Do not peel off the model or serial number label or the technical information on the rear surface of the refrigerator. Open refrigerator doors and freezer drawers to ventilate the interior.
OPERATION Control Panel Depending on the model, some of the following functions may not be available. The actual control panel may differ from model to model. Control Panel Features 1 2 3 4 5 6 7 8 9 10 11 12 NOTE x When the refrigerator is in the Power Saving Mode, the display remains off until a door is opened or a button is pressed. Once on, the display remains on for 20 seconds.
OPERATION 29 1 2 Refrigerator Temperature Indicates the set temperature of the refrigerator compartment in Celsius (°C) or Fahrenheit (°F). The default refrigerator temperature is 37 °F (3 °C). Press the Refrigerator button repeatedly to select a new set temperature from 33 °F to 46 °F (1 °C to 8 °C). 3 Freezer Temperature Indicates the set temperature of the freezer compartment in Celsius (°C) or Fahrenheit (°F). The default freezer temperature is 0°F (-18 °C).
OPERATION 9 Light Press the Light button to turn on the dispenser light. The icon illuminates on the LED display. 10 Water Filter 5HSODFH WKH ZDWHU ¿OWHU ZKHQ WKH Replace Filter LFRQ WXUQV RQ $IWHU UHSODFLQJ WKH ZDWHU ¿OWHU press and hold the Water Filter button for three seconds to turn the icon light off. Replace the ZDWHU ¿OWHU DSSUR[LPDWHO\ HYHU\ VL[ PRQWKV 11 Door Alarm When power is connected to the refrigerator, the door alarm is initially set to ON.
OPERATION 31 NOTE x To dispense cold water, push on the water switch with a glass. x 7KH ¿UVW LFH DQG ZDWHU GLVSHQVHG PD\ LQFOXGH particles or odor from the water supply line or the ZDWHU WDQN 7KURZ DZD\ WKH ¿UVW IHZ EDWFKHV RI LFH (about 140 - 160 cubes). This is also necessary ifthe refrigerator has not been used for a long time. x The dispenser will not operate when either of the refrigerator doors is open.
OPERATION Ice Compartment CAUTION Detaching the In-Door Ice Bin 1 Gently pull the handle to open the ice compartment. 2 To remove the in-door ice bin, grip the front handle, slightly lift the lower part, and slowly pull out the bin as shown. x Keep hands and tools out of the ice compartment door and dispenser chute. Failure to do so may result in damage or personal injury. Keep the ice compartment door closed tightly.
OPERATION 33 Automatic Icemaker Turning the Automatic Icemaker On Normal Sounds You May Hear Auto shutoff (feeler arm) NOTE x Ice is made in the automatic icemaker and sent to the dispenser. The icemaker produces 70 - 182 cubes in a 24-hour period, depending on freezer compartment temperature, room temperature, number of door openings and other operating conditions. x It takes about 12 to 24 hours for a newly installed refrigerator to begin making ice.
OPERATION Storing Food Where to Store Food Each compartment inside the refrigerator is designed to store different types of food. Store food in the optimal space to enjoy the freshest taste. Standard Door Door-in-Door 2 6 3 3 7 1 1 1 4 4 5 5 Vegetable Storage (Crisper) Preserves vegetables and fruit. 2 Dairy Product Bin Stores milk products such as butter and cheese. 3 $GMXVWDEOH 5HIULJHUDWRU 6KHOI Adjustable shelves to meet individual storage needs.
OPERATION 35 CAUTION x Do not store glass containers in the freezer. Contents may expand when frozen, break the container and cause injury. Wrap or store food in the refrigerator in airtight and moisture-proof material unless otherwise noted. This prevents food odor and taste transfer throughout the refrigerator. For dated products, check date code to ensure freshness. Food Butter or Margarine NOTE x If you are leaving home for a short period, like a short vacation, the refrigerator should be left on.
OPERATION Storing Frozen Food Do not use Check a freezer guide or a reliable cookbook for further information about preparing food for freezing or food storage times. x Bread wrappers Freezing Your freezer will not quick-freeze a large quantity of food. Do not put more unfrozen food into the freezer than will freeze within 24 hours (no more than 2 to 3 pounds of food per cubic foot of freezer space). Leave enough space in the freezer for air to circulate around packages.
OPERATION 37 Humidity Controlled Crispers (On Some Models) You can control the amount of humidity in the moisture-sealed crispers by adjusting the control to any setting between Vegetables and Fruit. x Vegetables keeps moist air in the crisper for best storage of fresh, leafy vegetables. x Fruit lets moist air out of the crisper for best storage of fruit. The Durabase® divider allows you to organize the Durabase® area into sections.
OPERATION Glide‘N’Access™ (On Some Models) 1 To remove the Glide‘N’Access™, pull out the shelf to full extension, lift the front up and pull straight out. CAUTION x Regularly detach and wash the storage bins and VKHOYHV WKH\ FDQ EHFRPH HDVLO\ FRQWDPLQDWHG by food. x Do not apply excessive force while detaching or assembling the storage bins. x Do not use the dishwasher to clean the storage bins and shelves.
OPERATION 39 Door-in-Door Bin (On Some Models) To open the Door-in-Door case, press on the area marked Press To Open. The Door-In- Door case is removable for easy cleaning and adjustment. The Door-in-Door inner and outer door bins are removable for easy cleaning. 1 To remove the Door-In-Door case, lift up and pull out. 1 To remove the door bins, lift up and pull out. 2 To replace the door bins, slide the door bin in above the desired support and push down until it snaps into place.
OPERATION $GMXVWLQJ WKH 5HIULJHUDWRU Shelves CAUTION The shelves in the refrigerator are adjustable to meet individual storage needs. Your model may have full or split shelves. x Make sure that shelves are level from one side to the other. Failure to do so may result in the shelf falling or spilled food. $GMXVWLQJ WKH VKHOYHV WR ¿W LWHPV RI GLIIHUHQW KHLJKWV ZLOO PDNH ¿QGLQJ WKH H[DFW LWHP \RX ZDQW HDVLHU x Do not clean glass shelves with warm water while they are cold.
SMART FUNCTIONS 41 SMART FUNCTIONS The LG SmartThinQ application allows you to communicate with the appliance using a smartphone. x The network connection may not work properly depending on the Internet service provider. Before Using LG SmartThinQ x The Wi-Fi connection may not connect or may be interrupted because of the home network environment. x For appliances with the 1 2 or logo Use a smartphone to check the strength of the wireless router (Wi-Fi network) near the appliance.
SMART FUNCTIONS LG SmartThinQ Application Features x For appliances with the or logo Firmware Update Keep the appliance performance updated. Manage Food This feature helps track items in the refrigerator and freezer, sends alerts when items are near their use by dates, generates grocery lists, and links to related recipes. Energy Monitoring This feature keeps track of the refrigerator’s power consumption and the number of door openings.
SMART FUNCTIONS 43 Open Source Software Notice Information This equipment complies with FCC radiation exposure limits set forth for an uncontrolled environment. This transmitter must not be co-located or operating in conjunction with any other antenna or transmitter. To obtain the source code under GPL, LGPL, MPL, and other open source licenses, that is contained in this product, please visit http://opensource.lge.com.
SMART FUNCTIONS Smart Grid Function When the refrigerator operates in Smart Grid mode, the Smart Refrigerator function can control energy usage or delay the operation of some functions to save energy during peak usage periods. Temporary Appliance Load Reduction (TALR) x You can override the Smart Grid function any time (using the Smart Grid button or application). The refrigerator responds to a TALR signal by aggressively reducing the load for a short time period, typically 10 minutes.
SMART FUNCTIONS 45 Smart Diagnosis™ Function 5 Press and hold the Freezer button for three seconds while continuing to hold your phone to the speaker. 6 After you hear three beeps, release the Freezer button. 7 Keep the phone in place until the tone WUDQVPLVVLRQ KDV ¿QLVKHG 7KH GLVSOD\ ZLOO count down the time. Once the countdown is over and the tones have stopped, resume your conversation with the specialist, who will then be able to assist you in using the information transmitted for analysis.
MAINTENANCE MAINTENANCE Cleaning WARNING x 8VH QRQ ÀDPPDEOH FOHDQHU )DLOXUH WR GR VR FDQ UHVXOW LQ ¿UH H[SORVLRQ RU GHDWK CAUTION x Do not use an abrasive cloth or sponge when cleaning the interior and exterior of the refrigerator. x Do not place your hand on the bottom surface of the refrigerator when opening and closing the doors. x When lifting the hinge free of the latch, be careful that the door does not fall forward.
MAINTENANCE 47 Replacing the Water Filter Replace the Fresh Air Filter: Replace the Water Filter : x Approximately every six months. x Approximately every six months. x When the Replace Filter x When the Replace Filter icon turns on. icon turns on. x When the water dispenser output decreases. 1 7XUQ WKH ¿OWHU FRYHU WR WKH OHIW WR GHWDFK LW IURP WKH UHIULJHUDWRU ZDOO 5HPRYH WKH ¿OWHU IURP WKH FRYHU x 7KH ¿OWHU LV ORFDWHG RQ WKH LQVLGH RI WKH ¿OWHU cover.
MAINTENANCE 2 3XOO WKH ZDWHU ¿OWHU GRZQZDUG DQG SXOO RXW 0DNH VXUH WR URWDWH WKH ¿OWHU GRZQ FRPSOHWHO\ EHIRUH pulling it out of the manifold hole. 6 $IWHU FKDQJLQJ WKH ¿OWHU SUHVV DQG KROG WKH Water Filter button for three seconds to reset the indicator light. CAUTION 3 5HSODFH ZLWK D QHZ ZDWHU ¿OWHU 7DNH WKH QHZ ZDWHU ¿OWHU RXW RI LWV SDFNLQJ DQG remove the protective cover from the o-rings.
MAINTENANCE 49 Performance Data Sheet Model: LG ADQ36006101-S Use Replacement Cartridge: ADQ36006101 6\VWHP WHVWHG DQG FHUWL¿HG E\ 16) ,QWHUQDWLRQDO DJDLQVW 16) $16, 6WDQGDUG DQG Standard 53 for the reduction of substances listed below. Contaminant Reduction Average ,QÀXHQW 16) VSHFL¿HG Avg % Challenge Reduction Concentration Average Product Water Concentration Max Permissible Product Water Concentration NSF Reduction Requirements Chlorine Taste and Odor 2.1 mg/L 2.0 mg/L ± 10% 0.972 0.
MAINTENANCE Application Guidelines/Water Supply Parameters CAUTION Service Flow 0.5 gpm (1.89 lpm) Water Supply Community or Private Well Potable Water Water Pressure 20 – 120 psi (140 – 830 kPa) x Read and follow Use Instructions before installation and use of this system. Water Temperature 36 °F – 100 °F (0.6 °C – 37.8 °C) x Installation and use MUST comply with all state and local plumbing codes.
MAINTENANCE 51 ENGLISH
TROUBLESHOOTING TROUBLESHOOTING FAQs: Frequently Asked Questions Q: What are the best temperature settings for my refrigerator and freezer? A: The default setting for the refrigerator is 37° Fahrenheit (3° Celsius). The default setting for the freezer is 0° Fahrenheit (-18° Celsius). Adjust these settings as necessary to keep food at desired temperatures. Milk should be cold when stored on the inner shelf of the refrigerator.
TROUBLESHOOTING 53 Before Calling for Service 5HYLHZ WKLV VHFWLRQ EHIRUH FDOOLQJ IRU VHUYLFH GRLQJ VR ZLOO VDYH \RX ERWK WLPH DQG PRQH\ Problem Refrigerator and Freezer section are not cooling. Cooling system runs too much. Possible Cause Solutions The refrigerator control is set to OFF (some models). Turn the control ON. Refer to the Setting the Controls section for proper temperature settings. Refrigerator is set to Demo Mode.
TROUBLESHOOTING Cooling Problem Interior moisture buildup. Food is freezing in the refrigerator compartment. Refrigerator or Freezer section is too warm. Possible Cause Solutions Doors are opened often or for long periods of time. When the doors are opened often or for long periods of time, warm, humid air enters the compartment. This raises the temperature and moisture level within the compartment. To lessen the effect, reduce the frequency and duration of door openings.
TROUBLESHOOTING 55 Cooling/Ice & Water Problem Refrigerator or Freezer section is too cold. Frost or ice crystals form on frozen food (inside of sealed package). Frost or ice crystals form on frozen food (outside of package). Solutions Doors are opened often or for long periods of time. When the doors are opened often or for long periods of time, warm, humid air enters the compartment. This raises the temperature and moisture level within the compartment.
TROUBLESHOOTING Ice & Water Problem Possible Cause Solutions Demand exceeds ice storage capacity. The icemaker will produce approximately 70-184 cubes in a 24 hour period. House water supply is not connected, valve is not turned on fully, or valve is clogged. Connect the refrigerator to a cold water supply with adequate pressure and turn the water shutoff valve fully open. If the problem persists, it may be necessary to contact a plumber.
TROUBLESHOOTING 57 Ice & Water Problem Ice has bad taste or odor. Icemaker is making too much ice. Ice is not dispensing. Solutions The ice detecting sensor is obstructed. Foreign substances or frost on the ice-detecting sensor can interrupt ice production. Make sure that the sensor area is clean at all times for proper operation. The refrigerator is not connected to a water supply or the supply shutoff valve is not turned on.
TROUBLESHOOTING Ice & Water Problem Ice is not dispensing. Possible Cause Solutions Infrequent use of the dispenser. Infrequent use of the ice dispenser will cause the cubes to stick together over time, which will prevent them from properly dispensing. Check the ice bin for ice cubes clumping/sticking together. If they are, break up the ice cubes to allow for proper operation. The delivery chute is clogged with frost or ice fragments.
TROUBLESHOOTING 59 Ice & Water Problem Dispensing warm water. Solutions Refrigerator or freezer doors are not closed properly. Water will not dispense if any of the refrigerator doors are left open. :DWHU ¿OWHU KDV EHHQ UHFHQWO\ removed or replaced. $IWHU WKH ZDWHU ¿OWHU LV UHSODFHG GLVSHQVH JDOORQV RI ZDWHU ÀXVK IRU DSSUR[LPDWHO\ ¿YH PLQXWHV WR UHPRYH trapped air and contaminants from the system. Do not dispense the entire 2.5 gallon amount continuously.
TROUBLESHOOTING Parts & Features Problem Possible Cause Solutions Food packages are blocking the door open. Rearrange food containers to clear the door and door shelves. Ice bin, crisper cover, pans, shelves, door bins, or baskets are out of position. Push bins all the way in and put crisper cover, pans, shelves and baskets into their correct positions. See the Operation section for more information. The doors were removed during product installation and not properly replaced.
TROUBLESHOOTING 61 Noises Problem Possible Cause Solutions Normal Operation 5DWWOLQJ QRLVHV PD\ FRPH IURP WKH ÀRZ of refrigerant, the water line on the back of the unit, or items stored on top of or around the refrigerator. Normal Operation Refrigerator is not resting solidly on the ÀRRU Floor is weak or uneven or leveling legs need to be adjusted. See the Leveling and Door Alignment section.
TROUBLESHOOTING Wi-Fi Problem Possible Cause Solutions The password for the Wi-Fi network was entered incorrectly. x Delete your home Wi-Fi network and begin the registration process again. Mobile data for your smartphone is turned on. x Turn off the Mobile data on your smartphone before registering the appliance. The wireless network name (SSID) is set incorrectly. x The wireless network name (SSID) should be a combination of English letters and numbers. (Do not use special characters.
LIMITED WARRANTY 63 LIMITED WARRANTY FOR USA Should your LG Refrigerator ("Product") fail due to a defect in materials or workmanship under normal and proper use, during the warranty period set forth below, LG Electronics (“LG”) will, at its option, repair or replace the Product. This limited warranty is valid only to the original retail purchaser of the Product and applies only when purchased and used within the United States including U.S. Territories.
LIMITED WARRANTY x 'DPDJH RU IDLOXUH FDXVHG E\ XQDXWKRUL]HG PRGL¿FDWLRQ RU DOWHUDWLRQ RU LI XVHG IRU RWKHU WKDQ WKH LQWHQGHG purpose. x Damage or failure resulting from misuse, abuse, improper installation, repair, or maintenance. Improper repair includes use of parts not authorized by LG. Improper installation or maintenance includes installation or maintenance contrary to the Product owner’s manual. x Damage or failure caused by incorrect electrical current, voltage, or plumbing codes.
LIMITED WARRANTY 65 Arbitration Rules and Procedures. To begin arbitration of a claim, either you or LG must make a written demand for arbitration. The arbitration will be administered by the American Arbitration Association (“AAA”) and will be conducted before a single arbitrator under the AAA’s Consumer Arbitration Rules that are in effect at the time the arbitration is initiated (referred to as the “AAA Rules”) and under the procedures set forth in this section.
LIMITED WARRANTY FOR CANADA ARBITRATION NOTICE: THIS LIMITED WARRANTY CONTAINS AN ARBITRATION PROVISION THAT REQUIRES YOU AND LG TO RESOLVE DISPUTES BY BINDING ARBITRATION INSTEAD OF IN COURT, UNLESS THE LAWS OF YOUR PROVINCE OR TERRITORY DO NOT PERMIT THAT, OR, IN OTHER JURISDICTIONS, IF YOU CHOOSE TO OPT OUT. IN ARBITRATION, CLASS ACTIONS AND JURY TRIALS ARE NOT PERMITTED. PLEASE SEE THE SECTION TITLED “PROCEDURE FOR RESOLVING DISPUTES” BELOW.
LIMITED WARRANTY 67 x 'DPDJH RU IDLOXUH FDXVHG E\ XQDXWKRUL]HG PRGL¿FDWLRQ RU DOWHUDWLRQ RI WKH 3URGXFW RU LI XVHG IRU RWKHU WKDQ WKH LQWHQGHG household purpose/use of the Product, or damage or failure resulting from any water leakage due to improper installation of WKH 3URGXFW x Damage or failure caused by use that is other than normal household use, including, without limitation, commercial or LQGXVWULDO XVH LQFOXGLQJ XVH LQ FRPPHUFLDO RI¿FHV RU UHFUHDWLRQDO IDFLOLWLHV RU DV RWKHUZLVH RXWOLQHG LQ WKH
LIMITED WARRANTY you expressly agree to the arbitration). To the extent permitted by applicable law, any dispute between you and LG shall QRW EH FRPELQHG RU FRQVROLGDWHG ZLWK D GLVSXWH LQYROYLQJ DQ\ RWKHU SHUVRQ¶V RU HQWLW\¶V SURGXFW RU FODLP 0RUH VSHFL¿FDOO\ without limitation of the foregoing, except to the extent such a prohibition is not permitted at law, any dispute between you and LG shall not under any circumstances proceed as part of a class or representative action.
MEMO 69
MEMO