ABLE OF CONTENTS English Version 2 Refrigerator Care and Cleaning 28-34 Spanish Version 46 Refrigerator Cleaning 28 Outside 28 Important Safety Instructions 3-4 Inside Walls : s for Ground Castigation 4 Door Lining & Gaskets 28 Plastic Parts (Covers and Panel) 28 Parts snd Features 5-7 Back Cove a8 Replacing Lights 28 Refrigerator Installation 815 Power Interruptions 29 Unpacking 8 When Going on Vacation 29 Installation 8 When Saving 29 How to overate and install Handle Go water Filter {Type 1) 3 How fo rem
IMPORTANT SAFETY INSTRUCTIONS SAFETY MESSAGES This manual FN. “DANGER “C. A DANGER A WARNING A CAUTION containing sa SON” or © India or damage fo the product, To reduce the risk of fire, electrical shock or personal injury, the following precaution measures should be followed: + NEVER disconnect the refrigerator by pulling the power cord, always grip the plug firmly and disconnect it directly from the outset air or replace immediately all faulty or damaged service cables.
1 vertebral] This appliance is nat intended for use by children, peso ivory of mental car or persons with lack of expert in relation fo the use of shi appliance by the person res| assure that they do not play with the appliance s with physical or mental disabilities, parsons with reduced nce or know-how, ure have supervision or instruction possible for their safety. Children should be supervised fo A DANGER: CHILDREN MAY BECOME TRAPPED Children becoming trapped or suffocated is not | a problem of the past.
BA TE el NEE as SPECIAL FEATURES €) CONTROL PANEL LED DISPLAY SCREEN Simple _electronic controls are user-friendly. The LED screen shows refrigerator and freezer temperatures, displays water filler status, dispenser information, and mare ICE PLUS @ When this feature is activated, the freezer a.
PARTS AND FEATURES KEY PARTS AND COMPONENTS In addition to the special features and components outlined in the Special Features section, thees are several other important components that are referenced in this manual €p ADJUSTABLE REFRIGERATOR SHELVING @B LED INTERIOR LAMPS The refrigerator compartment shelves are Refrigerator inferior is lit by the LED array adjustable to allow flexibility for storage needs €3 CAN STORAGE BIN €) GALLON STORAGE BINS Three interchangeable bins can be arranged FIXED DOOR BINS
Use the assistance of two of mots persons to move or install the refrigerator, Not following these instructions may cause Injury to the back and other parts of the body UNPACKING Before installing your refrigerator, remove ary tape or temporary stickers. Do rof remove any stickers shay feature warnings, the model serial number or the technical phase! of the product orated on the back of the refrigerator Ta remove adhesive tape re: , ruby it well with your fingers and a little liquid detergent.
REFRIGERATOR: INSTALLATION TOOLS YOU MAY NEED mmm) 3/8 in (10 men) Hex Socket Wrench fie Fl Phillips Screwdriver NOTE: iris always recommended that the doors be snorer candies fo narrow opening. If it is necessary to remove the NOTE: Hand DOOR HANDLE REMOVING 1. Removing Refrigerator Handle Loosen the se s with the 3/3010 2.
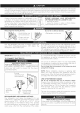
REFRIGERATOR INSTALLATION HOW TO REMOVE AND INSTALL REFRIGERATOR DOOR 1. Removing Refrigerator Doors Remove the left-side door firs? NOTE: Hands, top hinge and hinge cover appearance may vary from illustrations on this page FY WARNING + Disconnect electrical supply fo the refrigerator before installing, Failure to do so could result in death or sis injury.
REFRIGERATOR INSTALLATION HOW TO REMOVE AND INSTALL REFRIGERATOR DOOR (CONT) 2. Refrigerator Door Re installation Install the right-side door firs, » Right Door » Eff Door Lower the door onto the middies hinge pin {1} + Lower the door onto the middle hinge pin (7) Make sure the door is aligned with the cabinet + Make sure the door is aligned with the cabinet. Fit the yop hinge (2) over the ins scar larch (3) + Fit the fap hinge (8) over the hinge lever ischemic (9) and info place.
REFRIGERATOR INSTALLATION + Insert the water supply tube info f + Insert the tube at least 5/8 in. (15 Corrector connector nen) into the h. + Hook the fab on the door-switch side of the cover under 1 ge of the wire opening in the cabinet top. + Position the cover into place Insert and tighten the cover screw. FS CAUTION (cello ™ Tube Clip Insert the tube until you can sae only one of the lines printed on the tube. 2. After inserting, pull the tuba to ascertain that it is secure. 3.
REFRIGERATOR INSTALLATION HOW TO REMOVE AND INSTALL THE PULL OUT DRAWER 1. Reproving Pull out Drawer IMPORTANT. To avoid possible injury, product or property darned, you will need two persons fo perform the following instructions. To remove the drawer, push the tabs located on the front inside surface of sate rail. Then gently lift the rear left and right sides of the drawer and pull it out Fig. 1) To reinstall, pull out and fully extend both rails, Insert the 2d of rib in the crab + and fight.
REFRIGERATOR INSTALLATION + Push ths rails back info drawer cavity, With both + Hook door suppress into ail tabs, (Fig. 10) hands, hold 1 r of the bar and push that both rails go back simultaneously. Fiji) [ Fig.10 Y (Fig. 2) Fig. 7 nn + Lower door info final position and tighten the screws. (Fig. 11) Fig 11 + With the rails pulled out fo full extension, insert 2 in the rail assembly. (Fig. 12 HOW TO REMOVE AND INSTALL THE PULL OUT DRAWER (CONT) ) ” Fig. 12 2.
REFRIGERATOR INSTALLATION CLOSING AND ALIGNING THE DOORS Closing the Doors Your refrigerator has two front leveling screw: right and one on 1 iterator unstable or if you would like she doors fo close more easily, simply adjust the inclination of the refrigerator by following the instructions below 1. Plug the refrigerator inf a 3 prong grounded outlet Mace the refrigerator into is final position. 2.
USING YOUR REFRIGERATOR CONTROL PANEL FEATURES NOTE: The shape of the buttons may not match your model €b Leo pis Play The LED display shows the temperature settings, dispenser options, water fitter, door alarm, and locking status messages. 2] ICE TYPE / ICE PLUS The ICE TYPE / ICE PLUS bullion is used fo let Cubed jee or Cr ce.
USING YOUR REFRIGERATOR THE LED DISPLAY The LED display shows the temperature settings, dispenser options, water filler, door alarm, and locking status messages §] DISPENSER SELECTION IND cat Or Shaw Cubed ice or Crushed | croon that will be dis pressed e REFRIGERATOR TEMPERATURE tes the set ter ie of the hm ore— ent in Fahrenheit e FREEZER TEMPERATURE indicates the set temperature of the freezer compartment in Celsius or Fahrenheit oe ICE PLUS Her the ICE PLUS buffoon is pressed, the display will indicate
ADJUSTING THE TEMPERATURES AND DISPLAY Adjust Freezer Temperature To adjust the temperature in the freezer compartment, press the FREEZER bunion to «© through the the age of available settings Adjust Refrigerator Temperature To adjust the temperature in the refrigerator compartment, press the REFRIGERATOR button fo cycle through the range of available settings NOTE: The actual inner Temperate an the food status, sines the indicated temperature seething is the target temperature and not the acts] temperature
USING YOUR REFRIGERATOR OPERATING THE DISPENSER DISPENSING CRUSHED ICE DISPENSING WATER Press the ICE TYPE / ICE a Press the push WATER switch with a glass PLUS button so illuminate ar or other container and chilled water will the Crushed lee icon be dispensed Press the push ice switch Char the water switch is pressed, the with a glass or other fight wall be illuminated container and crashed ice WATER will bie dispensed CONTROLLING THE DISPENSER LIGHT ¢ Press fhe LIGHT / WATER FILTER Burton to turn she disp
SETTING THE FUNCTIONS SETTING THE DISPENSER LOCK Press and Fold the DOOR ALARM / LOCK button for three seconds fo lock the diaper and all of the other control panel functions s and hold again for Pr i 3 seconds to unlock SETTING THE DOOR ALARM The DOOR ALARM / LOCK tuition also controls the door alarm that sounds three times nd intervals <4) when a compartment door is left open for more than 60 seconds The alarm stops sounding when the door is closed, Cross the DOOR ALARM/LOCK button once to activate the do
SPACE PLUS ICE SYSTEM FR CAUTION + Keep hands and fools aut of fhe ics compartment door and dispenser chute, You could break something or injure yourself, Tha incarcerate wil stop producing ice when the ice bin is full, If you need more ice, empty fra ice bin in the fre adducing i can keep p Shake the ice bin o occasionally to level the (cs in les up rakes 1a misread the stop producing ice o thi mount af ic using cubes and NOTE: Storing cans of otter items in the ice bin may damage the ceramic Keep fhe ice
AUTOMATIC ICE MAKER lee is made in the automatic ice maker and sent to the dispenser.
USING YOUR REFRIGERATOR ADJUSTING CONTROL SETTINGS Give the refrigerator time before adding food. If is adding food fo the refrigerate o ins indicated i should be correct for normal usage. The controls are set correct is cold fo your liking and ice cool dawn completely eat fo wait 24 hours forbears taro rn the previous sec I household refrigerator when milk or juice is Finn The refrigerator control functions as the thermostat for tin prior: the ent the longer IF The hig or will run fa colder.
Packaging Recommendations: + Use sealed plastic containers + Lie plastic containers with a smooth surface. » Package with aluminum foil of high resistance. + Wrap with paper layered with plastic + Use water proof plastic emended plastic bags to store frozen foods + User Folio haste to reach the packaging or container instructions in order best freezing Do not use: + Bread Wrapping » Plastic container not safe for storing + Containers without lids ar seals.
USING YOUR REFRIGERATOR Tiding Shelves {in some models} You can some of the shelves in yous towards inside or outside like explained bal refrigerator + To slide the shelf towards the outside: Pull towards you, figure A, + To slicks the shelf towards the inside: Push until # stops, figure B 1. To remove, pull fhe drawer out fo full extension 2.
Glide'N'Serve {in some models). The Reservedness provides storage space with a variable temperature control that keeps the compartment colder than for large party trays, « taro. Tt Select Selection Button «When "MEAT" is ssl Glide'N'Szrve can + around This feature helps k tor fish fresh for a longer tire.
FREEZER SECTION ICE BIN {in some models) To remove Ice Bin + Pull the drawer as much as possible (1) + Raise the ics box and fake if out carefully (2) To rains tail lcs Bin: « Toke the drawer off as much as possible and put the ice bir in the right position DURABLE (in some models).
REFRIGERATOR CARE AND CLEANING pave BACK COVER EXPLOSION HAZARD FEST ELECTRICAL SHOCK HAZARD Before you begin, either unplug the refrain off power at the circuit breaker or fuse box taro or fun NOTE: Back Cover should only Do not use flammable cleanses. Not following these instructions can can; cat, explosion or fire. qualified technician The refrigerator, as well as the freezer, do their oan In order fo gut an efficient DE-freezing.
POWER INTERRUPTIONS 1 In case of a black out, coll your electric company encl ask how long if will last, In case of 9 24 hour or k out, do net open he refrigerator, this wil keen the food fr er black out, do sre of the following Oe : Sins tack wll prepares the food farm 2 fo 4 coe se you do net possess neither ice chats or dry our food as soon as possible REMEMBER: In a power failure, a full freezer stays cold ranger than a partially filed one.
REFRIGERATOR CARE AND CLEANING REPLACING THE WATER FILTER It is recommended that you replace the filter approximately every & months, when the water fitter indicator reaches O mantes, or whee the soot-put i and water dispenser notices I. Press the push button fo open fhe filter cover. NOTE: Replacing the fair causes a kraal amount of water (around drain. Place & cup under the filter hole fo catch any waste 2 Pull the cartridge downward, Pull aut the filer cartridge.
REFRIGERATOR CARE AND CLEANING REPLACING THE WATER FILTER Replace with a new cartridge. NOTE: After replacing the filter, flush 2.5 gallons through filter before use {flush for approximately 5 minutes). Hack th filter for leaks. Pe] how “FER Ld vow When the water filter indicator displays the message O Filter Month, bold 3 seconds. et the wale filler status display and indicator light by pressing and holding the LIGHT / WATER FILTER button for at least 3 seconds.
REFRIGERATOR CARE AND CLEANING Performance Data Sheet Model: LG ADQ36006101-5 Use Replacement Cartridge: ADQ36C0EIO The concentration of the indicated substances in water ordering the system was reduced jo a concentration less fo the permissible limit for water leaving the system as specified in NSF/ANS! Standard 42 and their or &; Standard 53 Standard 53 for Sy: ted and certified by NSF International against NSF/ANS! Sta fhe reduction of substances listed bole, ree Zorro | vr boar | Hsp eschatological | mn
Application Guidelines/ Water Supply Parameters Service Flow 0.5 gpm (19 lpm) Eater Supply le Eater Water Pressie Water Temperature 00°F (06°C 38°C) It is essential that fhe manufacturer's recommended titillation, maintenance and fighter bents be carried out for the prod as advertised, meant uct to perform Nita: While th laboratory conditions, ting wars par farmed under standard af performance ray vary. Replacement sordid ADQZIEOOME For & meted I 1-888.
BEFORE START The water source is riot guaranteed by the refrigerator manufacturer. Follow instructions carefully in order to recherche carnage Air located ins the water pipes can course hammering of tapping causing drags to the inner pipes or water spillage in the inside of the refrigerator, Call a qualified plumber to fix such haranguing on the connections Before installing the water pipe.
CONNECTING THE WATER LINE 3. DRILL A HOLE FOR THE VALVE Drill a 1/47 (6,35 mem) diameter holey in tha water pipeline Remove jagged edges produces after perforation. Make sure water does not reach the drill Not performing the 1/4" (6, ern perforation can lead to a tow or stroller ice production 4. TIGHTEN THE VALVE Tight the valve into the cold wa Hap.
CONNECTING THE WATER LINE move the ring plug {1} farm the valve Inca ted at the 11, CONNECT TO REFRIGERATOR fop of such device, Fix pipeline ino way ‘hot i cdo not vibrate on the refrigerator or wall Push refrigerator against wall sing its operating fern It will automatically ks acted in the ON position + Place compere: aut and the ferule at the end of the pipeline. Insert pipeline info the connection valve as far as possible.
TROUBLESHOOTING: GUIDE UNDERSTANDING SOUNDS YOU MAY HEAR Your new refrigerator might produce ain noses their your pre ous refrigerator did not. It is normal if you worry. petted. Hard surface increase sounds and rake therm sound louder their they really are.
TROUBLESHOOTING GUIDE Problem Possible Causes Solutions STRANGE SOUNDS OR SNOOZING/ VIBRATIONS +The refrigerator is positions nat correctly + Yau ends to adjust the floor is un section, cling screws due the or weak, Read the Instillation IT LOOKS LIKE THE COMPRESSOR MOTOR STAYS ON +The replaced refrigerator was an alder model + The room temperature Is hotter than usual 7 is being opens ry often of there has been a big paramount of fond in storage Modem refrigerators with a bigger storage capacity require lo
TROUBLESHOOTING GUIDE Problem Possible Causes Solutions THERE'S WATER iN THE DRAINING BIN refrigerator is in defrosting cycle + It's more humid than usual + The water will evaporate.
SMART DIAGNOSIS start THAGNOSIE™ SMART DIAGNOSIS" (Zy {In some models). pair the right refrigerator door 3. Hold the mouthpiece of your phone in front of the Should you experience any problems with your speaker that is located on the right binge of the refrigrafrigarator, it has the capability of transiting aerator door, when instructed the call center nN data via your telephone fo the LG service center This gives you the capability of speaking directly to our trained specialists.
Nina ER L6G ELECTRONICS LLS.4, INC, LG REFRIGERATOR LIMITED WARRANTY USA, Shaula your LG Refrigerator (“Product”) fail due to a defect in materials or workmanship under normal home use, during the warranty period set forth below, LG wiki at its option repair or replace the product. This limited warranty is valid only to the original retail purchaser of the product and applies only when purchased and used within the United States including US Territories.
WARRANTY LG ELECTRONICS CANADA, INC. LG REFRIGERATOR LIMITED WARRANTY « Canada WARRANTY: Should your LG Re frig "wt cant priced se! forth, baa orator {Product £5 Can acts diffract in material of workmanship under Surat harem use during 15 station para ar replace the Product Loon receipt of port of orig retail purchaser of a as only 10 & Fro wayward is valid only 10 the orgies acs of an colorization] Canadian distribute there.