LH-CX640X NA3RMLS-ENG DVD/VCR COMBI RECEIVER Combi Receiver System OWNER'S MANUAL MODEL: LH-CX640 (Main Unit: LH-CX640X Speakers: LHS-CX640T, LHS-CX640C LHS-CX640W CD-R/RW PAL Before please The up, operating or repairing this read this instruction booklet carefully and connecting working life of date of purchase. this product product, completely.
CAUTION Warning: To reduce the risk of electric shock, do of this not remove There product. iceable the are no user-serv- parts inside. Refer servicing qualified service Warning: To reduce the risk of fire electric uct to or back cover or personnel. shock, do dripping to not expose this or prod- splashing water, rain, not place objects filled as vases, on the prod- or moisture.
Contents GeneralFeatures.......................31 Introduction...................4 SymbolUsedinthisManual...............4 AbouttheSymbolDisplay..............4 NotesonDiscs..........................4 HandlingDiscs........................4 StoringDiscs.........................4 CleaningDiscs........................4 TypesofPlayableDiscs...................5 Regionalcode..........................5 Disc-relatedterms.......................6 FrontPanel.............................7 DisplayWindow...............
Introduction About the To proper use of this product, please read this owner's manual carefully and retain for future Symbol Display ensure reference. " " may appear on your TV display during operation and indicates that the function explained in this owner's manual is not available This manual provides information on the operation on that specific DVD video disc. and maintenance of your DVD player.
Types of Playable Discs Regional code This DVD player is designed and manufactured for playback of region "5" encoded DVD software. This unit can play only DVD discs DVD (8cm/12cmdisc) labeled "5" DVD audio discs (8cm/12cmdisc) Notes Video CD (VCD) (8cm/12cmdisc) ? on or "ALL". Regional Codes Most DVD discs have numbers in it clearly a globe visible on with the one or more cover. This number must match your DVD al code or the disc cannot play.
Disc-related terms PBC: DVD±R/DVD±RW version 2.0 disc formats. PBC allows you to interact with the system via menus, search functions, or other DVD -R and DVD +R are Playback Control (Video CD only) Playback control is available for Video CD (VCD) two different standards for recordable DVD drives and discs. This format allows information to be recorded onto the DVD disc DVD +RW and DVD -RW once. are only two standards for re-writable media, meaning the DVD content can be erased and re-recorded.
Front Panel EJECT(Z) Ejects OPEN/CLOSE Opens or the tape in the VCR deck. PAUSE/STEP(X/C) (Z) Pause closes the disc tray. playback Press of tape a for repeatedly disc in the DVD or VCR deck temporarily. or a frame-by-frame playback. Remote Sensor STOP Point the DVD/VCR Combi receiver remote control here. Stops playback of a disc PLAY Disc Tray (DVD deck) Insert a To play back a recorded tape disc here. REC/ITR or or (x) tape. (B) disc.
Display Indicates current A disc is loaded in the DVD deck. audio stream. loaded in the DVD WMA disc inserted (Lights when a Window disc is deck.) DVD/VCR Combi receiver is in VCR timer mode Indicates the unit is radio mode. or a VCR timer recording is recording programmed. DVD to VCR copy is in progress. DVD/VCR Combi receiver is Indicates current surround mode. Recording a tape. Indicates the unit is playing back a tape recorded in Hi-Fi.
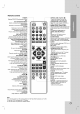
Remote Control POWER Switches DVD/VCR Combi receiver ON and OFF. 0-9 numerical buttons Selects numbered options in a menu. PROGRAM Accesses or removes Program track number on the program menu or a mark MARKER SEARCH on the a - - EJECT OPEN/CLOSE POWER CD/DVD FM/AM VCR AUX AV display. PROGRAM CLEAR SOUND MODE AUDIO Select programme of VCR or Tuner Adjusts manually the tape's picture PR/TRK/PRESET (b/B): SET UP/ i To tune in the desired radio station. normally or (z) (.
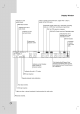
Rear Panel AC Power Cord Plug ANT.IN into the power source. Connect the aerial EURO AV2 (VCR IN+OUT/DVD Connect to Set Top jack. RF. OUT OUT) Box this using Connect to or TV with RF cable. a FM ANTENNA CONNECTOR another video recorder. Connect the FM antenna to this terminal. 66 6 4 EURO AV1 AUDIO/VIDEO (VCR Connect to your TV set or IN+OUT/DVD 6 6 OUT) another video recorder. S-VIDEO OUT Connect to a (DVD OUT) S-Video Input on TV. FOR DVD VIEWING ONLY.
Installation and TV & Set Top Box (or Setup another VCR Rear of Set Box Top (or Connections) another VCR) VIDEO OUTPUT AUDIO OUTPUT A D 6 R 66 4 6 InstaliodSeup 6 S Rear of TV COMPONENT VIDEO / PROGRESSIVE SCAN INPUT E Pb Y Y(G) ? Make on AUDIO LOUT Pr(R) following connections, depending capabilities of your existing equipment.
Progressive Scan (ColorStream pro) connection Connect the EURO AV1 AUDIO/VIDEO socket on the Rear of TV DVD/VCR Combi receiver to the COMPONENT VIDEO INPUT(Y Pb Pr) jacks on the TV using the COMPONENT VIDEO / PROGRESSIVE SCAN INPUT SCART to RCA cable. Y If your television is high-definition or "digital ready" television, you may take advantage of the DVD/VCR Combi receiver progressive scan output for the highest video resolution possible.
Accessory Audio/Video (A/V) Connections to DVD/VCR Combi receiver Connect the AV 3 jacks on the DVD/VCR Combi receiver component, using the optional audio/video cables. If the auxiliary devices (e.g. DVD) input jack of the DVD/VCR Combi are equipped to the audio/video out with OPTICAL OUT jack, jacks on your accessory connect them to to the corresponding receiver.
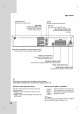
Speaker System Connection Connect the the speakers using To obtain the best possible supplied speaker surround sound, cords. adjust the Front Speaker (Right) speaker parameters; distance, level, Centre Front Speaker (Left) Speaker 6 etc.. 66 4 6 6 Rear Speaker (Right Surround) Rear Speaker (Left Surround) Subwoofer Notes ? Be sure to match the speaker cable to the appropriate terminal the components: on + to + and -- to --.
Speaker Positioning In the of normal case position the 6 use speakers (2 front centre speakers, speaker, 2 rear speakers and subwoofer). If you want to a ? ? play the excellent bass sound, DTS digital surround or Dolby Digital surround, you should connect subwoofer. Front speakers According to your listening position set up interval between speakers to 45 degree. the speakers for equal distance.
Mini Glossary for Audio Stream produce a 3D Surround effect, using 3D Surround Sound technology, which simulates multi-channel audio playback from two conventional stereo speakers instead of the five or more speakers normally required to lisThis unit & Surround mode Allows you to enjoy 5.1(or 6) discrete channels of high a trademark of DTS Technology, LLC. Manufactured under license from DTS Technology, LLC. Dolby Digital surround format lets you enjoy up to 5.
Before in Tuning Operation-VCR part video channel a on your TV Notes ? The output frequency of this video recorder (VCR) is set at UHF channel 36. If channel 36 is already another TV station, or if the picture is distorted, you can change the transmitter channel of used RF by 7. You Your TV receives ence have ally from the video recorder signals like another TV station. You have to select it, 8. Insert on on usu- your DVD/VCR Combi your TV. pre-recorded on the remote control.
Setting the clock Manually The clock in your DVD/VCR Combi receiver controls time and date settings for your DVD/VCR Combi receiver. 1. Press i. Press 1 or 2 to select TIME DATE. To set the colour system 1. Press i. 2. The main 3. Press 1 or 4. Press 3 or 4 menu will appear on the TV screen. 2 to select the SYSTEM and press OK. to select according to the COLOUR system used. Press OK. HHMNDDMMYY -- :. - - -- -- -- --- . VCR REC 12 TIME DATE 2.
How to the main use This DVD/VCR Combi receiver the programmed by using screen. The menus are Tuning menu easily be displayed on can menus controlled from the Remote Control Handset. 1. Switch 2. Press i button. your TV set and DVD/VCR Combi receiver by pressing the POWER button.
in TV Stations Tuning In certain 5. Manually of the country broadcast signals may be too weak for your DVD/VCR Combi receiver automatic tuning process to find or assign The TV station in order for your DVD/VCR Combi receiver to store them. 1. that you may name list will appear. name correctly. You must tune in these weaker broadcast stations so Press OK. areas TV stations Press 2 to select STATION your TV station. PR CH MFT 09 C10 00 manually PSET R Press i.
the order of TV Stations Changing TV stations into your DVD/VCR Combi receiver you may wish to change the order in which they are stored without having to retune them After tuning against! The instructions show you how you your desired order. 1. can given on this page simply move them will Deleting TV stations into your DVD/VCR Combi receiver you may wish to delete a station. The instructions given on this page will show you After how into 1. will appear on the TV 2 to select the PR SET.
Before Operation-DVD part On-Screen Display general playback status on the TV screen. Some items can be changed using the menu. To use the on-screen display: You display can the 1. Press DISPLAY 2. Press v / V to select The selected item is Press b / B to 3. item. inputting For number). press ENTER to execute the functions, some setting. Number Some discs may not shown below.
Initial LANGUAGE Settings LANGUAGE By using the Setup menu, you can make various adjustments to items such as picture and sound. You can also set a language for the subtitles and the Setup menu, among other things. For details on each Setup menu item, see pages 23 to 26. To Press SETUP to display the To go back to the previous the remote control. on Disc Menu Original Use v / V to select the desired alternate Setup menu appears. option then press to the second level.
DISPLAY 5. Display Mode Progressive TV Output 9Wide 16: Aspect Caution: Widescreen Scan Once the setting for progressive scan output is entered, an image will only be visible on a progressive scan compatible TV or monitor. If you set Progressive Scan to Off Select RGB Move On in error, you must reset the unit. 1) Remove any disc from the unit and close the disc tray. See that "NO DISC" is displayed on the display window.
OTHERS DivX(R) The PBC, Auto Play and DivX(R) VOD settings can be changed. VOD DivX display the DivX DRM (Digital Rights Management) Registration code for your unit only. You can OTHERS PBC Auto On Off Play DivX(R) DivX(R) Your Select VOD Video On Demand registration To learn code is more : XXXXXXXX visit www.divx.com/vod Move PBC Set (Done) Select Playback Control (PBC) On: Video CDs with PBC to On or Off. are encrypt played according to the PBC.
LOCK Password (Parental Control) You LOCK Rating Unlock Password New Country enter or 2. Follow step "New" is Move DVD-V Input Select for children to view. that may not be suitable of these discs contain scenes Many parental control information that applies to the complete disc or to certain scenes on the disc. Movies and scenes are rated from 1 to 8, depending on the country. Some discs offer suitable more scenes as an alternative.
Operation Tape Playing a You will be able to load and eject video cassettes DVD/VCR Combi receiver is plugged into only when your the mains. Your DVD/VCR Combi receiver may also playback recordings from NTSC tapes (on PAL TV). better Getting a When cassette is inserted and a picture playback started, the automatic tracking function works to get the best possible picture automatically. If the quality of the recording is poor, repeatedly press 3 or 4 on the remote control or press PROG.
Instant Timer Recording (ITR) 5. Instant Timer video cassette runs 6. incorporates Long which enables you to record up to twice the amount of time on a video cassette. For examE-180 will record up to 180 minutes using Standard Play (SP); using LP you will be able to record up to 360 minutes. Please note there will be an in slight loss using LP. picture sound Press REC/ITR to start and sound quality 7. Press PAUSE/STEP to continue recording.
Timer recording using Display On Screen 6. Press the numbered buttons to enter the 24 hour clock. e.g. will be 1pm displayed as 13:00. You may also select the the start and end times pressing Note 3 by or 4. Before setting the timer make sure that you have set the DVD/VCR Combi receiver clock correctly and you know which stations you have tuned TV stations on your DVD/VCR Combi receiver. protection start and end times of the programme that you wish to record.
If Timer record events Overlap... Change (Deleting) Do not overlap programmes, since overlapping portions of the conflicting programmes will not be recorded. Earlier recording times have priority over later recording times as shown in the diagram. If at the Timer Programme later date you wish to delete or change any of the settings in timer event memory you may do so a without having to enter all the timer event information again. Simply display the timer event screen.
Playing DVD a or General Features Video CD Note: Playback Setup Turn 1. on the TV and select the video connected to the DVD Turn input source able player. 2. the audio system (if applicable) and select the input source connected to the DVD player. 3. Press OPEN/CLOSE to open the disc tray and load your chosen disc in the tray, with the play- on back side down. Press OPEN/CLOSE to close the tray. Playback starts automatically. If playback does not start, 4. press PLAY.
Still Picture and Frame-by-Frame Playback Repeat You 1. 2. Press PAUSE/STEP the remote control during playback. Advance the picture frame-by-frame by pressing PAUSE/STEP repeatedly. on Press DVD Video Discs To exit still motion mode, press PLAY. ? Slow Motion ? Press PAUSE/STEP The DVD player now ? go into PAUSE mode. ? ? 2. Press . The > or during Use the . or or t 1/2 or T 1/2 required speed: (backward), or (forward). To exit Slow Motion mode, press PLAY.
Zoom Use to zoom Press ZOOM 1. the video enlarge image. during playback or still playback to activate the Zoom function. The square frame appears briefly in the right bottom of the picture. 2. 1600% size → screen fit mode → the can the contents of DVD discs: Menus DVDs may offer menus that allow you to access special features. To use the disc menu, press DISC the way the when image appears on you're playing a DVD movie. Use the bBvVbuttons to zoomed 4.
DVD Audio Discs DVD Audio is Moving disc format the building cess of DVD to provide high quality, uncompressed, multi-channel audio for a new experience in audio quality. A DVD Audio disc can be identified by the DVD audio logo on the disc jacket or on the disc itself. DVD Audio a new on suc- provide higher quality stereo than Audio CDs with a sampling rate of up to 192kHz (compared to 44.1kHz for CDs).
Playing Audio CD an or MP3/WMA MP3 / WMA disc limited Disc ? The DVD player can play MP3/WMA formatted recordings on CD-ROM, CD-R, or CD-RW discs. as compatibility with this player is follows: within 8 48 kHz (MP3), Sampling frequency: within 32 48kHz (WMA) Bit rate: within 8 320kbps (MP3), 32 192kbps (WMA) The player cannot read an MP3/WMA file that has a file extension other than ".mp3" / ".wma".
Audio CD and MP3 / WMA Disc Random Features 1. Pause playback, press PLAY, PAUSE/STEP again. press 2. during playback. To return to 2. during playback or when playback is stopped. Random Playback begins immediately and RANDOM appears on the menu screen. Press PAUSE/STEP 1. Press RANDOM ENTER until repeatedly or playback, press RANDOM RANDOM disappears from the To return to normal menu screen. Tip: Moving Press . 1.
Repeat Programmed Programmed Playback 1. The program function enables you to store your favorite tracks from any disc in the player memory. A program 1. Insert 2. ? ? Audio CD 2.
Viewing JPEG Disc a Moving you can view Kodak PICTURE CDs and discs with JPEG files. Using 1. this DVD Player disc and close the tray. The PHOTO appears on the TV screen. Insert a menu Press . List > once during viewing a picture or to the previous file. to JPEG Zoom (see PHOTO or advance to the next file Use JPEG to another File the to enlarge page) zoom 33 photo image.
5.1 Speaker Setup This to chapter includes important reference information help you set your DVD/VCR Combi receiver. If you connected following settings for the built-in 5.1 channel how far the sound has to travel to reach your set listening point. This allows the sound from each speaker Press b / B to 1. Press SETUP. The setup 2. Use v / V to select the AUDIO 3. move menu speaker. [0.3(1)m(ft) appears. option move Speaker Setup option to the third level. "Select" is Press ENTER and 5.
DVD VR format Disc Playing a This unit will play DVD-R/RW discs recorded the DVD-Video format that have been a ? using finalized using Refer to the information in this contacting This unit will play DVD-RW discs recorded using Recording (VR) format. disc and close the tray. The TITLE LIST appears on the TV screen. Insert a menu DVD-VR When Please shipping save ? Press v / V to select a track then press PLAY ENTER and playback starts. Press TITLE to move or to the list menu.
Playing a DivX Movie Disc DivX disc this DVD Player you can play disc and close the tray. The MOVIE appears on the TV screen. Insert player is limited DivX disc. ? 1. with this follows: as Using compatibility a menu Available resolution size of the DivX file is under 720x576 ? MOVIE The file (W x name H) pixel. of the DivX subtitle is available by 56 characters.
Additional Features-VCR part On Screen You may Video Doctor Display easily display the current time or tape counter, amount of tape left, day, month, year, day of week, programme channel, tape speed and operational mode of your DVD/VCR Combi receiver will appear on the TV screen. If a recording is taking place these On Screen onto the Displays This feature informs you that there is a problem with your DVD/VCR Combi receiver. These error messages will appear 1.
Hi-Fi Stereo Sound Your DVD/VCR Combi receiver will record and back Hi-Fi stereo sound. In addition it has NICAM Wide Screen System a play- stereo stereo sound decoder. This allows you to record and playback the sound in several different digital ways. Video cassettes recorded on your DVD/VCR Combi receiver will have a normal mono audio track and two VHS Hi-Fi stereo audio tracks. These stereo 1. or 1. another Hi-Fi VCR.
Additional Features Last Scene Memory This player memorizes last scene from the last disc that is viewed. The last scene remains in memory if you remove the disc from the player or switch off the player. If you load a disc that has the scene even memorized, the scene is automatically recalled. Note: player does not memorize the scene of a disc if you switch off the player before commencing to play the disc. This Screen Saver The appears when you leave the DVD mode for about five minutes.
Copying from DVD To VCR This unit allows you to copy the contents of a DVD to a VHS tape with a press of the REC/ITR button. Notes: Be to set sure setup protected, 2. 3. to "Off" on the from another video recorder With this video recorder you can make recordings from an external source, such as copying from another DVD/VCR Combi receiver or a camcorder. menu. If the DVD you 1. "Progressive Scan" Recording to copy is copy you may not be able to copy the disc.
Presetting You make sure Preset radio stations in the DVD/VCR Combi receiver that you have turned down the vol- Press FM/AM the remote control on front on memory first (see "Presetting radio stations" on the left). ume. 1. to the Radio Listening preset 50 stations for FM and AM. Before can tuning, the Radio Stations panel until the frequency the display and TV screen. or on the 1.
Tuning 1. into Station a Press FM/AM on Manually the remote control front on 2. panel until the frequency the display and TV screen. Press FM/AM front 3. panel on or on the band appears the remote control or on the to select the desired band. Press PRESET (3/4) on the front panel or press 1 and 2 on the remote control to tune in the desired station.
Language Codes Use this list to your desired language for the Disc Audio, Disc Subtitle, Disc Menu.
Troubleshooting Check the following guide for the possible cause of a problem before contacting service. Cause Symptom Correction No power. The power cord is disconnected. Plug the power securely. The power is on, but the DVD/VCR Combi receiver does not work. No disc is inserted. No tape is inserted. Insert a disc or tape. (Check that the disc or tape indicator in the display window is lit.) No The TV is not set to receive DVD/VCR Combi receiver signal output.
Symptom Cause Correction This remote control uses the same buttons for VCR and DVD functions The remote control is not pointed at the remote sensor of the DVD/VCR Combi receiver. Point the remote control at the remote sensor of the DVD/VCR Combi receiver. The remote control is too far from the DVD/VCR Combi receiver. Operate (7 m). There is an obstacle in the path of the remote control and the DVD/VCR Combi receiver. Remove the obstacle. The batteries in the remote control exhausted.
Specification General Power requirements Power consumption Dimensions (approx.) Mass (approx.) Operating temperature Refer to main label Refer to main label 430X81X360mm(wxhxd) 5.8 kg (17.
Speakers Satellite (LHS-CX640T) 2 Type Impedance Frequency Response Max Net Dimensions Input Input (W x Net Center 120 (1m) Power 90W Power 180W H 104x233x120mm D) Weight x 1.0 2 kg Way 2 Speaker 6Ω 120 Sound Pressure Level Max Net Dimensions Speaker 20,000 Hz - 82 dB/W speaker (LHS-CX640C) Type Impedance Frequency Response Rated 2 6Ω Sound Pressure Level Rated Way 20,000 Hz - 82 dB/W Input Power Input Power (W x H x D) Net Weight (1m) 90W 180W 220x114x110mm 1.
P/N: 3834RH0064W