LH-D6530X JA3RMLS_ENG DVD/CD RECEIVER OWNER'S MANUAL MODEL: LH-D6530 (Main Unit: LH-D6530X, Speakers: LHS-D6530V, LHS-D6530T LHS-D6530C, LHS-D6530W) CD-R/RW Before connecting up, operating or repairing product, please read this instruction booklet carefully and completely. The working life of purchase.
Precautions Safety CAUTION RISK OF ELECTRIC SHOCK DO NOT OPEN CAUTION: TO REDUCE THE RISK OF ELECTRIC SHOCK DO NOT REMOVE COVER (OR BACK) NO USER-SERVICEABLE PARTS INSIDE REFER SERVICING TO QUALIFIED SERVICE PERSONNEL. This lightning flash equilateral triangle with arrowhead symbol is intended to alert the within user an to the presence of uninsulated dangerous voltage within the product's enclosure that may be of sufficient magnitude to constitute risk of electric a shock to persons.
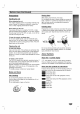
Table of Contents DVDAudioDiscs...........................23 Introduction Precautions.............................5 MovingtoanotherGROUP..............23 ViewinganotherPAGE.................23 24-25 Audio CD and MP3/WMA Disc Operation an Audio CD and MP3/WMA Disc 24 Playing .24 NotesonMP3/WMARecordings. NotesonDiscs..........................5 Pause.............................25 AboutSymbols..........................5 .6 FrontPanelandDisplayWindow. MovingtoanotherTrack...............
Before Use Playable Disc-related terms Discs Title (8cm/12cmdisc) or you to locate it Video CD (VCD) (8cm/12cmdisc) Audio CD (8cm/12cmdisc) can play a DVD-RW, DVD+RW, Kodak PICTURE CD and CD-R audio titles, MP3, WMA or or CD-RW that contains Group (DVD JPEG files. or itself, some cannot be -- -- on the conditions of the the CD-R/RW ment CD-R/RW played on recording equip(or DVD-RW, DVD+RW) disc (or DVD-RW, DVD+RW) discs the unit.
Before Use (Continued) Storing Precautions After the unit Handling discs playing, store the disc in its case. When Do not expose the disc to direct sunlight or sources of heat, or leave it in a parked car exposed to direct sun- The light, shipping the unit original shipping carton and packing materials may come in handy. For maximum protection, re-pack the unit as it was originally packed at the factory.
Front Panel and Display Window STANDBY/ON OPEN/CLOSE button PLAY/FUNCTION button STANDBY indicator Lights red when the receiver is in Standby mode (off). DISC PAUSE/MONO/STEREO button STOP/MEMORY button Tray TUNING (-/+)/ SKIP/SCAN buttons FUNC( OPEN/CLOSE MONO/ST.
Remote Control OPEN/CLOSE button POWER button AUX button BAND button CD/DVD button MUTE button DIMMER button SLEEP button INTRODUC NUMBER buttons REPEAT A-B button REPEAT button SOUND MODE button PL II PROGRAM button PRO LOGIC II button CLEAR button PRESET(+/-) AUDIO button VOLUME buttons (+/-) buttons SUBTITLE button ZOOM button RETURN button ENTER button ARROW buttons For use on a GUI in highlighting a selection DISPLAY button screen, TITLE and MENU screen.
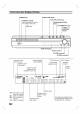
Rear Panel POWER CORD SUBWOOFER LINE OUT Connector VIDEO 2 SPEAKER Connectors (Input) VIDEO 1 Connectors (Input/Output) Connectors OPTICAL IN Connector OPTICAL OUT Connector MONITOR OUT Connector S-VIDEO OUT Connector COMPONENT VIDEO OUT Connect to a (Y Pb Pr) inputs. TV with Y Pb Pr Do not touch the inner pins of the jacks on the rear panel. Electrostatic discharge may cause permanent damage to the unit.
Connections to a TV Connecting Make the one of the ips Depending to on following connections, depending existing equipment. on of your capabilities PREATION your TV and other equipment you wish are various ways you could connect connect, there the DVD/CD receiver. Use one of the connections described below. Please refer to the manuals of your TV, VCR, Stereo or other devices as necessary to make the System best connections.
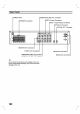
Connections Connecting 1 2 3 4 to (Continued) Optional Equipment Connect a VCR to the VIDEO 1 connectors. Connect a additional VCR to the VIDEO 2 connectors. Connect an optical output Connect an optical input of DVD of DVD Player (or Digital Device Device Player (or Digital etc) etc) to the OPTICAL IN connector. to the OPTICAL OUT connector.
Connections Aerial Connections Connect the supplied FM/AM aerial for listening to the radio. loop aerial to the AM aerial connector. Connect the AM Connect he FM wire aerial to the FM aerial connector. AM FM Wire aerial Loop aerial PREATION (supplied) (supplied) otes To prevent noise pickup, keep the AM loop aerial away from the DVD/CD receiver and other components. Be sure After to fully extend the FM wire aerial. connecting the FM wire aerial, keep it as horizontal as possible.
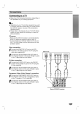
Connections (Continued) Speaker System Connection Connect the speakers using To obtain the best possible the supplied speaker surround cords. sound, adjust the speaker parameters (volume, distance, etc.).
Connections (Continued) Speaker Positioning In the of normal case position the 6 use speakers (2 front speakers, centre speaker, 2 rear speakers and sub- woofer). If you want to subwoofer. ? ? play Front speakers According to your listening position speakers to 45 degree. Centre speaker speakers The centre ? the excellent bass and front sound, DTS digital surround set up the speakers are for speakers ideally the equal same or Dolby Digital surround, distance.
Before Mini Operation Glossary for Audio Stream & Surround mode Sound Mode You enjoy surround sound simply by selecting one pre-programmed sound fields according to the can of the program you want to listen to. Allows you to enjoy 5.1(or 6) discrete channels of high quality digital audio from DTS program sources such as discs, DVD compact discs, etc.bearing the trademark.
Before General This manual Operation (Continued) Temporary Explanation basic instructions for operating the require specific operation or allow only limited operation during playback. When this occurs, the symbol appears on the TV screen, indicating that the operation is not permitted by gives TITLE DVD/CD receiver. Some DVDs the DVD/CD receiver is not available or on CHAPT GROUP TRACK General screen.
Before Operation (Continued) On-Screen Display (Continued) d DVD-A Items Group Function (Press 3/4 to select desired item) Number 2/6 Track Number 1 /12 Time search 0:10:15 DVD Audio Output 1PPCM mode Shows the current group number and total number of groups, and skips to the desired group number. 1/2,or Numbers, ENTER Shows the current track number and total number of tracks, and skips to the desired track number. 1/2,or Numbers, ENTER Shows the elapsed playing time.
Before Initial You Operation (Continued) set your can Menu Settings Select Personal Preferences own on the player. Initial Settings General you Language a see language for the setup menu. This is the menu when you press SETUP. Operation Disc Audio Russian Disc Subtitle English PREATION Disc Menu 1 Press SETUP. The setup Rating menu Country appears.
Before Operation (Continued) Speaker Setup 5.1 Auto Speaker settings DVD-V You DVD-A Play can DVD-V DVD-A set up the DVD/CD receiver so a DVD disc starts playing whenever the DVD is insert- automatically Select speaker settings, including volume balance and delay time, or test the speaker settings. Speaker settings are only active on the Analog MultiChannel Output. (See "Speaker Setup", page 28.) ed.
Before Operation (Continued) Parental Control Rating Movies DVDs may contain on scenes not suitable for Therefore, discs may contain Parental Control information that certain DVD-V Enter the code of DVD-V children. Code Country to the applies complete the disc. These scenes on disc from 1 to 8, and alternatively, more suitable scenes available for selection on some discs.
Operation Playing a with DVD and Video CD Playback Setup Turn on General Features DVD and Video CD DVD-V VCD2.0 DVD-A the TV and select the video input VCD1.1 ote source con- the 1 system: Turn input source the audio on system and select connected to the DVD/CD receiver. Moving Press OPEN/CLOSE to open the disc tray. DVD-V 2 Load your chosen disc in the tray, with the playback side facing down. 3 Press OPEN/CLOSE to close the tray.
DVD and Video CD General Features Still Picture and VCD2.0 DVD-V 1 To VCD1.1 go into PAUSE mode. now picture frame-by-frame by repeatedly on the remote control. The 3 To exit using operation 1 To in permitted some pictures, picture Repeat The VCD2.0 1 Press SLOW SCAN m The or M during playback. the TV on press REPEAT on the TV screen. a third time. screen. Track/All/Off Repeat Track icon appears the TV on screen.
DVD and Video CD General Features 3D Surround This unit (continued) VCD2.0 DVD-V produce can Operation a VCD1.1 3D Surround 3 Press CLEAR. The Marker number will be erased from the list. 3D SUR BYPASS 4 playback from two speakers, instead of the five or speakers normally required to listen to multi- 5 To conventional stereo more a home theater during play- back. 2 To turn off the 3D Surround MODE again Zoom VCD2.
DVD and Video CD DVD Audio Discs Operation DVD-A Viewing another PAGE Since DVD Audio discs DVD Audio is building on the success of DVD to provide high quality, uncompressed, multichannel audio for a new experience in audio quality. A DVD Audio disc can be identified by the DVD audio logo on the disc jacket or on the disc itself. a new disc format DVD Audio can provide higher quality stereo than Audio sampling rate of up to 192kHz (compared to 44.1kHz for CDs).
Audio and MP3/WMA Disc Playing an Audio CD and MP3 CD Operation MP3/WMA Disc play can Insert a disc and close the tray. Audio CD; Audio CD menu appears on MPEG1 audio files that have on The the TV on screen. Go to step player About the TV go to step 4. MP3/WMA disc; The MP3/WMA-JPEG choice can not read a technology. WMA(Windows compression of 2 JPEG MP3/WMA Disc MP3 WMA 1. Media 3. Folder1 Folder2 Folder3 Folder4 Folder6 Clear All - A a track then press PLAY 6.
Audio and MP3/WMA Disc Pause MP3 CD 1 Press PAUSE/STEP Operation (Continued) WMA Repeat during playback. 2 To return to playback, PAUSE/STEP again. press PLAY or To 1 press repeat to another Track Press SKIP/SCAN . or > Press SKIP/SCAN . twice In previous case WMA briefly during or step back to of audio CD, to directly to any track, enter the numbered buttons (0-9) to go using icon and "A Repeat during playback.
JPEG Disc Viewing Operation JPEG disc a Press SKIP/SCAN . This DV/CD receiver play discs with JPEG files Kodak picture CD. Before playing JPEG recordings, read the notes on JPEG Recordings on right. Insert 1 a can and 1 Press PAUSE/STEP menu appears on or > once to advance to the next file picture or during viewing a previous file. to the Still Picture disc and close the tray. The MP3/WMA-JPEG choice TV to another File Moving JPEG the 2 To return to the slide screen.
Programmed Playback CD VCD2.0 with Audio CD Programmed Playback function enables you to store your favorite tracks from any disc in the player memory. Program Program a setup Video CD with menu Press PROGRAM E the on to PBC, you the use must set PBC to Off on the function. See page 18. Program contain 30 tracks. can mode to enter the The with Video CD ote On Program 1 WMA Programmed Playback and MP3/WMA Disc The MP3 VCD1.1 during playback or in Program Edit mode.
Additional Information Speaker Setup Adjust the following settings for the built-in 5.1 channel Last Condition surround decoder. DVD Disc Audio R Disc Menu Code Volume Menu player. If you load a disc that tings memorized, the latest stop position is ly recalled. Small Distance Language switch off the 0 dB Size Aspect user settings for the last disc that you have viewed. Settings remain in memory even if you remove the disc from the player or R Front L Rating TV Memory VCD1.
Radio Operation Presetting You can tuning, 30 stations for FM and AM preset make the radio stations sure (MW). Before Preset radio stations in the DVD/CD receiver's memory (see "Presetting radio stations" on the left). that you have turned down the vol- first the remote control until FM 1 ume. Press BAND 1 AM on in the (MW) appears display or window. And then every time you press BAND, FM and AM (MW) changes alternately.
Other Function Sleep Timer You set the DVD/CD receiver to turn off automati- can cally 1 at a specified Selecting input source You other units connected to the can use Press SLEEP to set the desired sleep sleep time. time appears in the dis- window. Each time you press SLEEP the setting changes in the following order. SLEEP 90→80→70→60→50→40→30→20→10→ OFF ote You can check the time remaining before the DVD/CD receiver turns off. Press SLEEP.
Language Code Enter the (See appropriate 17).
Country Code Enter the appropriate List code number for the initial setting "Country Code" (See page 19).
Troubleshooting Check the following guide for the possible of cause a before problem contacting Cause Symptom Correction No power. ? The power cord is disconnected. ? The power is on, but the DVD/CD receiver ? No disc is inserted. ? Plug the power cord wall outlet. securely Insert that the DVD or, a disc. (Check ? The TV is not set to receive DVD signal ? output. Select the on the TV ? The video cable is not connected ? securely.
Troubleshooting (Cont'd) Cause Symptom Radio stations cannot ? The antenna is Correction positioned or connected poorly. be tuned in. ? ? Connect the antenna Adjust securely. the antennas and connect an external antenna if necessary. ? ? The of the stations is too weak in with automatic signal strength (when tuning tuning). No stations have been preset preset or ? Tune in the station manually. ? Preset the stations (page 29).
Specification Power Power [Genral] External dimensions (W x H x D) conditions AM [MW] 82 344 x Signal system Frequency response (audio) Signal-to-noise ratio (audio) Dynamic range (audio) Harmonic distortion (audio) Video input PAL cover) cover) status: Horizontal 35°C, Operation 625/50, 650 laser, wavelength REF NC nm NTSC 525/60 150 Hz to 18 kHz More than 70 dB (1 kHz, NOP, 20 kHz LPF/A-Filter) More than 70 dB (1 kHz, at 12W position) (20 kHz LPF/A-Filter) (p-p), 75 Ω, negat
P/N: 3828R-D031K