LGEGF_MEEEI_LH-T755TF_ENG_135G DVD/CD RECEIVER OWNER'S MANUAL MODEL: LH-T755TF (Main Unit: LH-T755, Speakers: LHS-75TFS, LHS-75TFC, LHS-75TFW) R Before connecting up, operating or repairing please read this instruction booklet carefully completely.
CAUTION RISK OF ELECTRIC SHOCK DO NOT OPEN CAUTION: TO REDUCE THE RISK OF ELECTRIC SHOCK DO NOT REMOVE COVER (OR BACK) NO USER-SERVICEABLE PARTS INSIDE REFER SERVICING TO QUALIFIED SERVICE PERSONNEL. This lightning flash with arrowhead symbol within equilateral triangle is intended to alert the user to the presence of uninsulated dangerous voltage within the product's enclosure that may be of sufficient magnitude to constitute a risk of electric an shock to persons.
SLOWSCAN...........................21 Contents REPEATA-B...........................21 Introduction.....................4-8 SymbolusedinthisManual...............4 AbouttheSymbolDisplay.............4 NotesonDiscs.........................4 REPEAT...............................21 3DSURROUND.......................21 TIMESEARCH..........................21 ZOOM..............................22 MARKERSEARCH....................22 HANDLINGDISCS.......................4 PAUSE................................
Introduction To proper use of this product, please read this owner's manual carefully and retain for future About the Symbol Display ensure reference. " " may appear on your TV display during operation and indicates that the function explained in this owner's manual is not available This manual provides information on the operation on that specific DVD video disc. and maintenance of your DVD/CD Receiver. Should require service, contact an authorized service the unit location.
Types of Playable Discs DVD Manufactured under license from Dolby Laboratories. Logic", and the double-D symbol are trademarks of Dolby Laboratories. Confidential Unpublished works. Copyright 1992-1997 Dolby Laboratories. All rights reserved. (8cm/12cmdisc) "Dolby", DVD audio discs (8cm/12cmdisc) "Pro Video CD Manufactured under license from Audio CD Inc. US Pat. No's.
Disc-related terms PBC: DVD±R/DVD±RW DVD -R and DVD +R are two different standards for recordable DVD drives and discs. This format allows information to be recorded onto the DVD disc DVD +RW and DVD -RW once. re-writable two standards for media, meaning the DVD erased and re-recorded. 4.38 are Gigabytes much.
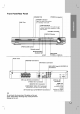
Front Panel/Rear Panel PHONES connector STANDBY/ON STANDBY indicator DISC Lights red when the receiver is in Standby mode (off). Tray Introducin FUNCTION/PLAY Press and hold down this button about 3 seconds, then press repeatedly to select other function.
Remote Control POWER OPEN/CLOSE (DVD/TV) Opens DVD Select the output (CD/DVD) source or Selects DVD tuner (FM To control the TV. a or and AM Set the MUTE at Selects AUDIO SOUND MRAKER - an audio an sound effect. PRESET/ Marks CH menu Selects the TV's Selects MENU SCAN REVERSE SKIP(>) To Starts a radio station's D.INPUT frequency RESOLUTION the tuner. track number on the program menu or a mark MARKER SEARCH on the a (B) playback.
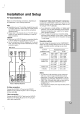
Installation and Setup TV Connections Make the one of the capabilities following connections, depending existing equipment. on of your Component DVD/CD Receiver to Tips: TV your TV and other equipment you wish to connect, there are various ways you could connect the DVD/CD Receiver. Use one of the connections Depending connection using Y Pb Pr an jacks from the the corresponding in jacks on the cable (C).
Optional Equipment Connections 1. Connect a VCR to the AV IN connectors. 2. Connect a additional VCR to the AV2 connectors. 3. Connect an optical output of DVD Player (or Digital Device etc) to the OPTICAL IN connector. Aerial Connections Connect the supplied FM/AM aerial for listening to the radio. Loop aerial to the AM aerial connector. Connect the AM Connect the FM Wire aerial to the FM aerial connector.
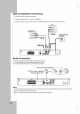
Assembling and Connecting the Speakers The front and rear speakers assemble the front and stands are as rear speaker speakers Connection Connect the the speaker Front speaker (Right) Connect the speaker terminals the bottom of each front and speaker.
Speaker Positioning In the of normal case position the 6 use speakers (2 If you want to play the excellent bass should connect a subwoofer. subwoofer). ? ? Front speakers According to your listening position between speakers to 45 degree. Centre speaker speakers The centre ? and front set up the speakers are speakers ideally front speakers, centre speaker, 2 rear speakers and or Dolby Digital surround, you sound, DTS digital surround the for equal same distance. And height.
HDMI Connection If you have a HDMI TV monitor, you or to this DVD/CD Receiver using a 1. Connect the HDMI OUT Receiver to the HDMI TV or monitor 2. Set the TV's can connect it HDMI compatible TV HDMI HDMI cable. the DVD/CD jack on jack on a HDMI compatible (H). H source to HDMI to TV's Owner's (refer manual). 3. Press RESOLUTION resolution you wish to repeatedly change.
Mini Glossary for Audio Stream & Surround Mode Sound Mode You can one of the enjoy surround sound simply by selecting pre-programmed sound fields according to the program you want to listen to. Allows you to enjoy 5.1(or 6) discrete channels of high audio from DTS program sources such as DVD and compact discs, etc.bearing the trademark.
On-Screen You the use general playback status on the TV can be changed using the menu. on-screen display: Some items screen. To the display can Display Example: On-Screen Display during playing DVD Video Selection Method Items Title Number 1/3 b / B, Numbers ENTER 1. Press DISPLAY 2. Press v / V to select during playback. The selected item is Press b / B to 3. an highlighted. the change the number buttons if use inputting the title Chapter item.
Initial LANGUAGE Settings LANGUAGE By using the Setup menu, you can make various adjustments to items such as picture and sound. You can also set a language for the subtitles and the Setup menu, among other things. For details on each Setup menu item, see pages 16 to 19. To display Menu English Language Disc Audio Original Disc Subtitle Off Disc Menu Original and exit the Menu: Press SETUP to display the A second press of menu. SETUP will take you back to initial Move screen.
AUDIO Dynamic Range Each DVD disc has a variety of audio output options. options according to the Set the receiver's AUDIO type of audio system you use. Speaker Setup Select DRC On Vocal On Control (DRC) DVD-A With the DVD* 1 format, you can hear a program's soundtrack in the most accurate and realistic presentation possible, thanks to digital audio technology.
LOCK (Parental Password Control) You LOCK Rating Unlock Password New Country (Security Code) enter can 1. Select Password Code 2. Follow step "New" is Move Input Select Some movies contain that may not be suitable of these discs contain scenes Many parental control information that applies to the complete disc or to certain scenes on the disc. Movies and scenes are rated from 1 to 8, depending on the country. Some discs offer more suitable scenes as an If you 1. 2.
OTHERS DivX(R) The PBC, Auto Play, B.L.E. and DivX(R) VOD settings You can be changed. VOD DivX can display the DivX DRM (Digital Right Management) Registration code for your unit only. OTHERS PBC On Auto Off Play B.L.E. On DivX(R) VOD Select Select Move The Registration code is used for VOD (Video-OnDemand) service agent.
Operation Playing a DVD Video CD or General Features Note: PLAYBACK SETUP Turn 1. on ? the TV and select the video input Turn the on the audio input source source system (if applicable) and select otherwise, all operations described the remote control. Some features may also be available on the Setup menu. use connected to the DVD/CD Receiver. 2. Unless stated MOVING TO ANOTHER TITLE/GROUP connected to the DVD/CD Receiver.
Still Picture and Frame-by-Frame REPEAT Playback You play can a Press REPEAT Press PAUSE/STEP 1. the remote control during playback. Advance the picture frame-by-frame by pressing PAUSE/STEP repeatedly. To exit still motion 2. on repeat mode. DVD Video Discs mode, press PLAY. the current ? Title: current title. ? Off repeats the does not : When ? Track this ? All ? Off segments. ? ? PressSLOWSCAN-morM+during playback. ? The DVD/CD Receiver will enter SLOW mode. 2.
Special ZOOM Use to zoom the video enlarge Press ZOOM 1. image. during playback or still playback to activate the Zoom function. The square frame appears briefly in the right bottom of the picture. Each press of the ZOOM button changes the TV in the sequence: 100% size → 400% size 2. screen → 1600% size → fit mode screen → 100% size DVD Features CHECKING THE CONTENTS OF DVD DISCS: MENUS DVDs may offer menus that allow you to access special features.
DVD Audio Discs DVD Audio is success disc format building provide high quality, a new of DVD to Moving multi-channel audio for on Some DVD Audio discs divide content into different the uncompressed, experience in audio quality. A DVD Audio disc can be identified by the DVD audio logo on the disc jacket or on a new groups. Your player enables you to quickly access different groups during playback via the on-screen display. 1. Press DISPLAY 2. Press v/V to select the disc itself.
Playing Audio CD an or MP3/WMA Disc The DVD/CD Receiver recordings can play CD-ROM, CD-R, on MP3/WMA formatted CD-RW discs. or MP3 / WMA disc limited ? Audio CD Once you insert an audio CD a menu appears on the screen. Press v / V to select a track then press ? or ENTER and playback starts. ? 1/12 ? List Program ? Track1 Track2 Track3 Track4 Track5 Track6 Track7 Clear All Track8 ? - - File an names and must 1. Press v / V to select to 2. a Press v / V to select ENTER.
Audio CD and MP3 / WMA Disc REPEAT A-B Features 1. To 2. Press A-B PAUSE 1. Press PAUSE/STEP 2. To return to ENTER or repeatedly. press PAUSE/STEP 3. MOVING TO ANOTHER TRACK Press SKIP 1. (. or >) briefly during playback or to return to the beginning You play 3. track. can menu screen. 3D SURROUND To produce a 3D surround effect that simulates multi- channel audio from two stereo Press SKIP . twice previous To exit the sequence and return to normal play, press A-B again.
Programmed Playback The program function enables you to store your favorite tracks from any disc in the player memory. A program 1. 2. MP3/WMA Discs: or AUDIO CD MUSIC or menu appears. Press PROGRAM. The mark will appear to the right of the word "Program" on the right side of the menu screen. E Press PROGRAM again, to exit the Edit mode.
Viewing Using a JPEG Disc this DVD/CD Receiver you can view discs with JPEG files. 1. Insert disc and close the a appears on the TV tray. The PHOTO menu screen. ZOOM JPEG Use zoom (see page to enlarge 22) photo image. JPEG TO ROTATE PICTURE Press v / V PHOTO the picture during showing clockwise a picture to rotate the counter clockwise.
Maintenance and Service DVD VR format Disc Playing a This unit will play DVD-R/RW discs recorded using using the DVD-Video format that have been finalized a ? This unit will play DVD-RW discs recorded using Recording (VR) format. Insert a menu appears disc and close the on the TV When shipping save Do not ENTER and playback track then press PLAY or starts. Notes: played and display are Player made with CPRM data does not by DVD the "CHECK DISC".
Playing a DivX Movie Disc DivX disc as Using this DVD/CD Receiver you Insert 1. a appears disc and close the on the TV can play compatibility with this player is limited follows: DivX disc. ?A vailable resolution size of the DivX file is under tray. The MOVIE menu 720x576 screen. ? The file (W x name H) pixel. of the DivX subtitle is available by 56 characters.
Additional Features LAST SCENE MEMORY SYSTEM SELECT You must select the appropriate system mode for your system. If NO DISC appears in the display window, press and hold PAUSE/STEP on the front TV This receiver memorizes last that is viewed. The last scene from the last disc remains in memory the disc from the receiver or scene if you remove switch off the receiver. If you load a disc that has the scene memorized, the scene is automatically recalled.
5.1 Speaker Setup This to chapter includes important reference help you set your DVD/CD Receiver. information If you connected speakers to your DVD/CD Receiver, the Distance lets the speakers know how far setting Speaker Setup Make the Distance following settings for the built-in 5.1 channel the sound has to travel to reach your set listening point. This allows the sound from each speaker to reach the listener at the surround decoder. Press b / B to 1. Press SETUP. The 2.
the Radio Stations Presetting You preset can Before 50 stations for FM and AM make tuning, sure Preset radio stations in the DVD/CD Receiver's (MW). that you have turned down the volume. on the remote control until FM appears in the (MW) or AM on the display Press PRESET +/- 2. or on the front panel for about two seconds frequency indication starts to change, or repeatedly control to select the Press and hold TUNING (MW) FM appears in the window.
Sleep You can Timer XTS Setting set the DVD/CD Receiver to turn off automatically at a specified The SLEEP indicator and display sleep can enjoy the vivid stereophonic sound of the digital original source without any signal distortion. sleep time. Each time you press XTS during 2 channel mode, the setting changes in the following order. XTS-1→XTS-2→XTS-3→NORMAL... time appears in the window. Each time you press SLEEP the 2. You time. Press SLEEP to set the desired 1.
Language Codes Use this list to Disc input your desired language for the following initial settings: Audio, Disc Subtitle, Disc Menu.
Troubleshooting Check the following guide for the possible cause of a before problem contacting Correction Cause Symptom No power. ? The power cord is disconnected. ? The power is on, but the DVD/CD Receiver ? No disc is inserted. ? Plug the power cord wall outlet. Insert is ? picture. a disc. (Check securely into the that the DVD or, audio CD indicator in the DVD does not work. No service. The TV is not set to receive DVD signal ? Select the mode output. display lit.
Cause Symptom Radio stations cannot ? The antenna is Correction positioned or connected poorly. be tuned in. ? Connect the antenna ? Adjust securely. the antennas and connect an external antenna if necessary. ? ? The of the stations is too weak in with automatic signal strength (when tuning tuning). No stations have been preset or preset ?T ? une in the station Preset the stations manually. (page 32). stations have been cleared (when tuning by scanning preset stations).
Specifications Power Power Refer to main label Mass Genral External dimensions (W x H x D) conditions CD/ VD AM [MW] 54 x 350 mm 5°C to Laser Semiconductor Signal system Frequency response (audio) Signal-to-noise ratio (audio) Dynamic range (audio) Harmonic distortion (audio) Video input PAL 35°C, Operation More than 75 dB (1 kHz, NOP -6 (1 kHz, at 1W position) (20 kHz LPF) (p-p), 75 Ω, negative sync., RCA jack x 2 1.0 V (p-p), 75 Ω, negative sync., RCA jack x 1 (Y) 1.
P/N: 3834RH0135G