LH-T7652IA_JACSELA_ENG DVD RECEIVER OWNER'S MANUAL MODEL: LH-T7652IA (Main Unit: LH-T7652 Speakers: LHS-76IAS, LHS-76IAC, LHS-76IAW) R USB Before connecting up, operating or repairing this product, please read this instruction booklet carefully and completely.
CAUTION: The CAUTION apparatus should not be exposed to water splashing) and no objects filled with liquids, such should be placed on the apparatus. (dripping as or vases, CAUTION Most CAUTION: TO REDUCE THE RISK OF ELECTRIC SHOCK DO NOT REMOVE COVER a (OR BACK) appliances dedicated That NO USER-SERVICEABLE PARTS INSIDE is, recommend be they placed upon outlet circuit which powers only that no additional outlets or branch and has circuits. Check the PERSONNEL.
Introduction Maintenance and Service MaintenanceandService.................3 Beforeuse.............................4 FrontPanel/RearPanel...................5 RemoteControl.........................6 Installation and a chapter before service technician. HANDLING THE UNIT Setup TVConnections.........................7 Optional Equipment Refer to the information in this contacting Connections . . . . . . . . . . .8 When shipping AntennaConnections....................
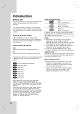
Introduction Before of Types use Playable Discs DVD To ensure proper use of this product, please read this owner's manual carefully and retain for future (8cm/12cmdisc) reference. Video CD This manual provides information on the (VCD) (8cm/12cmdisc) operation Audio CD and maintenance of your DVD/CD Receiver. Should the unit require service, contact an authorized service location.
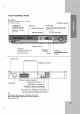
Front Panel/Rear Panel MIC 1/MIC 2 Connect 2 or a microphone to MIC 1 or MIC to both sockets. PHONES connector STANDBY/ON DISC Lights Press and hold down this button about 3 mode OPEN/CLOSE button red when the receiver is in Standby sensor port Connect to a USB MONO/ST./ port of memory TUNING(-/+) /SKIP(.bb/BB>) P./STEP memory device (USB to select VOLUME controller DISPLAY Window Remote a seconds, then press repeatedly other function. (off). USB Introducin FUNC.
AUX Selects DVD output To BAND Select the tuner System' s (FM and AM directly or MARKER Marks Displays Selects enjoy great an audio language (DVD) audio channel b/B/v/V Selects menu or Reverse/ Forward slow Displays the disc's Title VOLUME To Accesses Enter a (X) (B) frequency into the MUTE ZOOM SLEEP all Set the ly at a System to turn specified time. off automatical- DIMMER sequence. ECHO VOL.
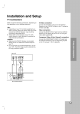
Installation and Setup TV Connections Make the of the one capabilities following connections, depending existing equipment. on of your S-Video connection Connect the S-VIDEO OUT Receiver to the S-VIDEO IN Tips: S-Video cable Depending on your TV and other equipment you wish to connect, there are various ways you could connect the DVD/CD Receiver. Use one of the jack on the DVD/CD jack on the TV using the (S).
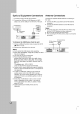
Connections Optional Equipment 1. Connect VCR to the AV IN connectors. a 2. Connect the USB player, etc.) port of USB to the USB port Connect the supplied FM/AM antenna for listening to the radio. MP3 Memory (or on Antenna Connections the front of the unit. Connect the AM Loop antenna to the AM antenna connector. Connect the FM Wire antenna to the FM antenna Rear of VCR Front of DVD/CD Receiver IN connector.
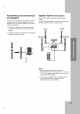
Assembling and Connecting the Speakers The front and speaker rear speakers detached from the stands. Connect the assemble the front and stands are as rear to speaker speakers cords and from speaker Speaker System Connection Connect the the supplied speaker To obtain the best possible surround sound, adjust speaker parameters (volume, distance, etc.). the illustrated. 1. Connect the terminals on speaker cords to the appropriate the bottom of each front and rear 2.
Displaying Disc Information Initial on-screen You can loaded 1. display various information about the disc on-screen. Press DISPLAY to show various playback information. The items 2. displayed differ depending playing status. type or You can change Title select an (Track) -- the disc By using the Setup menu, you can make various adjustments to items such as picture and sound. You can also set a language for the subtitles and the Setup menu, among other things.
DISPLAY Scan Progressive Progressive Scan Video provides pictures with less flickering. DISPLAY TV 16:9 Aspect Display Widescreen Mode Progressive highest quality If you are using the COMPONENT VIDEO OUT jacks, but are connecting the receiver to a standard (analog) Off Scan the television, set Progressive Scan to Off.
AUDIO 5.1 Each DVD disc has variety of audio output options. options according to the a Set the receiver's AUDIO type of audio system you use. Make the following settings 1. Press ENTER and 5.1 On Vocal On Front L Small Volume 0 dB Distance 0 m Test Move Off Select Select With the DVD* Control (DRC) format, you can 2. hear a program's 3. soundtrack in the most accurate and realistic presentation possible, thanks to digital audio technology.
LOCK Area Code (Parental Control) Enter the code of the LOCK Rating Unlock Password **** Area Code US whose standards area used to rate the DVD video disc, based on were the list on page 22. Select "Area Code" 1. on the LOCK menu then press B. Follow 2. Move step 2 as shown previous paragraph (Rating). Select Select the first character 3. Blocks of rated DVDs based playback content. Not all discs are 1.
Operation General features Buttons Z (OPEN X (PAUSE) / CLOSE) Opens (. closes the disc or During playback, Press X SKIP Discs Operations / >) tray. press X to pause repeatedly to playback. play Frame-by-Frame. During playback, press next chapter/track or to current chapter/track. SKIP Press SKIP . twice briefly (. to >) to go to the beginning of the or return to the step back to the previous chapter/track.
Notes general features: on If you press SKIP (>) Chapter (Track) playback, Last Scene once the during Repeat repeat playback This receiver memorizes last that is viewed. The last The A-B on some scene scene even if you remove switch off the receiver. If you load a disc that has the scene memorized, the scene is automatically recalled. DVDs. repeat function is available only in the current title.
Playing This unit an Audio CD play can Audio CDs or or MP3/WMA file MP3/WMA files The program function enables you to store your favorite tracks from any disc in the receiver memory. A recorded media. Once you insert CD, MP3/WMA files recorded media an a menu the TV on or 1. 2. 0:00:00 0:00:00 Select a track the on "List", then press PROG. or " additional tracks place 1/104 MP3 Program disc. (Add)" icon then press ENTER to place the selected track on the "Program" list.
Viewing This unit a JPEG file play discs with JPEG files. Before playing JPEG recordings, read the JPEG Recordings on right. 1. Zoom JPEG Each time press ZOOM the order. can Insert a menu on Zoom on Press v/B/M to disc and close the The PHOTO notes tray. appears the TV on setting change in the following y Zoom off enlage the video Press V/b/m to reduce the video screen. image. image.
Playing this DVD/CD Receiver you Using 1. DivX Movie file a Insert a appears disc and close the on the TV play can DivX disc DivX disc. tray. The MOVIE menu ? compatibility ? player is limited Available resolution size of the DivX file is under 800x600 screen. with this follows: as The file (W x name H) pixel. of the DivX subtitle is available MOVIE by 45 characters.
DVD Audio Discs DVD Audio is success disc format building provide high quality, a new of DVD to Moving multi-channel audio for on Some DVD Audio discs divide content into different the uncompressed, experience in audio quality. A DVD Audio disc can be identified by the DVD audio logo on the disc jacket or on a new groups. Your player enables you to quickly access different groups during playback via the on-screen display. 1. Press DISPLAY 2. Press 3/4 to select the disc itself.
the Radio Stations Presetting You can Before preset 50 stations for FM and AM make tuning, sure Listening Preset radio stations in the DVD/CD Receiver's (MW). that you have turned down the volume. AM (MW) on the Remote Control until FM appears in the or display Press and hold about two seconds until the starts to TUN.(-/+) for frequency indication Scanning stops a AM (MW) appears in the on the Remote preset station you want.
Timer Sleep You XTS/XTS pro Setting set the DVD/CD Receiver to turn off can at automatically specified a The SLEEP indicator and display sleep XTS ON window. The unique XTS ON When playing the movie with the relatively to the general music, it Note: check the time can remaining before the DVD/CD sense Receiver turns off. Press SLEEP. The display window. remaining of sound at woofer for you to satisfy with.
Language Codes Use this list to Disc input your desired language for the following initial settings: Audio, Disc Subtitle, Disc Menu.
Troubleshooting Check the following guide for the possible cause of a before problem contacting Correction Cause Symptom No power. ? The power cord is disconnected. ? The power is on, but the DVD/CD Receiver ? No disc is inserted. ? Plug the power cord wall outlet. Insert is ? picture. a disc. (Check securely into the that the DVD or, audio CD indicator in the DVD does not work. No service. The TV is not set to receive DVD signal ? Select the mode output. display lit.
Cause Symptom Radio stations cannot ? The antenna is Correction positioned or connected poorly. be tuned in. ? Connect the antenna ? Adjust securely. the antennas and connect an external antenna if necessary. ? ? The of the stations is too weak in with automatic signal strength (when tuning tuning). No stations have been preset or preset ?T ? une in the station Preset the stations manually. (page 20). stations have been cleared (when tuning by scanning preset stations).
Specifications Power Genral Refer to main label Net 3.9 kg 430 x External dimensions (W x H x D) conditions CD/ VD AM [MW] Amplifer mm 5°C to Laser Semiconductor Signal system Frequency response (audio) Signal-to-noise ratio (audio) Dynamic range (audio) Harmonic distortion (audio) Video input PAL 35°C, Operation 625/50, More than 75 dB (1 kHz, NOP -6 (1 kHz, at 1W position) (20 kHz LPF) (p-p), 75 Ω, negative sync., RCA jack x 2 1.0 V (p-p), 75 Ω, negative sync.
P/NO : 3834RT0005N