OWNER’S MANUAL 3D Blu-ray™ / DVD Home Cinema System Please read this manual carefully before operating your set and retain it for future reference. LHB655 (LHB655, S65T1-S, S65T1-C, S65T1-W) www.lg.com Copyright © 2015-2018 LG Electronics Inc. All Rights Reserved.
Getting Started Safety Information 1 CAUTION Getting Started RISK OF ELECTRIC SHOCK DO NOT OPEN CAUTION: TO REDUCE THE RISK OF ELECTRIC SHOCK DO NOT REMOVE COVER (OR BACK) NO USER-SERVICEABLE PARTS INSIDE REFER SERVICING TO QUALIFIED SERVICE PERSONNEL.
Getting Started This device is equipped with a portable battery or accumulator. Disposal of your old appliance 1. All electrical and electronic products should be disposed of separately from the municipal waste stream via designated collection facilities appointed by the government or the local authorities. 2. The correct disposal of your old appliance will help prevent potential negative consequences for the environment and human health. 3.
Getting Started Notes on copyrights 1 Getting Started yy Because AACS (Advanced Access Content System) is approved as content protection system for Blu-ray Disc format, similar to use of CSS (Content Scramble System) for DVD format, certain restrictions are imposed on playback, analog signal output, etc., of AACS protected content.
Getting Started 5 Important Notice for TV colour system The colour system of this player differs according to currently playing discs. Only the multi system colour TV can receive all signals output from the player. yy If you have a PAL colour system TV, you will see just distorted images when using discs or video contents recorded in NTSC. yy The multi system colour TV changes the colour system automatically according to input signals.
Table of Contents Table of Contents 1 Getting Started 2 8 8 9 9 9 10 11 11 Safety Information Introduction – Playable discs and symbols used in this manual – About the “7” symbol display – Regional code – System Select Remote Control Front Panel Rear Panel 2 Connecting 12 13 13 14 15 15 16 17 17 17 18 19 19 20 Positioning the System Speaker Connection – Attaching the speakers to the player Connecting to Your TV – What is SIMPLINK? – ARC (Audio Return Channel) function – Resolution setting Antenna
Table of Contents 48 48 48 48 48 49 49 51 52 53 – Listening to the radio – Presetting the radio stations – Deleting a saved station – Deleting all the saved stations – Improving poor FM reception Using BLUETOOTH® technology – Listening to music stored on the BLUETOOTH devices LG Sound Sync Using the Premium Enjoying with LG Multi-room Audio (LG Music Flow) 64 65 66 68 70 70 70 71 7 Area Code List Language Code List Trademarks and Licenses Specifications Maintenance – Handling the unit – Notes on discs I
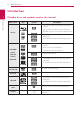
Getting Started Introduction 1 Playable discs and symbols used in this manual Getting Started Media/Term Logo Symbol e Description yy Discs such as movies that can be purchased or rented. yy “Blu-ray 3D” discs and “Blu-ray 3D ONLY” discs. yy BD-R/RE discs that are recorded in BDAV format. Blu-ray y u i r DVD-ROM yy BD-R/RE discs that contain Video, Audio or Photo files. yy ISO 9660+JOLIET, UDF and UDF Bridge format yy Discs such as movies that can be purchased or rented.
Getting Started ,,Note yy Depending on the recording software & the finalization, some recorded discs (CD-R/RW, DVD±R/RW, BD-R/RE) may not be playable. yy BD-R/RE, DVD±R/RW and CD-R/RW discs recorded using a personal computer or a DVD or CD Recorder may not play if the disc is damaged or dirty, or if there is dirt or condensation on the player’s lens.
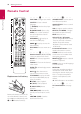
Getting Started Remote Control 1 FUNCTION Getting Started • • • • • • a • • • • • • • • • • • • c • • • • • • FUNCTION: Changes input mode. SPEAKER LEVEL: Sets the sound level of desired speaker. SUBTITLE: Selects a subtitle language. INFO/MENU 1 (POWER): Switches the player ON or OFF. B (OPEN/CLOSE): Ejects a disc. SLEEP: Sets a certain period of time after which the unit will switch to off. INFO/MENU (m): Displays or exits On-Screen Display.
Getting Started 11 Front Panel a c e a Disc Tray d MIC 1/2 b Display Window e USB Port c Operation buttons R (Open / Close) T (Play / Pause) I (Stop) F (Function) Changes the input source or function.
F A C G Connecting A A Positioning the System Connecting E A The following illustration shows an example of positioning the system. Note that the illustrations Ain these instructions differ from the actual unit for D explanation purposes. For the best possible surround sound, all the speakers other than the subwoofer should be placed at the same distance from the listening 2 position (A).
Connecting Speaker Connection Attaching the speakers to the player Connect the black stripe of each wire to the terminals marked -(minus) and the other end to the terminals marked + (plus). Connect a woofer cord to the player. When connecting a woofer cord to the player, insert the connector until it clicks. 2. In some cases, the wires need to be connected to the speakers.
Connecting Connecting to Your TV If you have a HDMI TV or monitor, you can connect it to this player using a HDMI cable (Type A, High speed HDMI™ cable with Ethernet). Connect the HDMI jack on the player to the HDMI jack on a HDMI compatible TV or monitor. ,,Note yy If a connected HDMI device does not accept the audio output of the player, the HDMI device’s audio sound may be distorted or may not output. yy When you use HDMI connection, you can change the resolution for the HDMI output.
Connecting What is SIMPLINK? Some functions of this unit are controlled by the TV’s remote control when this unit and LG TV’s with SIMPLINK are connected through HDMI connection. Controllable functions by LG TV’s remote control; Play, Pause, Scan, Skip, Stop, Power Off, etc. LG TV’s with SIMPLINK function has the logo as shown above. ,,Note Depending on the disc type or playing status, some SIMPLINK operation may differ from your purpose or not work.
Connecting Resolution setting The player provides several output resolutions for HDMI OUT jack. You can change the resolution using [Settings] menu. 1. Press HOME ( ). 2. Use A/D to select the [Settings] and press ENTER (b). The [Settings] menu appears. 2 3. Use W/S to select [DISPLAY] option then press D to move to the second level. Connecting 4. Use W/S to select the [Resolution] option then press ENTER (b) to move to the third level. 5.
Connecting Antenna Connection Connect the supplied antenna for listening to the radio. 17 Connections with External Device AUX connection You can enjoy the sound from an external component through the speakers of this system. Rear of the unit You can also use the F (Function) button on the front panel to select the input mode. Rear of the unit ,,Note Be sure to fully extend the FM wire antenna. Red White To the audio output jacks of your component (TV, VCR, etc.
Connecting OPTICAL IN connection You can enjoy the sound from your component with a digital optical connection through the speakers of this system. Connect the optical output jack of your component into the OPTICAL IN jack on the unit. And then select the [OPTICAL] option by pressing FUNCTION. Or press OPTICAL / TV SOUND to select directly. 2 You can also use the F (Function) button on the front panel to select the input mode.
Connecting Connecting to Your Home Network This player can be connected to a local area network (LAN) via the LAN port on the rear panel. By connecting the unit to a broadband home network, you have access to services such as software updates, BD-Live interactivity and online content services. Broadband service Router Using a wired network provides the best performance, because the attached devices connect directly to the network and are not subject to radio frequency interference.
Connecting 2 Wired network setup Advanced Setting If there is a DHCP server on the local area network (LAN) via wired connection, this player will automatically be allocated an IP address. After making the physical connection, a small number of home networks may require the player’s network setting to be adjusted. Adjust the [NETWORK] setting as follow. If you want to set the network settings manually, use W/S to select [Advanced Setting] on the [Network Setting] menu and press ENTER (b). 1.
Connecting Notes on network connection yy Many network connection problems during set up can often be fixed by re-setting the router or modem. After connecting the player to the home network, quickly power off and/ or disconnect the power cable of the home network router or cable modem. Then power on and/or connect the power cable again.
System Setting Initial Setup When you turn on the unit for the first time, the initial setup wizard appears on the screen. Set the display language and network settings on the initial setup wizard. 4. Select [Next] and press ENTER (b). 5. Press ENTER (b) to verify the test tone signals of the speakers. 1. Press 1 (POWER). The initial setup wizard appears on the screen. 2. Use W/S/A/D to select a display language and press ENTER (b).
System Setting 23 9. Displays the guide to enjoy online contents using LG AV Remote. Press ENTER (b). Settings Adjust the setup settings You can change the settings of the player in the [Settings] menu. 1. Press HOME ( ). 3. Use W/S to select the first setup option, and press D to move to the second level. 4. Use W/S to select a second setup option, and press ENTER (b) to move to the third level. 5. Use W/S to select a desired setting, and press ENTER (b) to confirm your selection. 3 System Setting 2.
System Setting [NETWORK] menu The [NETWORK] settings are needed to use the software update, BD-Live and online content services. [Country Setting] Connection Setting [Initialize] If your home network environment is ready to connect, the unit needs to be set up via wired connection for network communication. (See “Connecting to Your Home Network” on page 19.) Depending on the region, [Initialize] function may not be available.
System Setting 25 [DISPLAY] menu Resolution TV Aspect Ratio Sets the output resolution of the HDMI video signal. Refer to page 16 for details about the resolution setting. Select a TV aspect ratio option according to your TV type. [Auto] Select when a standard 4:3 TV is connected. Displays theatrical images with masking bars above and below the picture. If the HDMI OUT jack is connected to TVs providing display information (EDID), automatically selects the resolution best suited to the connected TV.
System Setting HDMI Color Setting [LANGUAGE] menu Select the type of output from the HDMI OUT jack. For this setting, please refer to the manuals of your display device. Display Menu [YCbCr] Select when connecting to a HDMI display device. [RGB] Select when connecting to a DVI display device. 3D Mode 3 System Setting Select the type of output mode for Blu-ray 3D disc playback. (This function is activated only when 3D TV is connected.
System Setting 27 [AUDIO] menu DRC (Dynamic Range Control) Each disc has a variety of audio output options. Set the player’s Audio options according to the type of audio system you use. This function allows you to listen to a movie at a lower volume without losing clarity of sound. ,,Note Since many factors affect the type of audio output, see “Audio Output Specifications” on page 63 for details.
System Setting Speaker Setup [LOCK] menu To obtain the best possible sound, use the speaker setup display to specify the volume of the speakers you have connected and their distance from your listening position. Use the test to adjust the volume of the speakers to the same level. The [LOCK] settings affect only Blu-ray Disc and DVD playback. To access the any features in [LOCK] settings, you must enter the 4-digit security code you have created.
System Setting 29 DVD Rating [OTHERS] menu Blocks playback of rated DVD based on their content. (Not all discs are rated.) Quick Start [Rating 1-8] Rating one (1) has the most restrictions and rating eight (8) is the least restrictive. [Unlock] If you select [Unlock], parental control is not active and the disc plays in full. Blu-ray Disc Rating Set an age limit of BD-ROM play. Use number buttons to input an age limit for BD-ROM viewing. All BD-ROM can be played.
System Setting TV Sound Connecting You can listen to TV sound through this unit’s speaker automatically when TV is turned on. Software [Information] Displays the current software version. [OSS Notice] LGE Open Source Software Notice is displayed. [Update] Press W to move and press A/D to select [On] or [Off ]. Select [Next] and press ENTER (b).
System Setting 31 Sound Effect You can select a suitable sound mode. Press SOUND EFFECT repeatedly until the desired mode appears on the front panel display or the TV screen. The displayed items for the equalizer maybe different depending on sound sources and effects. [Standard]: You can enjoy optimized sound. [Music]: You can enjoy comfortable and natural sound. [Cinema]: You can enjoy more immersive and cinematic surround sound. [Flat]: Provides balanced sound.
Operating Home Menu Display Using [HOME] menu The home menu appears when you press HOME ( ). Use W/S/A/D to select a category and press ENTER (b). a [Movie] - Plays video content. 4 b [Photo] - Plays photo content. Operating c [Music] - Plays audio content. d [Premium] - Displays the Premium home screen. (page 52) e [Input] - Changes input mode. f [Settings] - Adjusts the system settings.
Operating 33 Playing the Linked Devices Playing a disc erot 1. Press B (OPEN/CLOSE), and place a disc on the disc tray. 2. Press B (OPEN/CLOSE) to close the disc tray. For the most Audio CD, BD-ROM and DVD-ROM discs, playback starts automatically. 3. Press HOME ( ). 4. Select [Movie] or [Music], and select disc icon. ,,Note yy Depending on the BD-ROM titles, an USB device connection may be needed for the proper playback.
Operating Playing a file on disc/USB device yui This player can play video, audio and photo files contained in the disc or USB device. 1. Insert a data disc on the tray or connect an USB device. 5. Select a file using W/S/A/D, and press d(PLAY) or ENTER (b) to play the file. Notes on USB device yy This player supports USB flash drive/external HDD formatted in FAT32 and NTFS when accessing files (music, photo, movie). However, for BD-Live, use the USB flash drive / external HDD formatted in FAT32.
Operating 35 Playing a file on android device yui yy This unit can support only MTP (Media Transfer Protocol) Android (4.0 or later is recommended) devices. This player can play video, audio and photo files contained in the Android device. yy Do not extract the Android device during operation (play, etc.). 1. Connect the android device to the unit with USB cable. Make sure that MTP is activated on Android device. yy Video, audio and photo files can be played.
Operating Playing a file on a network server yui Using Home Network Server for PC This player can play video, audio and photo files located in a DLNA-compatible digital media server through your home network. Before connecting to PC to play a file, SmartShare PC software should be installed on your PC. 1. Check the network connection and settings (page 19). About SmartShare PC Software 2. Press HOME ( ). 3. Select [Movie], [Photo] or [Music] using A/D, and press S.
Operating 37 ,,Note yy SmartShare PC software is not supported with Mac OS. System requirements Minimum System yy The SmartShare PC software is a customized software edition only for sharing files and folders to this player. yy CPU : Intel® 2.0 GHz or AMD Sempron™ 2000+ processors yy This manual explains operations with the English version of SmartShare PC software as examples. Follow the explanation referring to the actual operations of your language version.
Operating General Playback Basic operations for photo content Basic operations for video and audio content To play a slide show To stop playback To stop a slide show Press Z (STOP) during playback. To pause playback Press M (PAUSE) during playback. Press d (PLAY) to resume playback. To play frame-by-frame (Video) Press M (PAUSE) during video playback. Press M (PAUSE) repeatedly to play Frame-by-Frame playback.
Operating 39 Resume playback eroyt u The unit records the point where you pressed the Z (STOP) depending on the disc. If “MZ (Resume Stop)” appears on the screen briefly, press d (PLAY) to resume playback (from the scene point). If you press Z (STOP) twice or unload the disc, “Z(Complete Stop)” appears on the screen. The unit will clear the stopped point. ,,Note yy The resume point may be cleared when a button is pressed (for example; 1 (POWER), B (OPEN/CLOSE), etc).
Operating On-Screen Display Displaying content information onscreen You can display and adjust various information and settings about the content. eroy To control video playback eroy 2. Select an [Option] using A/D, and press ENTER (b). 1. During playback, press INFO/MENU (m). You can control playback and set options while watching videos. During playback, press INFO/MENU (m). 4 Operating a Progress bar - Displays the current position and total playing time.
Operating ,,Note yy If no button is pressed for a few seconds, the on-screen display disappears. yy A title number cannot be selected on some discs. yy Available items may differ depending on discs or titles. 41 Setting the slide show option You can use various options during viewing a photo in full screen. 1. While viewing pictures, press INFO/MENU (m). 2. Select an [Option] using A/D, and press ENTER (b).
Operating Advanced Playback Repeating a specific portion eroy Repeat playback erotu y This player can repeat a portion you have selected. Blu-ray Disc / DVD / Video files During playback, press REPEAT (h) to select a desired repeat mode. A-B – Selected portion will be repeated continually. Chapter – The current chapter will be played back repeatedly. (BD / DVD only) Title – The current title will be played back repeatedly. All – All the titles or files will be played back repeatedly.
Operating 43 Selecting a subtitle language eroy 1. During playback, press INFO/MENU (m). 2. Select an [Option] using A/D, and press ENTER (b). Watching from a different angle er 3. Use W/S to select the [Subtitle] option. If the disc contains scenes recorded at different camera angles, you can change to a different camera angle during playback. 4. Use A/D to select desired subtitle language. 1. During playback, press INFO/MENU (m). By pressing ENTER (b), you can set various subtitle options. 2.
Operating Changing Subtitle Code Page y Changing the Picture Mode eroy If the subtitle is displayed in broken letter, you can change the subtitle code page to view the subtitle file properly. You can change the [Picture mode] option during playback. 1. During playback, press INFO/MENU (m). 2. Select an [Option] using A/D, and press ENTER (b). 2. Select an [Option] using A/D, and press ENTER (b). 3. Use W/S to select the [Code Page] option. 4. Use A/D to select desired code option. 1.
Operating 45 Viewing content information y Selecting a subtitle file y The player can display the content information. If the subtitle file name is different from the video file name, you need to select the subtitle file on the [Movie] menu before playing the movie. 1. Select a file using W/S/A/D. 2. Press INFO/MENU (m). The file information appears on the screen. During video playback, you can display the file information by pressing TITLE/POPUP. 1.
Operating Listening to music during slide show i You can display photo files while listening to audio files. 1. While viewing a photo in full screen, press INFO/ MENU (m) to display the option menu. 2. Select an [Option] using A/D, and press ENTER (b). 3. Use W/S to select [Music Select] option, and press ENTER (b) to display the [Music Select] menu. 4. Use W/S to select a device, and press ENTER (b). Available device may differ depending on the location of the current photo file.
Operating 47 Advanced Features Enjoying BD-Live™ e BD-ROM supporting BD-Live that has a network extension function allows you to enjoy more functions such as downloading new movie trailers by connecting this unit to the internet. 1. Check the network connection and settings (page 19). 2. Insert an USB storage device to the USB port on the front panel. An USB storage device is needed to download bonus content. 3. Press HOME ( ), and set the [BD-LIVE connection] option on the [Settings] menu (page 24). 4.
Operating Radio Operations Be sure that the antennas are connected. (Refer to the page 17) Listening to the radio 1. Press FUNCTION until TUNER (FM) appears in the display window. The last received station is tuned in. 4 Deleting a saved station 1. Press PRESET (- / +) to select a preset number you want to delete. 2. Press CLEAR, the preset number will blink in the display window. 3. Press CLEAR again, to delete the selected preset number. Deleting all the saved stations 2.
Operating 49 Using BLUETOOTH® technology About BLUETOOTH Bluetooth is wireless communication technology for short range connection. The sound may be interrupted when there is interference by the other electronic waves which run on same frequency or if you connect Bluetooth devices in the other rooms nearby. Connecting individual devices under Bluetooth wireless technology does not incur any charges.
Operating ,,Note yy When using Bluetooth technology, you have to make a connection between the unit and the Bluetooth device as close as possible and keep the distance. However it may not work well in the case below : -- There is a obstacle between the unit and the Bluetooth device. -- There is a device using same frequency with Bluetooth technology such as a medical equipment, a microwave or a wireless LAN device. yy You should connect your Bluetooth device to this unit again when you restart it.
Operating LG Sound Sync 51 1. Turn on the unit by pressing 1 (Power) on the remote control. 2. Select LG TV function by using FUNCTION on the remote control or F on the unit until the function is selected. You can control some functions of this unit by your TV’s remote control with LG Sound Sync. It is compatible with the LG TV that is supported LG Sound Sync. Make sure of the LG Sound Sync logo on your TV.
Operating Using the Premium You can use various content services via Internet with the Premium feature. 1. Check the network connection and settings (page 19). 2. Press HOME ( ). 3. Select the [Premium] using A/D, and press ENTER (b). 4. Select an online service using W/S/A/D, and press ENTER (b). 4 ,,Note Operating yy For detailed information of each service, contact to the content provider or visit support link of the service.
Operating 53 Enjoying with LG Multi-room Audio (LG Music Flow) ,,Note yy If you use this unit with MUSIC flow, at least one unit should be connected by LAN cable. For more detail for use with MUSIC flow, refer to the MUSIC flow’s user manual. tu yy It is recommended to connect up to 4 speakers for smooth playback. LG smart Hi-Fi audio system MUSIC flow allows you to enjoy music with the several speakers wirelessly. yy Signal interference may cause the playback to stop.
Troubleshooting Troubleshooting General Symptom Cause & Solution The unit does not work properly. yy Turn off the power of this unit and the connected external device (TV, Woofer, DVD-player, Amplifier, etc.) and turn it on again. yy Disconnect the power cord of this unit and the connected external device (TV, Woofer, DVD-player, Amplifier, etc.) and then try connecting again. yy Previous setting may not be saved when device power is shut off. The Power does not turned on.
Troubleshooting 55 Network Symptom Cause & Solution BD-Live feature does not work. yy The connected USB storage may not have enough space. Connect the USB storage with at least 1GB free space. yy Ensure that the unit is correctly connected to the local area network and can access the internet (page 19). yy Your broadband speed may not fast enough to use the BD-Live features. Contact your Internet Service Provider (ISP) and increase the broadband speed is recommended.
Troubleshooting Picture Symptom Cause & Solution There is no picture. yy Select the appropriate video input mode on the TV so the picture from the unit appears on the TV screen. yy Connect the video connection securely. yy Check the [HDMI Color Setting] in the [Settings] menu is set to the appropriate item that conforms to your video connection. yy Your TV may not support the resolution you have set on the player. Change the resolution that your TV accepts.
Appendix 57 Controlling a TV with the Supplied Remote Control You can control your TV using the buttons below. Setting up the remote to control your TV You can operate your TV with the supplied remote control. If your TV is listed in the table below, set the appropriate manufacturer code. 1. While holding down 1 (TV POWER) button, and press the manufacturer code for your TV with the numerical buttons (see the table below).
Appendix Network Software Update Network update notification From time to time, performance improvements and/or additional features or services may be made available to units that are connected to a broadband home network. If there is new software available and the unit is connected to a broadband home network, the player will inform you about the update as follows. Option 1: 1. The update menu will appear on the screen when you turn on the player. 2.
Appendix 59 4. If newer version exists, the message “A new update was found. The update takes a few minutes. Do you want to update?” appears. 5. Select [OK] to start update. (Selecting [Cancel] will end the update.) 6. The player starts downloading the newest update from the server. (Downloading will takes several minutes depending on your home network condition) 7. To update software the next time, the software update procedure has to be started from the beginning again.
Appendix Additional Information File requirement Video files File Location Disc, USB DLNA File Extension Audio Format Codec Format Subtitle “.avi”, “.mpg”, “.mpeg”, “.mkv”, “.mp4”, “.asf”, “.wmv”, “.m4v” (DRM free), “.vob”, “.3gp”, “.mov”, “.trp”, “.m2t”, “.mpe”, “.m1v”, “.m2v”, “.wm”, ”.flv”, “.ts”, “.dat” XVID, MPEG1 SS, H.264/ MPEG-4 AVC, MPEG2 PS, MPEG2 TS, VC-1 SM (WMV3) Dolby Digital, DTS, MP3, WMA, AAC, AC3 SubRip (.srt / .txt), SAMI (.smi), SubStation Alpha (.ssa/.txt), MicroDVD (.
Appendix ,,Note yy The file name is limited to 180 characters. yy Maximum files/Folder: Less than 2000 (total number of files and folders) yy Depending on the size and number of the files, it may take several minutes to read the content on the media. yy File compatibility may differ depending on the server. yy Because the compatibility on DLNA server are tested on the SmartShare environment, file requirements and playback functions may differ depending on media servers.
Appendix About DLNA Compatibility notes This Player is a DLNA Certified digital media player that can display and play video, photo and audio content from your DLNA-compatible digital media server (PC and Consumer Electronics). yy Because BD-ROM is a new format, certain disc, digital connection and other compatibility issues are possible. If you experience compatibility problems, please contact an authorized Customer Service Center.
Appendix 63 Audio Output Specifications Jack/Setting Source HDMI OUT PCM DTS Re-encode *3 Auto *1 *2 Dolby Digital PCM 5.1ch DTS Dolby Digital Dolby Digital Plus PCM 5.1ch DTS Dolby Digital Plus Dolby TrueHD PCM 5.1ch DTS Dolby TrueHD DTS PCM 5.1ch DTS DTS DTS-HD PCM 5.1ch DTS DTS-HD Linear PCM 2ch PCM 2ch DTS Linear PCM 2ch Linear PCM 5.1ch PCM 5.1ch DTS Linear PCM 5.1ch Linear PCM 7.1ch PCM 7.1ch DTS Linear PCM 7.
Appendix Area Code List Choose an area code from this list.
Appendix 65 Language Code List Use this list to input your desired language for the following initial settings: [Disc Audio], [Disc Subtitle] and [Disc Menu].
Appendix Trademarks and Licenses All other trademarks are trademarks of their respective owners. Blu-ray Disc™, Blu-ray™, Blu-ray 3D™, BD-Live™, BONUSVIEW™ and the logos are trademarks of the Blu-ray Disc Association. “DVD Logo” is a trademark of DVD Format/Logo Licensing Corporation. Java is a trademark of Oracle and/or its affiliates.
Appendix 67 Cinavia Notice This product uses Cinavia technology to limit the use of unauthorized copies of some commerciallyproduced film and videos and their soundtracks. When a prohibited use of an unauthorized copy is detected, a message will be displayed and playback or copying will be interrupted. More information about Cinavia technology is provided at the Cinavia Online Consumer Information Center at http://www.cinavia.com.
Appendix Specifications General Power requirements Power consumption Refer to main label. Refer to main label. Networked standby : 1.5 W (If all network ports are activated.) Dimensions (W x H x D) Approx. 360 mm x 60.5 mm x 299 mm Operating temperature 5 °C to 35 °C (41 °F to 95 °F) Operating humidity 5 % to 90 % Inputs/Outputs HDMI OUT (video/audio) 19 pin (Type A, HDMI™ Connector) x 1 ANALOG AUDIO IN 2.
Appendix 69 System Laser Semiconductor laser Wavelength 405 nm / 650 nm Signal system Standard NTSC/PAL color TV system Frequency response 20 Hz to 18 kHz (48 kHz, 96 kHz, 192 kHz sampling) Harmonic distortion Less than 0.05 % Dynamic range More than 80 dB LAN port Ethernet jack x 1, 10BASE-T / 100BASE-TX Bus Power Supply (USB) 5 V 0 500 mA Speakers Front Type 1 Way 1 speaker Max.
Appendix Maintenance Notes on discs Handling discs Handling the unit When shipping the unit Please save the original shipping carton and packing materials. If you need to ship the unit, for maximum protection, re-pack the unit as it was originally packed at the factory. Cleaning the unit To clean the player, use a soft, dry cloth. If the surfaces are extremely dirty, use a soft cloth lightly moistened with a mild detergent solution.
Appendix 71 Important Information relating to Network Services All information, data, documents, communications, downloads, files, text, images, photographs, graphics, videos, webcasts, publications, tools, resources, software, code, programs, applets, widgets, applications, products and other content (“Content”) and all services and offerings (“Services”) provided or made available by or through any third party (each a “Service Provider”) is the sole responsibility of the Service Provider from whom it or