INTROPA_LM-D6960A_ENG_MFL38637153 MINI HOME THEATER OWNER’S MANUAL MODEL : LM-D6960 LM-D6960A LMS-D6960V, LMS-D6960C LMS-D6960S, LMS-D6960W Please read this manual carefully before operating your set. Retain it for future reference. Designs and specifications are subject to change without notice for improvement.
Safety Precautions CAUTION RISK OF ELECTRIC SHOCK DO NOT OPEN WARNING: TO REDUCE THE RISK OF ELECTRIC SHOCK DO NOT REMOVE COVER (OR BACK) NO USER-SERVICEABLE PARTS INSIDE REFER SERVICING TO QUALIFIED SERVICE PERSONNEL. This lightning flash with arrowhead symbol within an equilateral triangle is intended to alert the user to the presence of uninsulated dangerous voltage within the product’s enclosure that may be of sufficient magnitude to constitute a risk of electric shock to persons.
Table of Contents Before Use Introduction . . . . . . . . . . . . . . . . . . . . . . . . . . . . . . . . . . . . . . . . . . . . . . . . . . . . . . . . . . . . . . . . . . . . . . . . . . . . . . . . . . . . . . . . . . . . . . . . . . . . . . . . . . . . . . . . . . . . . . . . . . . . . . . . . . . . . . . 2 3 3 4 5 DVD (8 cm / 12 cm disc) Connections . . . . . . . . . . . . . . . . . . . . . . . . . . . . . . . . . . . 6-9 Before Operation. . . . . . . . . . . . . . . . .
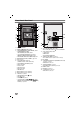
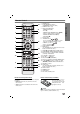
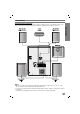
Front Panel/ Rear Panel 13 1 2 12 COMPONENT VIDEO OUT (PROGRESSIVE SCAN) Pr 14 3 4 Pb S-VIDEO OUT OPTICAL IN Y 11 18 10 5 6 7 AUX IN REAR R (8 ) REAR L (8 ) CENTER (8 ) WOOFER (3 ) FRONT R (4 ) FRONT L (4 ) 17 9 8 15 16 1. DISPLAY WINDOW 2. 3. POWER ( STANDBY/ON) button • PROGRAM/MEMORY (PROG./MEMO.) button • STEREO/MONO (ST./MO.), HIGH DUBBING (HI-DUBB.) button • CD SYNCHRO RECORDING (CD SYNC.), NORMAL DUBBING (NOR-DUBB.
Remote Control 1 TUNER/BAND DVD AUX 22 USB 1. 2. 3. 4. 2 SLEEP 21 DIMMER 3 20 4 5. 6. 1 - TAPE - 2 5 SETUP DISPLAY PRESET + 19 TUN. - TUN. + 6 7. 8. SELECT /ENTER 7 8 MENU 9 STOP PRESET PAUSE/STEP PLAY PROG./MEMO. SCAN REPEAT SKIP 10 TITLE 18 17 REPEAT A-B MARKER SEARCH EQ master XTS Pro XDSS plus VIRTUAL E.X SOUND AUDIO RETURN ZOOM S-TITLE CLEAR RDS PTY MUTE 15 12. 13. 14. 15. 16. 14 17. 18. 16 11 12 ECHO VOL. MIC VOL. 9. 10. 11. 13 19. 20. 21.
Connections Connecting to a TV • Make one of the following connections, depending on the capabilities of your existing equipment. ips • Depending on your TV and other equipment you wish to connect, there are various ways you could connect the unit. Use one of the connections described below. • Please refer to the manuals of your TV, VCR, Stereo System or other devices as necessary to make the best connections. Caution – Make sure the unit is connected directly to the TV.
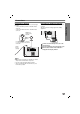
Connecting to Antenna Connecting to Auxiliary Equipment Connect the supplied FM/AM antennas for listening to the radio. - Connect the AM loop antenna to the AM antenna connector. - Connect the FM wire antenna to the FM antenna connector. You can use VCR or other unit connected to the AUX connector. This unit receives the analog signal from auxiliary equipment.
Connections Connecting to Optional Equipment Connecting USB You can use an optical output of a Digital Device to the OPTICAL IN connector. This unit receives the optical digital signal from optional equipment. OPTICAL OUT COMPONENT VIDEO OUT (PROGRESSIVE SCAN) Pr Pb S-VIDEO OUT Y OPTICAL IN USB Memory, MP3 Player (or Memory Card Reader, etc.
Connections Speaker System Connection PREPARATION Connect the speakers using the supplied speaker cables by matching the colors of the terminals and those of the cords. To obtain the best possible surround sound, adjust the speaker parameters (distance, level, etc.).
Before Operation Volume Adjustment XDSS (Extreme Dynamic Sound System) • Turn VOLUME knob clockwise to increase the sound level, or counterclockwise to decrease it. • Press VOLUME + to increase the sound level, or use VOLUME - to decrease it on the remote control. You can improve the sound quality during playback. Press XDSS plus repeatedly on the remote contol. DVD/VCD/DivX/CD NORMAL y XDSS ON MP3/WMA NORMAL → XDSS ON → MP3 - OPT ON MUTE Press MUTE to turn off the sound, press again to restore.
Setting the Clock Using Microphone 1 You can sing to a music source by connecting a microphone to the unit. Press CLOCK. (If the clock requires setting, press and hold CLOCK for more than 2 seconds.) - The hours display begins to blink. 2 pressing . bb/BBB > on the front panel. Select a 24 hour cycle or 12 hour cycle by (12HR) or (24HR) 1 “ ” will be shown in the display window. Play the music you want. 2 Sing along with the accompaniment. the microphone volume by turning MIC 3 Adjust VOLUME KNOB.
Before Operation Timer Function With the TIMER function you can have the radio reception, CD play, USB play and TAPE play turned on and off at the time desired. 1 Press CLOCK to check the current time. For your reference If you don’t set clock, timer function doesn’t work. tUSBtTAPE” flash in the 2 “TUNERtDVD/CD display window in turn. Press TIMER to enter the timer setting mode.
Before Operation Allows you to enjoy 5.1(or 6) discrete channels of high quality digital audio from DTS program sources such as discs, DVD and compact discs, etc.bearing the trademark. DTS Digital Surround delivers up to 6 channels of deemed audibly in distinguishable from the master (which means identical to the original masters) and results in exceptional clarity throughout a true 360 degree sound field. “Manufactured under license from Digital Theater Systems, Inc. US Pat. No’.
Before Operation Caution: Before using the remote control, press the DVD button to select the device to be operated. General Explanation This manual gives basic instructions for operating the unit. Some DVDs require specific operation or allow only limited operation during playback. When this occurs, the symbol appears on the TV screen, indicating that the operation is not permitted by the unit or is not available on the disc. On-Screen Display General playback status can be displayed on the TV screen.
Before Operation DISPLAY By using the Setup menu, you can make various adjustments to items such as picture and sound. You can also set a language for the subtitles and the Setup menu, among other things. For details on each Setup menu item, see pages 15 to 18. To display and exit the Menu: Press SETUP to display the menu. A second press of SETUP will take you back to initial screen. To go to the next level: Press on the remote control. To go back to the previous level: Press on the remote control.
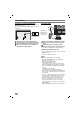
Before Operation Size Press / to set a mode. (Large, Small or None) • You cannot change the size of the front L/R speaker, which is set to “Large”. • The size of the Subwoofer can be selected to “Large” or “None”. • Since the size of the Center and Rear L/R speaker are fixed to “Small”, you can not change settings. AUDIO AUDIO 5.1 Speaker Setup Select DRC On Vocal On Move Select 5.1 Speaker Setup DVD Select speaker settings, including volume balance and distance, or test the speaker settings.
Before Operation Password (Security Code) LOCK (Parental Control) Rating Unlock Password **** Area Code RU AO Move 1 Select Password on the LOCK menu then press . 2 Follow step 2 as shown left (Rating). “Change” or “New” is highlighted. 3 Enter the new 4-digit code, then press SELECT/ENTER. Input it again to verify. 4 Press SETUP to exit the menu. Select Rating DVD Some movies contain scenes that may not be suitable for children to view.
Before Operation Operation with DVD and Video CD OTHERS Playing a DVD and Video CD OTHERS Playback Setup DVD PBC On DivX(R) Registration Select Move Select PBC VCD Set Playback Control (PBC) to On or Off. On:Video CDs with PBC are played according to the PBC. Off:Video CDs with PBC are played the same way as Audio CDs. DivX(R) Registration VCD • Turn on the TV and select the video input source connected to the unit.
Operation with DVD and Video CD Slow Motion ote Unless stated otherwise, all operations described use the remote control. Some features may also be available on the Setup menu. Moving to another TITLE DVD DivX When a disc has more than one title, you can move to another title. Press DISPLAY while playback is stopped then the appropriate number (0-9) or use / to move to another title. You can play any title by inputting its number while playback is stopped.
Operation with DVD and Video CD General Features (continued) To clear a Marked Scene 1 During disc playback, press SEARCH. Time Search DVD VCD DivX The Time Search function allows you to start playing at any chosen time on the disc. 1 Press DISPLAY during playback. The on-screen display appears on the screen. The Time Search box shows the elapsed playing time of the current disc. 2 Within 10 seconds, press / to select the Time Search icon in the on-screen display.
Operation with DVD and Video CD Operation with Audio CD and MP3/WMA Disc Special DVD Features (continued) Playing an Audio CD and MP3/WMA DVD DivX Press AUDIO repeatedly during playback to hear a different audio language or audio track. Changing the Audio Channel VCD Press AUDIO repeatedly during playback to hear a different audio channel (STER., LEFT or RIGHT). file CD MP3 WMA The unit can play audio CD and MP3/WMA. Audio CD Once you insert an audio CD a menu appears on the TV screen.
Programmed Playback Operation with Audio CD and MP3/WMA Disc Repeat Track/All/Off CD MP3 WMA You can play a title/chapter/all/track on a disc. 1 Press REPEAT when playing a disc. The repeat icon appears. 2 Press REPEAT to select a desired repeat mode. • Track: repeats the current track • All: repeats all the tracks on a disc. • Off (No display) : does not play repeatedly. CD MP3 WMA The Program function enables you to store your favorite tracks from any disc in the player memory.
Operation with JPEG Disc JPEG Slide Show JPEG This unit can play discs with JPEG files. Before playing JPEG recordings, read the notes on JPEG Recordings on right. Use / / / to highlight the then press SELECT/ENTER. 1 Moving to another File JPEG Insert a disc and close the tray. The PHOTO menu appears on the TV screen. (Slide Show) OPERATION Viewing a JPEG disc Press . or > once during viewing a picture to advance to the next file or to the previous file.
Operation with DivX Disc The unit can play the DivX files. 1 Insert a disc and close the tray. The DivX menu appears on the TV screen. 0:00:00 1 / 12 DivX disc compatibility with this player is limited as follows: • Available resolution size of the DivX file is under 720x576 (W x H) pixel. MOVIE List Movie Folder 1 Movie Folder 2 Movie Folder 3 Movie Folder 4 Movie Folder 5 Movie Folder 6 Movie Folder 7 • The file name of the DivX subtitle is available by 20-40 characters (differs from language).
Operation with RADIO Listening to the radio You can preset 50 stations for FM and AM. Before tuning, make sure that you have turned the volume down to the minimum level. 1 Press TUNER/BAND on the remote control to show either FM or AM in the display window. Or Press TUNER on the front panel. Every time you press this button, AM and FM changes alternately. 2 remote TUNING (-/+) on the front panel or control.
Operation with RADIO RDS Function : OPTIONAL Programme Search (PTY) : OPTIONAL About RDS : OPTIONAL A major benefit of RDS is its ability to encode broadcasts with Programme Type (PTY) codes that indicate the type of material being broadcast. The following list shows the abbreviations used to indicate each PTY along with an explanation of the PTY. This unit is equipped with RDS (Radio Data System), which brings a wide range of information from FM radio.
Basic Playback To Stop Play 1 Open cassette TAPE1-2 by pushing to the 2 PUSH EJECT position. one or two cassettes with the tape side to 3 Insert the bottom and then close the TAPE 1 (and/or 2) Press STOP( ) on the front panel or TAPE STOP( ) on the remote control during playback. Press TAPE1-2 (or TAPE) to select tape function. (“NO TAPE ” appears in the display window.) 4 To Play Rewind or Fast Forward door. BB > on the front panel or After press .
Troubleshooting Check the following guide for the possible cause of a problem before contacting service. Cause Symptom Correction No power. • The power cord is disconnected. • Plug the power cord into the wall outlet securely. The power is on, but the unit does not work. • No disc is inserted. • Insert a disc. (Check that the DVD or, audio CD indicator in the DVD display is lit.) No picture. • The TV is not set to receive DVD signal output.
Language Code List Language Abkhazian Afar Afrikaans Albanian Ameharic Arabic Armenian Assamese Azerbaijani Bashkir Basque Bengali; Bangla Bhutani Bihari Breton Bulgarian Burmese Byelorussian Cambodian Catalan Chinese Corsican Croatian Czech Danish Dutch English Esperanto Estonian Faroese Fiji Code 6566 6565 6570 8381 6577 6582 7289 6583 6590 6665 6985 6678 6890 6672 6682 6671 7789 6669 7577 6765 9072 6779 7282 6783 6865 7876 6978 6979 6984 7079 7074 Language Finnish French Galician Georgian German Greek
Specifications General Power supply Power consumption Net Weight External dimensions (W x H x D) Refer to the main label. 90 W 6.5 kg 272 X 322 X 354 mm Tuner/Amplifier FM Tuning Range Intermediate Frequency Signal to Noise Ratio Frequency Response AM Tuning Range Intermediate Frequency Signal to Noise Ratio Frequency Response Output Power T.H.D Frequency Response Signal-to-noise ratio 87.5 - 108.0 MHz or 65 -74 MHz, 87.5 -108.0 MHz 10.