LGECM_LM-K5540A_ENG_67C DVD MINI KARAOKE SYSTEM OWNER'S MANUAL MODEL : LM-K5540 LM-K5540A/D/X, LMS-K5540V, LMS-K5540C, LMS-K5540S R Please read this manual carefully before operating your set. Retain it for future reference. Designs and notice for specifications improvement.
Safety Precautions CAUTION RISK OF ELECTRIC SHOCK DO NOT OPEN WARNING: TO REDUCE THE RISK OF ELECTRIC SHOCK DO NOT REMOVE COVER (OR BACK) NO USER-SERVICEABLE PARTS INSIDE REFER SERVICING TO QUALIFIED SERVICE PERSONNEL. This lightning flash equilateral triangle with arrowhead symbol is intended to alert the within user an to the presence of uninsulated dangerous voltage within the product's enclosure that may be of sufficient magnitude to constitute a risk of electric shock to persons.
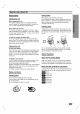
Table of Contents SafetyPrecautions...............................2 .28-30 OperationwithDVDandVideoCD. PlayingaDVDandVideoCD....................28 TableofContents................................3 GeneralFeatures..........................28-29 BeforeUse...................................4-5 PlayableDiscs................................4 MovingtoanotherTITLE....................28 .28 MovingtoanotherCHAPTER/TRACK. Precautions..................................5 Search.................................
Before Use Playable Discs ote When DVD (8cm/12cmdisc) Video CD (VCD) (8cm/12cmdisc) Audio CD (8cm/12cmdisc) addition, this unit can play a DVD±R, DVD±RW, SVCD, and CD-R or CD-RW that contains audio titles, MP3, WMA, JPEG or DivX files. on DTS-encoded CDs CDs, excessive audio level may be heard from the analog stereo output.
Before Use (Cont'd) After the unit Handling When shipping the unit The original shipping carton and packing materials come in handy. For maximum protection, re-pack the unit as it was originally packed at the factory. When setting up the unit The picture and sound of a nearby TV, VCR, or radio may be distorted during playback. In this case, position the unit away from the TV, VCR, unit after removing the disc.
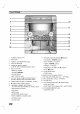
Front Panel 1 2 18 3 17 4 5 16 6 15 78 14 13 9 12 10 11 1. NUMERIC buttons 2. DISC TRAY 3. POWER 4. 5. (0~9) ? RECORD/ RECORD PAUSE ? CD SEARCH ? AUTO TUNING DISPLAY WINDOW ? TEMPO FUNCTION SELECT buttons ? PRESET ? REVERSE PLAY ? STOP ? PLAY MODE button ? DEMO button ( STANDBY/ON) (TUNER, TAPE, KARAOKE 11. button DVD/CD, AUX) MULTI JOG DIAL 6. ? ? ? ? MANUAL TUNING CD SKIP 12. (.
Rear Panel INTRODUC 1 8 2 7 SUB WOOFER 3 CENTR 4 REAR REAR FRONT FRONT L 6 R L R 5 1. COMPONENT VIDEO OUT/ PROGRESSIVE SCAN (Y Pb Pr) Jack 2. VIDEO OUT Jack 3. ? S-VIDEO OUT Jack ? OPTICAL OUT Jack 4. VOLTAGE SELECTOR 5. POWER CORD 6. SPEAKER Connector 7. ? AUXILIARY INPUT Sockets ? SUB WOOFER Connector 8.
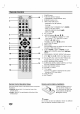
Remote Control POWER MUTE 19 1 DVD/ KARAOKE TUNER/BAND 1. POWER button 2. FUNCTION SELECT buttons 3. (TUNER/BAND, DVD/KARAOKE, AUX) NUMERIC buttons (0-9) 4. TAPE FUNCTION buttons AUX 2 - - 3 - - - - 4 1-TAPE-2 SET UP PRESET TUN. TUN. /ENTER 7 MENU 89 TAPE STOP PROG./MEMO. ARROW buttons use menu PRESET ( ? TUNING (-/+) [TUN. ( 16 10 STOP # PLAY PAUSE/STEP D.SKIP 11 15 EQ OAO a selection / MENU button )] on screen.
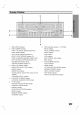
Display Window 2 1 1 3 7 4 6 5 1. LEVEL METER indicator 2. ? 3. ? RDS Data DISC NUMBER indicator ? MUTE indicator ? DISC TYPE indicator ? ? PLAY/ PAUSE indicator ? LEFT FRONT SPEAKER indicator ? RIGHT FRONT SPEAKER indicator ? RIGHT SURROUND SPEAKER indicator ? LEFT SURROUND SPEAKER indicator ? SUB WOOFER indicator ? CENTER SPEAKER indicator ? DISC TYPE indicator ? SURROUND ? ANGLE indicator 6. (MP3/DVD/CD/VCD) (L) (R) 5.
Connections Connecting Make the to a TV of the following connections, depending capabilities of your existing equipment. one ips Depending on Progressive Scan (ColorStream If your television is your TV and other equipment you wish to connect, there are various ways you could connect the unit. Use one of the connections described below. best connections.
Connections Connecting to Antenna Connect the - - Connect supplied FM/AM antennas for listening to the radio. the AM loop antenna to the AM antenna connector. Connect the FM wire antenna to the FM antenna connector. PREATION otes To prevent noise pickup, keep the AM loop Be sure After antenna away from the unit and other fully extend the FM wire antenna. connecting the FM wire antenna, keep it component. to as horizontal as possible.
Connections Connecting You 1 2 to can use VCR Connect a or VCR Auxiliary Equipment other unit connected to the AUX connector. or auxiliary device, Select AUX function pressing etc to the AUX connector. the AUX button on the unit or the remote control.
Connections Speaker System Connection Connect the cords. To speakers using the supplied speaker cords by matching the colors of the terminals and those obtain the best possible surround sound, adjust the speaker parameters (distance, level, etc.). of the PREATION If you feel lack of bass frequency Connect an active sub woofer to the SUB WOOFER OUT using a monaural cord (not supplied).
Connections Speaker Positioning In the of normal case position use the 6 speakers (2 front speakers, center speaker, 2 rear speakers and sub- woofer). If you want to ? ? play the excellent bass sound or Dolby Digital surround, you should connect a subwoofer. Front speakers According to your listening position set up interval between speakers to 45 degree. Center the speakers for equal distance.
Before Volume ? SURROUND Adjustment Turn VOLUME knob clockwise to increase the sound level, ? Operation or You counterclockwise to decrease it. Press VOLUME VOLUME + to increase the sound to decrease it - on To activate surround mode level, or use choose can one Press SURROUND SURROUND ON the remote control. between 2 fixed sound (SURR.) impressions. button. SURROUND OFF ote MUTE This function is only available to the "BYPASS" sound mode. Press MUTE to turn off the restore.
Before Setting Operation the Clock Using Microphone You 1 Press CLOCK. requires setting, press and for more than 2 seconds.) The hours display begins to blink. (If the clock hold CLOCK - Select either the 12 hour 2. cycle by turning (12HR) cycle or the 24 hour (24HR) " Play source by connecting microphone will be shown in the a OPTIONAL a to the MIC socket. display window. music you want. Sing along with the accompaniment.
Before Operation Timer Function With the TIMER function you can have the radio reception and recording, CD or tape playing turned on and off at the time desired. 1 Press CLOCK to check the current time. 2 Press setting mode. display window in turn. previous press and hold the 2 seconds. The - " 3 4 previous memorized TIMER TIMER button setting, memorized timer setting TIMER" indicators appear in the for more than Time and on display. Press SET when the desired function flashes.
Before Mini Operation Glossary for Audio Stream & Sound Mode Surround mode You DVD VCD CD enjoy surround sound simply by selecting one pre-programmed sound fields according to the can of the program you want to listen to. Allows you to enjoy 5.1(or 6) discrete channels of high quality digital audio from DTS program sources such as discs, DVD and compact discs, etc.bearing the trademark. When DVD is inserted DTS pressing the AUDIO button on the remote control during playback.
Before Operation 3 Caution: Before the remote using control, press the KARAOKE DVD/CD button to select the device to be General This manual operated. or gives basic instructions for is not available playback 2 status Press on Temporary the Title A-B number). For some setting functions, setting. / Repeat title Repeat sequence play from this prohibited or can displayed on the TV changed on the menu.
Before Initial Operation LANGUAGE Settings the By using Setup can make various menu, you ments to items such as picture and sound. You set for the subtitles and the language among other things. a item, To see For details on can also menu, menu OSD English Disc Audio Original Disc Subtitle Off Disc Menu Original and exit the Menu: Press SETUP to display the menu. SETUP will take you back to initial To go to the next level: on on A second press of screen.
Before Operation DISPLAY Progressive Scan DVD DISPLAY TV 16:9 Aspect Display Mode Progressive Progressive Scan Video provides the highest quality pictures with less flickering. If you are using the Component Video jacks for connection to a TV or monitor that is compatible with a progressive scan signal, set Progressive Scan to On.
Before Operation AUDIO 5.1 Each DVD disc has Set the audio variety of audio output options. player's AUDIO options according to the type system you Speaker Setup DVD Select a of use. speaker settings, including volume balance and distance, or test the speaker settings. Speaker settings are only active on the Analog MultiChannel Output. AUDIO Dolby Digital Bitstream DTS Bitstream Make the MPEG PCM Sample Freq. 48 kHz 5.
Before Operation Volume Press OTHERS / adjust the output speaker. (-5dB 5dB) to level of the selected OTHERS ~ PBC On DivX(R) Registration Select Distance If you have connected speakers to your DVD Player, setting the Distance lets the speakers know how far the PREATION sound has to travel to reach your set listening point. This allows the sound from each speaker to reach the listener at the Press / time. same to the Distance of the selected adjust PBC speaker.
Before LOCK Operation Password (Parental Control) You LOCK Rating Unlock Password **** Code Country can 2 Follow control information certain scenes on step 2 on the LOCK shown left as menu then press (Rating). "Change" . or 3 highlighted. Enter the new 4-digit code, then press SELECT/ENTER. Input it again to verify. 4 Press SETUP to exit the that may not be suitable of these discs contain parental to the complete the disc. Movies and menu.
Operation with RADIO Presetting the radio stations You 50 stations for FM and AM. Before ume preset can sure Press TUNER/BAND 1 FM or AM in the Every time you press changes alternately. this the frequency 2 button, AM and FM on the front indication starts to panel change. front buttons (FF/GG) ) on the / panel or TUN. ( Scanning stops when the Manual 3 on the 4 a station. Tuning PROG./MEMO. on on the front panel or the remote control.
with RADIO Operation RDS Function Programme Search (PTY) OPTIONAL - A About RDS This unit is equipped with RDS (Radio Data System), which brings a wide range of information from FM radio. RDS is a system for transmitting station call signs or network information, a description of station programme type text message about the station or specifics of ability to encode broadcasts with Programme Type (PTY) codes that indicate the type of material being broadcast.
with TAPE Operation Basic Press TAPE1-2 1 2 3 To Playback " (or TAPE) ("NO TAPE Open cassette TAPE1-2 appears in the PUSH EJECT Insert to select one or Press tape function. to the STOP( ) Tape Counter position. panel or TAPE STOP( during playback. the front on the remote control on display window.) by pushing Stop Play ) Reset OPERATION Press COUNT. RESET two cassettes with the tape side the bottom and then close the TAPE 1 to (and/or 2) Playing during playback.
with DVD and Video CD Operation Playing General Features DVD and Video CD a Playback Setup Turn on the TV and select the video input ote source Unless stated connected to the unit. Audio the 1 2 system: Turn input on the audio use the remote control. Some features may also be available on the Setup menu. system and select connected to the unit. source otherwise, all operations described Press Z OPEN/CLOSE button to open the disc Moving tray.
Operation with DVD and Video CD General Features Still Picture and DVD To Frame-by-frame playback VCD playback. The player can on the remote control will PAUSE/STEP repeatedly on by 3 the remote " DVD Time Search the remote control during will enter SLOW mode. 2 Use the t or 1 Press DISPLAY display 3 To return to normal PLAY, press PLAY. playback in reverse is not applicable for Video CD.
Operation with DVD and Video CD General Features Zoom VCD2.0 DVD during playback or still playback discs: Menus to acti- vate the Zoom function. If you press ZOOM repeatedly, the increases up to four steps. magnification 100% size 400% size (screen size→ 1600% size 2 Use the / zoomed / fit mode) → 100% size → / fit (screen buttons to 800% appropriate the picture. 1 Press TITLE. function may not work for DVDs.
with Audio CD and MP3/WMA Disc Operation Playing Disc Audio CD and MP3/WMA an MP3 CD MP3 / WMA disc limited WMA ? The unit can play CD-ROM, CD-R, MP3/WMA formatted recordings on CD-RW discs. or compatibility with this player is follows: as within 32 48 kHz (MP3), Sampling frequency: within 24 48kHz (WMA) Bit rate: within 32 320kbps (MP3), 40 192kbps (WMA) The player cannot read an MP3/WMA file that has a file extension other than ".mp3" / ".wma".
with Audio CD and MP3/WMA Disc Operation Pause MP3 CD 1 Press PAUSE/STEP WMA during playback. 2 To return to press PLAY playback, PAUSE/STEP again. to another Track Moving Press . > or press MP3 CD WMA briefly during playback to go to the next track beginning of the current track. Press . twice or briefly to or to return to the step back to the previous track.
with JPEG Disc Operation Viewing This unit JPEG disc a Slide Show JPEG Use play discs with JPEG files. Before playing JPEG recordings, read the notes on JPEG Recordings on right. 1 can Insert / / to highlight the (Slide Show) then press SELECT/ENTER. Moving disc and close the tray. The JPEG menu appears on the TV / a screen. to another File Press PREV./NEXT . > or to advance to the next file picture during viewing a to the previous file.
Programmed Playback The MP3 CD WMA function enables you to store your favorite tracks from any disc in the A program can contain 300 tracks (Audio CD/MP3/WMA). 1 Program Insert disc.
with DivX Disc Operation The unit play the etc) and can .mpeg, .divx MPEG4 encoded files subtitle files (.avi, mpg, (.srt, .smi, .sub). Insert the MPEG4 encoded disc and close the 1 DivX disc as ? tray. The DivX menu appears the TV on The file (W x name of the DivX subtitle is available DIVX ? Movie Folder 1 (differs from If there is impossible code to may be displayed as " file, it Movie Folder 2 Movie Folder 4 Movie Folder 5 ? Movie Folder 6 Movie Folder 7 language).
Operation You can You can with KARAOKE play KARAOKE (singing along) with karaoke disc by connecting a microphone to the unit. enjoy KARAOKE with a stereo-recorded disc, even if it is a non-karaoke disc, by reducing the singer's Karaoke Basic 1 Karaoke Advanced Playback Check if the system is connected. (Refer to the page 10-14.) To 2 Turn the powers of TV (or Amplifier) and DVD Karaoke and enter to the video mode on TV.
Operation with KARAOKE the Reserving Karaoke MENU Songs When you want to make a reservation of next melody, you can enjoy the most 8 melodies reservation Preparation Without The main MENU appears 1 2 3 waiting. Press the NUMERIC buttons to melody number you want play mode. Melody number appears on Press MENU on the karaoke mode. Main MENU reserve Playback on (On the screen. the TV screen) OPERATION in the karaoke disc the TV screen. Press PROG./MEMO.
Operation with KARAOKE MUSIC LIST SINGER LIST 1 Select SINGER LIST and select the initial of the LOCAL SONG and POP SONG 1 Select MUSIC LIST the main by pressing on / the on menu. The LOCAL SONG and POP SONG shown / in the you want by pressing the SONG LIST and SINGER LIST menu, and press SELECT/ ENTER. singer the TV menu will be screen. A B D E F J L O 2 Select the , 2 Select LOCAL SONG POP SONG on the TV pressing / the by pressing and press SELECT/ ENTER.
with KARAOKE Operation RANDOM 1 5 Select RANDOM main / by pressing on the Select number you want press SELECT/ ENTER. with the Sing along / by pressing and accompaniment. menu. 6 7 Repeat step 4~5. Change the team of red team or blue team alternately. When reaching the targeted winning number, the "CONGRATULATION!" will be shown the on TV screen. It appears 2 Press SELECT/ENTER to as below. begin randomly.
Troubleshooting Check the following guide for the possible cause of before problem a contacting service. Cause Symptom Correction No power. ? The power cord is disconnected. ? Plug the power securely. The power is on, but the unit does not work. ? No disc is inserted. ? Insert a disc. (Check that the DVD or, audio CD indicator in the DVD display is lit.
Language Code Enter the appropriate (See page 20).
Country Code Enter the appropriate List code number for the initial setting "Country Code" (See page 24).
Specifications General Section Power Refer to the main label. supply consumption Power 230W Mass 11.5kg External dimensions (W x H x D) 273 x 326 359 x mm Tuner/Amplifier Section FM AM Tuning Range Intermediate Frequency Signal to Noise Ratio Frequency Response Tuning Range Intermediate Frequency Signal to Noise Ratio Frequency Response Output Power 87.5 108.0 MHz - 60/55 dB 60 522-1611kHzor530-1610kHzor530-1720kHz 450 kHz 35 dB 100 - 0.
P/NO : 3834RH0067C