ALMATY_LM-U1560/U1060/U560/U365/U360_ENG_MFL35767806 MINI HI-FI System OWNER’S MANUAL MODEL : LM-U1560 (LM-U1560A/D/X, LMS-U1560W, LMS-U1560) LM-U1060 (LM-U1060A/D/X, LMS-U1060) LM-U560 (LM-U560A/D/X, LMS-U560) LM-U365 (LM-U365A/D/X, LMS-U365) LM-U360 (LM-U360A/D/X, LMS-U360) Please read this manual carefully before operating your set. Retain it for future reference. Designs and specifications are subject to change without notice for improvement.
Safety Precautions CAUTION RISK OF ELECTRIC SHOCK DO NOT OPEN WARNING: TO REDUCE THE RISK OF ELECTRIC SHOCK DO NOT REMOVE COVER (OR BACK) NO USER-SERVICEABLE PARTS INSIDE REFER SERVICING TO QUALIFIED SERVICE PERSONNEL. This lightning flash with arrowhead symbol within an equilateral triangle is intended to alert the user to the presence of uninsulated dangerous voltage within the product’s enclosure that may be of sufficient magnitude to constitute a risk of electric shock to persons.
Table of Contents INTRODUCTION OPERATION Operation with RADIO . . . . . . . . . . . . . . . . . . . . . . . . 13 Table of Contents . . . . . . . . . . . . . . . . . . . . . . . . . . 3 Presetting the radio stations . . . . . . . . . . . . . . . . . . 13 Before Use. . . . . . . . . . . . . . Safety Precautions. . . . . . Notes on Discs . . . . . . . . Notes on Remote Control. Notes on Tapes . . . . . . . . Listening to the radio . . . . . . . . . . . . . . . . . . . . . . . . 13 . . . . . . . . . . .
Before Use Safety Precautions Notes on Remote Control Handling the unit Remote Control Operation Range When shipping the unit Point the remote control at the remote sensor and press the buttons. Distance: About 23 ft (7 m) from the front of the remote sensor. Angle: About 30° in each direction of the front of the remote sensor. The original shipping carton and packing materials come in handy. For maximum protection, re-pack the unit as it was originally packed at the factory.
Front Panel/Rear Panel LM-U1560 Model 2 3 4 5 INTRODUCTION 1 12 11 10 9 8 7 6 13 AUXIN WOOFER (3 ) FRONT R (4 ) FRONT L (4 ) 15 14 1. 4.
Remote Control 1. 2. DISP.MODE DIMMER 1 2 15 14 USB 3 FUNCTION 13 12 4 TUN.- 3. 4. 5. TUN.+ 6. 7. 5 6 11 7 8. 9. 10. 10 8 9 11. 12. 13. 14. 15. 6 POWER button DISPLAY (DISP.MODE) button DIMMER button PRESET/FOLDER ( / ) buttons CLOCK button CD FUNCTION buttons B/[]) button • PLAY/ PAUSE (B • CD STOP(x) button • CD SKIP/SEARCH (.m/M M>) buttons • (TUN.-/+) buttons -TUNER • REPEAT button DISC SKIP (D.
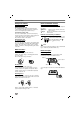
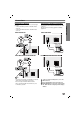
Connections Connecting to Auxiliary Equipment Connect the supplied FM/AM antennas for listening to the radio. - Connect the AM loop antenna to the AM antenna connector. - Connect the FM wire antenna to the FM antenna connector. You can use VCR or other unit connected to the AUX connector. This unit receives the analog signal from auxiliary equipment.
Connections Speaker System Connection Connect the speakers using the supplied speaker cables by matching the colors of the terminals and those of the cords. To obtain the best possible surround sound, adjust the speaker parameters (distance, level, etc.).
Audio Adjustment Setting the CLOCK 2 Select a 24 hour cycle or 12 hour cycle by turning MULTI JOG . (12HR) 3 4 5 6 7 8 or (24HR) Press SET/CD[] to confirm the selected hour cycle. Use MULTI JOG to set the correct hours. Press SET/CD[] Use MULTI JOG to set the correct minutes. Press SET/CD[] and the correct time is shown on the display. Press CLOCK at any time briefly to see the time.
Audio Adjustment Timer Function With the TIMER function you can have the radio reception, CD play, USB play and TAPE play turned on and off at the time desired. 1 7 Set the minute to switch on by turning MULTI JOG on the front panel. 8 Press SET/CD[[ to confirm the turn on min utes time. ‘OFF TIME’ indicator appears for about 0.5 seconds in the display window and then disappears. 9 10 11 12 13 14 Set the hour to switch off by turning MULTI JOG on the front panel. 15 Turn the system off.
Audio Adjustment XTS Pro You can choose 7 fixed sound impressions and adjust the BASS, MIDDLE and TREBLE. The unique sound quality of the LG Technology creates the optimum sound for you to play the prefect playback of the original sound and to feel the living sound source. Each time you press XTS Pro the setting changes in the following order. - You can select a desired sound mode by using EQ master button on the front panel (or EQ master on the remote control).
RDS Function - OPTIONAL About RDS Programme Search (PTY) This unit is equipped with RDS (Radio Data System), which brings a wide range of information from FM radio. RDS is a system for transmitting station call signs or network information, a description of station programme type text message about the station or specifics of musical selection and the correct time.
Operation with RADIO Listening to the radio You can preset 50 stations for FM and AM. Before tuning, make sure that you have turned down the volume to the minimum. 1 Press FUNCTION on the remote control to show either FM or AM in the display window. Or Press TUNER on the front panel. The last received station is tuned in. 2 Press PRESET UP/DOWN buttons (or PRESET/FOLDER ( / ) on the remote control) repeatedly to select the preset station you want.
Operation with TAPE Basic Playback To Stop Play Press TAPE1-2 (or TAPE) to select tape function. (“NO TAPE ” appears in the display window.) 1 Open cassette TAPE1-2 by pushing to the 2 ZPUSH EJECT position. one or two cassettes with the tape side to 3 Insert the bottom and then close the TAPE 1 (and/or 2) door. To Play Rewind or Fast Forward BB on the front panel or bb/B BB on After press bb/B the remote control during playback, press B(or b) at the tape position you want.
CD Playback To Search a Track 1 2 Press 1 STANDBY/ON to turn on the unit. Press the m / M buttons on the front panel, and then press once more at the point you want. (or hold the .m / M > buttons on the remote control during playback, then release at the point you want.) 3 Z OPEN/CLOSE) and Press CD OPEN/CLOSE (Z place the disc into the disc tray. The disc on the left (DISC 1) is played first. Press the CD button on the front panel to enter the CD mode.
CD Playback To Play tracks in random order To Program Play Press the RANDOM button the remote control during playback. The tracks on the CD will all play in random order. “ RANDOM ” will be shown in the EX) You can arrange the order of the tracks on the discs and create your own program. The program can contain up to 20 tracks. 5 00:20 display window. 1 Playing time indicator Press PROG.MEMO on the front panel or PROGRAM/MEMO on the remote control in the stop mode.
USB FUNCTION Compact Flash Card (CFC), Micro Drive (MD), Smart Media Card (SMC), Memory Stick (MS), Secure Digital Card (SD), Multi Media Card (MMC), Memory Stick Pro (MS-Pro) - Compatible with : FAT12,16,32 - Only use the memory cards recommended. Basic Playback 1 2 3. Plug the USB device into the USB connector of your unit. Press the USB button to enter the USB mode. “CHECKING” appears in the display window, and then the total number of files is displayed.
Troubleshooting Check the following guide for the possible cause of a problem before contacting service. Correction Cause Symptom No power. • The power cord is disconnected. • Plug the power cord into the wall outlet securely. No sound. • The audio cables are not connected securely. • Connect the audio cable into the jacks securely. • The power of the external source equipment is switched off. • Turn on the equipment connected with the audio cable. • The speaker cable is set to the wrong position.
Specifications [General] [CD] FM [Tuner] AM (MW) [Amp] [TAPE] MODEL LM-U1060 LM-U560 LM-U365 LM-U360 (SUB WOOFER) Power supply Power consumption Net Weight External dimensions (W x H x D) Frequency response Signal-to-noise ratio Dynamic range Tuning Range Intermediate Frequency Signal to Noise Ratio Frequency Response Tuning Range Intermediate Frequency Signal to Noise Ratio Frequency Response Output Power T.H.D Frequency Response Signal-to-noise ratio Tape Speed Wow Flutter F.
P/NO : MFL35767806