LM-U1560/U1060/U560/U360_ENG_146M MINI HI-FI System OWNER'S MANUAL MODEL : LM-U1560 (LM-U1560A/D/X, LMS-U1560W, LMS-U1560) LM-U1060 (LM-U1060A/D/X, LMS-U1060) LM-U560 (LM-U560A/D/X, LMS-U560) LM-U360 (LM-U360A/D/X, LMS-U360) Please read this manual carefully before operating your set. Retain it for future reference. Designs and notice for specifications improvement.
Precautions Safety CAUTION CAUTION Most RISK OF ELECTRIC SHOCK DO NOT OPEN appliances the Power Cord recommend they be placed upon circuit; That is, a single outlet circuit which powers only that appliance and has OF ELECTRIC SHOCK additional outlets no specification (OR BACK) branch circuits. Check the or page of this owner's manual to be certain. Do not overload wall outlets.
Table of Contents INTRODUCTION OPERATION SafetyPrecautions.........................2 OperationwithRADIO........................13 TableofContents..........................3 Presettingtheradiostations..................13 BeforeUse................................4 Listeningtotheradio........................13 SafetyPrecautions........................4 NotesonDiscs..........................4 NotesonRemoteControl...................4 NotesonTapes..........................4 OperationwithTAPE............
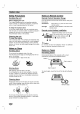
Before Use Precautions Safety shipping on Distance: volatile liquids, such remote as the unit. Do not leave rubber near contact with the unit for They will leave marks Cleaning insecticide spray, or long period a plastic products in Remote control of time. the unit soft cloth use a solution. Do not benzine, or use thinner, are a these as might damage alcohol, the surface rear two batteries with aligned correctly. Caution Do not mix old and new batteries.
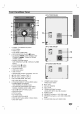
Front Panel/Rear Panel LM-U1560 Model 12 INTRODUC 11 1 10 2 3 9 8 4 AUXIN 13 WOOFER (3) FRONT R(4) FRONT L(4 ) 15 7 5 6 14 1. 2.
Remote Control 1. POWER button 2. DISPLAY 1 15 2 14 USB 3 3. PRESET/FOLDER 4. CLOCK button 5. FUNCTION 13 12 4 TUN.- TUN.+ ) / ( B /[]) PLAY/ PAUSE ? CD ? CD SKIP/SEARCH ? (TUN.-/+) ? REPEAT button STOP( x ) button button ( .m/M> ) buttons buttons -TUNER 7. TAPE FUNCTION buttons FORWARD PLAY ? REVERSE PLAY ? 8.
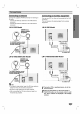
Connections Connecting Connect the to Antenna supplied Connecting FM/AM antennas for listening to the radio. loop antenna to the AM antenna connector. Connect the FM wire antenna to the FM antenna - can use VCR Auxiliary Equipment other unit connected to the AUX or connector. Connect the AM - You to This unit receives the from analog signal auxiliary PREATION equipment. connector.
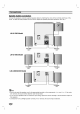
Connections Speaker System Connection Connect the speakers using the supplied speaker cables by matching the colors of the terminals and those possible surround sound, adjust the speaker parameters (distance, level, etc.). of the cords.
Audio Setting 1 Adjustment the CLOCK Press CLOCK. (If the clock - 2 The hours Select a turning When the requires setting, press more than 2 seconds.) begin to blink. CLOCK for 24 hour cycle MULTI JOG or and hold 12 hour To 1 cycle by or In the before the power is can see means SLEEP 180 →150 cycle. To check the 3 Use MULTI JOG to set the correct hours. → 30 → system → 20 →10 setting 120 →90→80→70 → OFF remaining (No display) → 60→ 50 →SLEEP 180...
Audio Adjustment Timer Function With the TIMER function you can have the radio reception, CD play, USB play and TAPE play turned on and off at the time desired. 1 Set the minute to switch 7 MULTI JOG Press TIMER to enter the timer 'OFF TIME' indicator appears for about 0.5 display window and then mode. setting "TUNERtCD tUSBtTAPE" flash in the disappears. display MULTI JOG the front on by turning panel.
Audio Adjustment EQUALIZER Effect You impressions and adjust BASS, MIDDLE and TREBLE. You - choose 7 fixed sound can the XTS Pro select can master button a on unique sound quality of the LG Technology creoptimum sound for you to play the prefect playback of the original sound and to feel the living ates the desired sound mode the front The by using EQ panel (or EQ master on the remote control). When you want to change a sound mode press EQ master button repeatedly within 3 seconds.
RDS Function - OPTIONAL About RDS Programme Search (PTY) This unit is A which casts with equipped with RDS (Radio Data System), brings a wide range of information from FM radio. RDS is a system for transmitting station call signs or network information, a description of station programme type text message about the station or specifics of ability to encode broadProgramme Type (PTY) codes that indicate type of material being broadcast.
Operation with RADIO Presetting the radio stations You 50 stations for FM and AM. Before can preset make Press FUNCTION Press TUNER or on on Select 2 show either FM Press TUNER display panel. the front this - - Scanning stops Manual when the unit tunes in on the front on PROGRAM/MEMO (or A station. control) briefly the front panel control) display window. preset number will flash in the buttons remote the front on PRESET/FOLDER (or control) .
with TAPE Operation Basic Press TAPE1-2 1 " (or TAPE) ("NO TAPE Open cassette TAPE1-2 2 ZPUSH Insert 3 To Playback to select appears in the EJECT one or tape STOP/CLEAR(x) on the front panel or TAPE STOP(x) on the remote control during playback. display window.) by pushing to the To position. two cassettes with the tape side the bottom and then close the TAPE 1 Stop Play Press function.
CD Playback Basic Playback 1 Press 1 2 To Search STANDBY/ON to turn Press the CD button on the front on the unit. panel to enter the CD mode. If no is displayed. disc is entered in the disc place ( Z OPEN/CLOSE) the disc into the disc The disc the left on Press the m / M buttons on the front panel, and then press once more at the point you want. (or hold the .m / M> buttons on the remote control you during playback, want.) (DISC 1) and tray.
CD To Playback tracks in random order To Program Play Press the RANDOM button the remote control You can during playback. create your Play The tracks the CD will all on " RANDOM EX) in random order. play arrange the order of the tracks own program. The program on the discs and can contain up to 20 tracks. " 00:20 5 will be shown in the Playing Press PROG.MEMO 1 window. display time indicator PROGRAM/MEMO on on the front panel or the remote control in the stop mode.
USB FUNCTION otes ? Don't remove a playing ? MP3 player Don't add the USB a the memory card when multi card reader. Numbers of file available ? Be ? ? memory card while or remove by using ? ? or the USB. sure to save are playing maximum 999 EA. file in the memory card after formatting. No cladding hard disc is supported. The MP3 player requiring installation of a drive is not supported. This unit can play USB device that contains MP3/WMA files.
Troubleshooting Check the following guide for the possible cause of a problem before service. contacting Correction Cause Symptom No power. ? No sound. ? The power cord is disconnected. ? Plug the power securely. The audio cables ? Connect the audio cable into the not connected are securely. The ? speaker to the wrong The unit does not start playback. jacks securely. The power of the external ment is switched off.
Specifications MODEL LM-U1560+LMS-U1560W SECTION FM [Tuner] AM Refer to the back panel of the unit. Power Refer to the back panel of the unit. Net 6.
P/NO : 3834RH0146M