
Installation Manual


Installation Manual 11
Installation
ENGLISH
Installation of Wired Remote Controller(Optional)
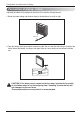
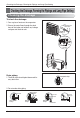
1. Please fix tightly using provided screw after placing remote controller setup board
on the place where you like to setup.
- Please set it up not to bend because poor setup could take place if setup board bends.
Please set up remote controller board fit to the reclamation box if there is a reclamation box.
- Install the product so as not to make a gap with the wall side and to prevent shaking after the installation.
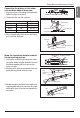
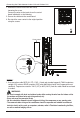
2. Can set up Wired remote controller cable into three directions.
- Setup direction: the surface of wall reclamation, upper, right
- If setting up remote controller cable into upper and right side, please set up after removing remote
controller cable guide groove.
h
Remove guide groove with long nose.
①
Reclamation to the surface of the wall
②
Upper part guide groove
③
Right part guide groove
Wall
Side
Wall
Side
Wall
Side
Wall
Side
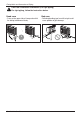
<Connecting order>
<Separating order>
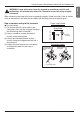
3. Please fix remote controller upper part into the
setup board attached to the surface of the wall,
as the picture below, and then, connect with
setup board by pressing lower part.
- Please connect not to make a gap at the remote controller
and setup boardʼs upper and lower, right and left part.
- Before assembly with the installation board, arrange the
Cable not to interfere with circuit parts.
When separating remote controller from setup
board, as the picture below, after inserting into the
lower separating hole using screw driver and then,
spinning clockwise, remote controller is separated.
- There are two separating holes. Please individually separate
one at a time.
- Please be careful not to damage the inside
components when separating.
1
2
3
2
3
<Wire guide grooves>