
Installation Sheet


– 4 –
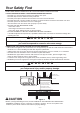
Parts, Tools, Materials
THE FOLLOWING PARTS ARE SUPPLIED WITH THE OVEN:
NOTE: Depending on your ventilation requirements, you may not use all of these parts.
Damper/duct connector
(for roof venting or wall venting installation)
Not Actual Size (2 pieces must be assembled as
shown) Not used if venting into kitchen.
One power cord clamp and
One dark-colored mounting screw
(to hold the power cord)
Actual Size
Two 1/4" x 3" toggle bolts - Actual Size
Two 1/4" x 3" bolts - Actual Size
Two tapping screws - Actual Size
(for attaching the damper duct connector)
One upper cabinet template- Not Actual Size
One rear wall template- Not Actual Size
(1 piece mounting plate only)
One power cord clamp bushing - Actual Size (for the cord hole in a metal upper cabinet)
NOTE: You need to install at least one lag screws into a 2" x 4" stud and three anchor bolts into the wall.
and the mounting area must meet the 150 lbs. weight requirement.
One mounting plate - Not Actual Size (for supporting the Microwave Oven )
WARNING - TO REDUCE THE RISK OF FIRE AND ELECTRIC SHOCK,
INSTALL AT LEAST 13-3/4 INCHES ABOVE A COOKTOP(OR RANGE)
SUITABLE FOR USE ABOVE GAS OR ELECTRIC
COOKING EQUIPMENT 36 INCHES OR LESS WIDE.
APTO PARA SU USO SOBRE EQUIPOS ELÉCTRICOS O
A GAS CON ANCHO DE 36 PULGADAS (90CM) O INFERIOR
ADVERTENCIA - PARA REDUCIR EL RIESGO DE INCENDIO Y DE DESCARGA ELÉCTRICA,
INSTALE AL MENOS A 13-3/4 PULGADAS (35CM) SOBRE LA VITROCERÁMICA (O FOGÓN)
(for drywall holes)
(for drywall holes)
Two 1/4" x 3" bolts - Actual Size
(for securing to the upper cabinet
)
1/4" x 2" lag screws - Actual Size
(for wall stud holes)
Two