Life's Good OWNER'S MANUAL MCR PLEASE E OVEN READ THiS OPERATING LMV1831 AND OWNER'S MANUAL KEEP iT HANDY THOROUGHLY FOR REFERENCE BEFORE AT ALL TIMES, _ IIIII I IIIII MFL06317608 www°lg.
Thank you for purchasing an LG microwave Please record the model number and serial number of this unit for future reference. We Model No: also suggest you record the details of your contact with LG (LG Electronics U.S.A., Inc.) concerning this unit. Dealer: oven. Serial No: Dealer Phone No: Customer Relations LG Electronics U.S.A., Inc. Service Division Bldg. #3 201 James Record Rd. Huntsville, AL 35824-0126 Staple your receipt here as proof of purchase.
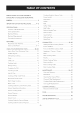
PRECAUTIONS Cooking TO AVOID POSSIBLE Timer EXPOSURE TO EXCESSIVE MICROWAVE SAFETY INSTRUCTIONS .............. 4-5 Cook ........................... 16 ........................................................... 17 Hold Warm ENERGY ...........................................................................2 IMPORTANT Guide for Sensor On/Off ................................................................ 17 Soften ...........................................................................
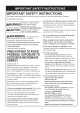
iMPORTANT SAFETY iNSTRUCTiONS The safety instructions below will tell you how to use your oven and avoid harm to yourself or damage to your oven. , Turn the fan on to disperse WARNING Hazards or unsafe practices that may result in severe personal injury or death. CAUTION Hazards or unsafe practices that may result in minor personal injury or property damage. ADMIMt'2_ ,,,,.,,,,,,,,,.,- Read all the instructions under the hood. Keep the area under the hood properly ventilated at all times.
= To avoid improperly cooking some foods. = Do not heat any types of baby bottles or baby food. Uneven heating may occur and possibly cause personal injury. = Do not heat small=necked containers, such as syrup bottles. = Do not deep=fat fry in your microwave oven. = Do not attempt home canning in your microwave = Install or locate this appliance only in accordance with the provided installation instructions. = This appliance should be serviced only by qualified service personnel.
LOCATION OF MODEL NUMBER GROUNDING iNSTRUCTiONS To request service information or replacement parts, the service center will require the complete model number of your microwave oven. The number is on the inside of the door frame as shown in the illustration below• MODEL NUMBER LABEL This appliance must be grounded.
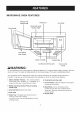
MICROWAVE OVEN FEATURES Window with Metal Shield Metal Rack Vent Grille Model and Serial Number Plate Door Handle i r"m J Door Safety \%== Lock System _ Glass Turntable I Coo i J Cooktop/Countertop Guide Grease Filter Light Oven Control Panel WARNING: Do not operate the oven when empty or without the glass tray. It is best to leave a glass of water in the oven when not in use. The water will safely absorb all microwave energy, if the oven is accidentally started.
OVEN CONTROL PANEL © © @ © © © © © @ © @ @ © © © -8-
1. Display. The Display includes a clock an indicators to tell you time of day, cooking time settings and cooking functions selected. 12. Cook Time. Press this button to set a cooking time. 13. Power Level. Press this button to select a 2. Reheat. Press this button to reheat a casserole, cooking power level. dinner plate, and soup/sauce. The oven's sensor will tell the oven how long to cook depending on the amount of humidity it detects from the food. 14. Add 30 Sec.
CLOCK LEARN ABOUT YOUR lVllCROWAVE OVEN This section discusses the concepts behind microwave cooking and introduces you to the basics you need to know to operate your microwave oven. Please read this information before using your oven. When the oven is first plugged in or after a power failure, the display will show ..... . If a time of day is not set, '.... will show on the display until you press "Clock". 1.
VENT HI/LOW/OFF COOKTOP LIGHT The button on the bottom left of the control panel controls the cooktop light. fo The vent removes steam and other vapors from the surface cooking area. Press Vent once for High fan speed, twice for Low fan speed, or three times to turn the fan off. 1. Press Light On/Off. Vent 0nl0ff To turn on, press once. "Light" will flash in display, then stay on. Press once. "Vent" will flash and "High" will show briefly in the display. 2. Press Light On/Off.
COOKING 8 3 AT HiGH COOK POWER 0 1. Enter the cook time. MULTI=STAGE COOKING For best results, some recipes call for different power levels during different stages of a cook cycle. You can program your oven to switch from one power to another for up to 2 stages. 3 stages can be programmed if the first stage is the defrost cycle. 2. Press START/Enter. When the cook time is over, you will hear four beeps and End wilt display. 3 0 0 1. Enter the first cooktime. 2. Press Cook Time.
COOKING GUIDE FOR LOWER POWER LEVELS The 10 power levels in addition to HIGH allow you to choose the best power level for the food you are cooking. Below are listed all the power levels, examples of foods best cooked at each level, and the amount of microwave power you are using.
SENSOR SENSOR OPERATING iNSTRUCTiONS Sensor Cook allows you to cook most of your favorite foods without selecting cooking times and power levels. The display will indicate the sensor category during the initial sensing period. The oven automatically determines the required cooking time for each food item. When the internal sensor detects a certain amount of humidity coming from the food, it will tell the oven how much longer to heat. The display will show the remaining heating time.
SENSOR SENSOR REHEAT COOK Using Cook lets you heat common microwaveprepared foods without needing to program times and Cook Powers. Sensor Cook has preset Power Levels for 13 food categories. See the details in the cooking guide table. Reheat lets you heat foods without needing to program times and Power Levels. Reheat has preset Power Levels for 6 categories. See the details in the cooking guide table. 1. Press Reheat. 1. Press Cook. 3 2. Press 3 to choose Casserole. 6 2. Press 6 to choose Rice.
COOKING GUIDE FOR SENSOR CATEGORY RECOMMENDED AMOUNTS POPCORN 1 DIRECTIONS Sensor Popcorn lets you pop commercially packaged microwave popcorn. Pop only one package at a time. For best results, use a fresh bag of popcorn. Place a bag of prepackaged microwave popcorn on the center of the glass tray. 2.0 - 3.5 oz.
TIMER ON/OFF SOFTEN You can use your microwave oven as a timer. Use the Timer for timing up to 99 minutes, 99 seconds. The oven uses tow power to soften foods (butter, ice cream, cream cheese, and frozen juice.) See the following table. Exa _!_To _ 2 2. Enter the time by using the number buttons. 2. Choose food amount. Press 2 to choose quart. 3. Press START/Enter. When the time is over, the oven will beep twice continuously until you press the Timer button. 3. Press START/Enter.
SOFTEN PRESS TIMES TABLE CATEGORY START TEMP. Butter Refrigerated Ice Cream Frozen DIRECTION Unwrap and place in a microwave safe dish on the rack over the glass tray. Butter wilt be at room temperature and ready for use in a recipe. AMOUNT 1, 2 or 3 sticks (4 oz./1 stick) Place in a microwave safe dish on the rack Cream Cheese Refrigerated Frozen Juice Frozen over the glass tray. Ice cream will be soft enough to make scooping easier.
DEFROST WEIGHT / TiME • Place foods in a shallow glass baking dish or a on a microwave roasting rack to catch drippings. Five defrost choices are preset in the oven. The Defrost feature provides you with the best defrosting method for frozen foods, because the oven automatically sets the defrosting times for each food item according to the weight you enter.
DEFROSTING TiPS METAL RACK • When using Defrost Weight/Time, the weight to be entered is the net weight in pounds and tenths of pounds (the weight of the food minus the container). CAUTION • Before starting, make sure you have removed any of the metal twist-ties which often come with frozen To avoid risk of property damage: ] Do not use the rack to pop popcorn. food bags, and replace them with strings or elastic bands. The rack must be on the four plastic supports when used.
GETTING THE BEST COOKING RESULTS . Turn over foods like pork chops, baking potatoes, roasts, or whole cauliflower halfway through the cooking time to expose all sides equally to microwave To get the best results energy. . Place delicate and follow from your microwave the guidelines oven, read below. . Storage Temperature: Foods taken from the freezer or refrigerator take longer to cook than the same foods at room temperature.
APPETIZERS/SAUCES/SOU Cooking Appetizers" Techniques PS MEAT Cooking Tips and , Prepare such as melba toast, shredded wheat and crisp rye crackers are best for microwave use. Wait until party time to add the spreads. Place a individual appetizers cooking. , Stir dips to distribute cooking time. - Cover the meat with waxed , Cook sauces made with cornstarch more during cooking , To adapt a conventional sauce or gravy recipe, reduce the amount of liquid slightly.
MEAT COOKING MEAT POWER LEVEL TABLE COOKING TiME DiRECTiONS BEEF Hamburgers, Fresh or defrosted (4 oz. each) 1 patty 2 patties 4 patties HI 1-11/2 minutes 11/2-2 minutes 21/2-31/2 minutes Sirloin tip roast (3-4 Ibs.) 8=10 minutes per pound RARE(135°F) 11-13 minutes per pound MEDtUM(155°F) LAMB 11-12 minutes per pound RARE(135°F) 12-13 minutes Lamb roast, rolled boneless per pound MEDiUM(145°F) 13-14 minutes (3-4 Ibs.
POULTRY Cooking Poultry: General Directions . Prepare the poultry for cooking. - Defrost completely. , The poultry is done when it is no longer pink and the juices run clear. When done, the temperature in the - Arrange poultry pieces with thicker pieces at the outside edge of the baking dish. When cooking legs, thigh meat should be 180-185°F. , Let the poultry stand covered with foil after cooking for 10 minutes. arrange them like the spokes of a wheel.
PASTA AND RICE Microwave cooking and conventional cooking of pasta, rice, and cereal require about the same amount of There is no stirring needed and leftover pasta tastes just like fresh cooked when reheated in the microwave oven. time, but the microwave is a more convenient method because you can cook and serve in the same dish. Cooking Pasta and Rice: Tips and Techniques . If you are planning to use rice or pasta in a casserole, undercook it so it is still firm. .
CARE AND CLEANING For best performance and safety, keep the oven clean inside and outside. Take special care to keep the inner door panel and the oven front frame free of food or grease build-up. 2. Soak grease filters in hot water and a mild detergent. Rinse welt and shake to dry. Do not use ammonia or place them in a dishwasher. The aluminum will darken. Never use abrasive powder or pads.
4. Open the door. OVEN LIGHT REPLACEMENT 5. Remove the 1. Unplug the oven or turn off power at the main power supply and wear gloves. 2. Remove the vent cover mounting screws. (2 outside screws) 3. Tip the cover forward, then lift out to remove. 6. Slide a new charcoal filter into place and close the door. The filter should rest at the angle shown. 7. Slide the bottom of the vent cover into place. Push the top until it snaps into place. Replace the mounting screws.
MICROWAVE UTENSIL GUIDE USE OVENPROOF GLASS (treated for high intensity heat): Utility dishes, loaf dishes, pie plates, cake plates, liquid measuring cups, casseroles and bowls without metallic trim. DO NOT USE METAL UTENSILS: Metal shields the food from microwave energy and produces uneven cooking. Also avoid metal skewers, thermometers or foil trays.Metal utensils can cause arcing, which can damage your microwave oven.
FREQUENTLY ASKED QUESTIONS Q. Can I use a rack in my microwave oven so that I may reheat or cook on two levels at a time? A. Only use the rack that is supplied with your rmicrowave poor cooking performance oven. Use of any other rack can result in and/or arcing and may damage your oven. Q. Can I use either metal or aluminum pans in my microwave oven? A.
BEFORE CALLING FOR SERVICE Check the following list to be sure a service call is really necessary. A quick review of this manual as well as the additional information in this checklist may prevent an unneeded service call. If nothing on the oven operates: • check for a blown circuit fuse or a tripped main circuit breaker. • check if oven is properly connected to electric circuit in house. • check that controls are set properly.
LG Electronics Inc. will repair or replace your product, at LG's option, if it proves to be defective in material or workmanship under normal use, during the warranty period set forth below, effective from the date of original consumer purchase of the product. This limited warranty is good only to the original purchaser of the product and effective only when used in the United States, including U.S. Territories.
Life's Good Printed in China