E OVEN OWNER'S MANUAL PLEASE READTHIS OWNER'S MANUAL THOROUGHLYBEFOREOPERATING. LMVM2085SB LMVM2085SW LMVM2085ST P/NO.
Thank you for purchasing Please record the model number and serial number of this unit for future reference. We also suggest you record the details of your contact with LG (LG Electronics U.S.A., Inc.) concerning this unit. a LG microwave oven. Model No: Serial No: Dealer: Dealer Phone No: Staple your receipt here for proof of purchase. Customer Relations LG Electronics U,S.A., inc. Service Division Bldg. #3 201 James Record Rd.
PRECAUTIONS TO AVOID POSSIBLE EXPOSURE TO EXCESSIVE MICROWAVE ENERGY ................................................................... 2 Defrost ................................................................ Quick Defrost ..................................................... Time Defrost ....................................................... 21 21 21 TABLE OF CONTENTS ............................................ 3 Defrost Tips ........................................................ Metal Rack ..
IMPORTANT SAFETY INSTRUCTIONS The safety instructions below will tell you how to use your oven and avoid harm to yourself or damage to your oven. ^_lk WARNING • Suitable for use above both gas and electric cooking equipment 36 inches wide or less. - To reduce the risk of burns, electric shock, fire, injury to persons, or exposure to excessive microwave energy. • Read all the instructions • Do not use this oven for commercial It is made for household use only. before using your oven. purposes.
• To avoid improperly cooking some foods. - Do not heat any types of baby bottles or baby food. Uneven heating may occur and possibly cause personal injury, - Do not heat small-necked containers, such as syrup bottles. - Do not deep-fat fry in your microwave oven. - Do not attempt home canning in your microwave oven.
Please read this owner's manual. It will tell you how to use all the fine features of this microwave oven. LOCATION OF MODEL NUMBER To request service information or replacement parts, the service center will require the complete model number of your microwave oven. The number is on the oven front as shown in the illustration below.
MICROWAVE OVEN FEATURES Door Handle Model and Serial Number Plate Cooking Guide Metal Rack Vent Grille IF _'_J_ IE _ Window with Metal Shield W/_- Control Glass Turntray GuideTray Panel Grease Filter Cooktop/Countertop Light Your microwave oven is designed to make your cooking experience as enjoyable and productive as possible. To get you up and running quickly, the following is a list of the oven's basic features: 6. Cooktop/Countertop Light 7. Control Panel.
INSTALLING GLASS TRAY 1. Glass Tray 1 3. Guide Tray 2. Ring 4. Rotating Shaft The glass tray moves in both direction and turns to help cook food more evenly. Do not operate the microwave oven without the glass tray in place. To Install: 1. Place the guide tray on the oven cavity bottom. The rollers on the shaft should fit inside the guide tray bottom groove.(see figure 1,2) 2. Place the rotating ring on the guide tray. (see figure 3) 3. Place the glass tray on the rotating ring.
INSTALLATION INSTRUCTIONS FOR GLASS TRAY To Install: 1. Place the guide tray on the oven cavity bottom The rollers on the shaft should fit inside the guide tray bottom groove. (see figure 1,2-1,2-2) 2. Place the rotating ring on the guide tray. (see figure 3) 3. Place the glass tray on the rotating ring. Fit the rollers of the shaft between the raised, hollowed groove of the glass tray bottom. The rollers on the rotating ring should fit inside the glass tray bottom ridge. (see figure 4-1,4-2) \ I Figure
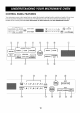
CONTROL PANEL FEATURES Your microwave oven control panel lets you select the desired cooking function quickly and easily. All you have to do is touch the necessary Command pad. The following is a list of all the Command and Number pads located on the control panel. For more information on these features, see the OPERATION section. L_ I c°o= l'°'°°=J ] POWER\ 6\ LEVEL 7 \8\ 9\ 0\ lO LESS V VENT Io.,o. _,-=,EE°_.
NOTE: Styling and features vaE/by model. 11. DEFROST: Touch this key to defrost food by entering weight, cook time or Quickly. 1. DISPLAY: The Display includes a clock and indicators Touch this key 2 times to Quick Defrost Cook. to tell you time of day, cooking time setting, and Touch this key 3 times to Time Defrost Cook. cooking functions selected. 12. CUSTOM SET: Touch this pad to change the oven's 2.
LEARN ABOUT YOUR MICROWAVE OVEN VENT FAN The fan moves steam and other vapors from the cooking surface. There are five speeds. This section discusses the concepts behind microwave cooking and introduces you to the basics you need to know to operate your microwave oven. Please read this information before using your oven. I ,_ CAUTION 1. Touch ON/OFF. This shows the last level until you select the fan speed level. I VENT 2. Touch 5-SPEED until LEVEL 4 appears in the display.
KIDS MEAL UsingKIDS MEAL letsyou heatcommon microwave-prepared foods without needingto programtimes and cook power. MAC & CHEESE, HOT DOG,CHICKEN NUGGETS. @ @ 1. Touch STOP/CLEAR. ( HOT DOG I 2. Touch HOT DOG, 2 3. Touch 2. 4. Touch START/ENTER. Touch Pad number 1 2 6 ozs. 2 ea 4 ozs. 12 ozs. 4 ea 8 ozs. EZ-ON A time-saving pad, this simplified control lets you quickly set and start microwave cooking without the need to touch the START/ENTER. 7 3 0 3. Enterthetime. @ 4, Touch START/ENTER.
CUSTOM SET MICROWAVE You can change the default values for beep sound, clock, display speed, and defrost weight. POWER LEVELS Your microwave oven has 10 cook power levels to let you cook or heat a wide variety of foods. See following chart for more information. No, Function 1 Beep ON/ OFF control 2 Clock display control 3 Display 4 Defrost weight mode selected No. Result 1 2 1 2 Sound ON Sound OFF Clock ON Clock OFF 1 2 3 1 2 Slow speed Normal speed Fast speed Lbs. Kg. 1.
COOKING GUIDE FOR LOWER POWER LEVELS The t0 power levels in addition to HIGH allow you to choose the best power level for the food you are cooking Below are listed all the power levels, examples of foods best cooked at each level, and the amount of microwave power you are using, POWER LEVEL 10 High MICROWAVE t 00% OUTPUT USE • Boil water. • Cook ground beef. • Make candy. • Cook fresh fruits and vegetables. • Cook fish and poultry. • Preheat browning dish. • Reheat beverages. • Bacon slices.
SENSOR OPERATING INSTRUCTIONS SENSOR POPCORN SENSOR POPCORN lets you pop 3.0 and 35 ounce bags of commercially packaged microwave popcorn. Pop only one package at a time. If you are using a microwave popcorn popper, follow manufactureCs instructions. Sensor Cook allows you to cook most of your favorite foods without selecting cooking times and power levels. The display will indicate sensor category during the initial sensing period.
SENSOR COOK SENSOR Using SENSOR COOK lets you heat common microwave-prepared foods without needing to program times and Cook Powers. SENSOR COOK has preset Cook Power for 7 food categories. Using SENSOR REHEAT lets you heat common microwave-prepared foods without needing to program times and Power levels. REHEAT I REHEAT I I COOK I 1.Touch REHEAT, 1,Touch COOK. 1 6 2. Choose food category. 2.
SENSOR COOK TABLE CATEGORY Baked Potato DIRECTION Pierce each potato with a fork and place on the oven tray around the edge, at least one inch apart. AMOUNT 1 - 4 medium approx. 8 -10 ozs. each Fresh Vegetable Prepare as desired, wash and leave residual water on the vegetables. Place in an appropriately sized microwave container. Add amount of water according to the quantity. (1-2cups : 2tablespoons, 3-4cups 4tablespoons) Cover with plastic wrap and vent.
SOFTEN MELT The oven uses low power to sotten foods (butter, ice cream, cream cheese, and frozen juice.) See the following table. The oven uses low power to melt foods (butter or margarine, chocolate, marshmallows, or processed cheese food.) See the following table, 1. Touch SOFTEN. _ MELT J 1. Touch MELT. 2 2. Choose food category. Touch 2 for ice cream, 2 2. Choose food category. Touch 2 for chocolate. 2 3. Choose food amount. Touch 2 for quart. 2 3. Choose food amount.
SOFTEN TABLE CATEGORY Butter DIRECTION Unwrap and place on the rack over the glass tray. Butter will be at room temperature Ice Cream AMOUNT 1,2, or 3 sticks and ready for use in recipe. Place on the rack over the glass tray. Pint, Quart, Half gallor Ice cream will be soft enough to make scooping easier. Cream cheese Unwrap and place on the rack over the glass tray. 3 or 8 ozs. Cream cheese will be at room temperature and ready for use in recipe. Frozen juice Remove top. Place in oven.
DEFROST DEFROST TABLE Four defrost choices are preset in the oven. The defrost feature provides you with the best defrosting method for frozen foods because the oven automatically sets the defrosting times for each food item according to the weight you enter. For added convenience, the DEFROST includes a built-in tone mechanism that reminds you to check, turn over, separate, or rearrange the food during the defrost cycle. Four different defrosting options are provided. Category MEAT 0.1 to 6.0 Ibs 1.
DEFROST TIPS METAL RACK • When using DEFROST, the weight to be entered is the net weight in pounds and tenths of pounds (the weight of the food minus the container). [ CAUTION • Use DEFROST only for raw food. DEFROST gives best results when food to be thawed is a minimum of 0°F To avoid risk of property damage: (taken directly from a true freezer).
GETTING THE BEST COOKING RESULTS • Let It Stand: After you remove the food from the microwave, cover food with foil or casserole lid and let it stand to finish cooking in the center and avoid overcooking the outer edges, The length of standing time depends on the density and surface area of the food. To get the best results from your microwave oven, read and follow the guidelines below.
APPETIZERS/SAUCES/SOU MEAT PS Cooking Appetizers: Tips and Techniques Recommended Cooking Meat: General Directions • Prepare the meat for cooking. • Crisp crackers, such as melba toast, shredded wheat, and crisp rye crackers are best for microwave use. Wait until party time to add the spreads. Place a paper towel under the crackers while they cook in the microwave oven to absorb extra moisture. - Defrost completely. • Arrange individual appetizers cooking.
MEAT COOKING TABLE MEAT POWER LEVEL BEEF HI COOKING TIME Hamburgers, Fresh or defrosted (4 ozs. each) 1 patty 2 patties 4 patties 1-11/2 minutes 11/2-2 minutes 21/2-31/2minutes 8-10 minutes Sirloin tip roast (3-4 Ibs.
CHICKEN • Watch the poultry as it cooks. - Drain and discard juices as they accumulate. - Shield thin or bony pieces with small strips of aluminum foil to prevent overcooking. Keep foil at least 1 inch from the oven walls and other pieces of foil. • Poultry is done when it is no longer pink and the juices run clear. When done, the temperature in the thigh meat should be 180-185°F. • Let the poultry stand after cooking covered with foil for 10 minutes.
PASTA AND RICE Cooking Pasta and Rice: Tips and Techniques • If you are planning to use rice or pasta in a casserole, undercook it so it is still firm. • Allow for standing time with rice, but not for pasta. • The Pasta and Rice Cooking Tables below provide specific directions, with Power Level and cooking time settings for most common types of pasta and rice.
CARING FOR YOUR MICROWAVE OVEN To make sure your microwave oven looks good and works well for a long time, you should maintain it properly. For proper care, please follow these instructions carefully. For interior surfaces: Wash often with warm, sudsy water and a sponge or soft cloth, Use only mild, nonabrasive soaps or a mild detergent. Be sure to keep the areas clean where the door and oven frame touch when closed. Wipe well with clean cloth.
METAL RACK Wash the metal rack with a mild soap and a soft or nylon scrub brush. Dry completely. Do not use abrasive scrubbers or cleaners to clean rack. CLEANING THE GREASE FILTER The grease filter should be removed and cleaned often at least once a month. 1. Unplug microwave oven or disconnect power. 2. To remove grease filter, slide filter to the back. Pull filter downward.The filter will drop out. 3. Soak grease filter in hot water and a mild detergent.
CHARCOAL FILTER REPLACEMENT I CAUTION COOKTOP/NIGHT REPLACEMENT I To avoid risk of personal injury or property damage, do not operate oven hood without filters in place. I LIGHT CAUTION I To avoid personal injury or property damage, wear gloves when replacing light bulb. 1. Unplug microwave oven or disconnect power.
MICROWAVE UTENSIL GUIDE USE DO NOT USE OVENPROOF GLASS (treated for high intensity heat): Utility dishes, loaf dishes, pie plates, cake plates, liquid measuring cups, casseroles, and bowls without metallic tdm. METAL UTENSILS: Metal shields the food from microwave energy and produces uneven cooking. Also avoid metal skewers, thermometers, or foil trays, Metal utensils can cause arcing, which can damage your microwave oven. CHINA: Bowls, cups, serving plates, and platters without metallic trim.
BEFORE CALLING FOR SERVICE Check the following list to be sure a service call is necessary may prevent an unneeded service call. PROBLEM Reviewing additional information on items to check POSSIBLE CAUSES if nothing on the oven operates • check for a blown circuit fuse or a tripped main circuit breaker. • check if oven is properly connected to the electric circuit in house. • check that controls are set properly. if the oven interior light does not work • the light bulb is loose or defective.
I WARNING I To avoid electrical shock which can cause severe personal injui_ or death, do not remove outer case at any time, only an authorized service technician should remove outer case. QUESTIONS AND ANSWERS QUESTION ANSWER Can I use a rack in my microwave oven so that I may reheat or cook in two rack positions at a time? Only use the rack that is supplied with your microwave oven. Use of any other rack can result in poor cooking performance and/or arcing and may damage your oven.
LG Electronics Inc. will repair or replace your product, at LG's option, i[ it proves to be defective in material or workmanship under normal use, during the warranty period set forth below, effective from the date of original consumer purchase or the product, This warranty is good only to the original purchaser of the product and ef[ective only when used in the United States, including U.S.Territories. WARRANTY HOW SERVICE IS HANDLED: PERIOD: Please call 1-800-243-0000 and choose the appropriate option.