Life's Good / _qV ",¢Z}.., ' t:_f ...... ,,<.>9V7 r'_,,_ _+_ _,.,)/""q L...... FRE CH DOOR REFRIGERATOR Please read this owner's manual thoroughly before operating and keep i1 handy for reference at all times.
TABLE OF CONTENTS TABLE OF CONTENTS 3 4 PRODUCT FEATURES IMPORTANT SAFETY INSTRUCTIONS 27 HOW TO USE 27 Before Use 28 Control Panel 28 - Control Panet Features 30 in-Door ice Bin 30 - Detaching the In-Door ice Bin - Assembling the In-Door ice Bin Automatic icemaker 7 COMPONENTS 30 31 7 Refrigerator Exterior 8 Refrigerator interior 31 32 - Turning the Automatic Icemaker On or Off - When You Should Turn the icemaker Off 32 - Normal Sounds You May Hear 32 - Preparing for Vac
PRODUCT PRODUCT FEATURES FEATURES * Depending on the model, some of the following FILTERED WATER functions may not be available. AND ICE DISPENSER The water dispenser dispenses fresh, chilled water. The ice dispenser dispenses cubed and crushed ice.
IMPORTANT SAFETY IMPORTANT INSTRUCTIONS SAFETY INSTRUCTIONS READ ALL INSTRUCTIONS BEFORE USING THE APPLIANCE. This guide contains many important safety messages. Always read and obey all safety messages. This is the safety alert symbol. It alerts you to safety messages that inform you of hazards that can kill or hurt you or others, or cause damage to the product. All safety messages will be preceded by the safety alert symbol and the hazard signal word WARNING or CAUTION.
IMPORTANT SAFETY INSTRUCTIONS 5 READ ALL INSTRUCTIONS BEFORE USING THE APPLIANCE. To reduce the risk of fire, electric shock, or personal injury when using your product, basic safety precautions should be followed, including the following: • This product is not to be used for special purposes such as the storage of medicine or test materials or for use on ships, etc.
IMPORTANT SAFETY INSTRUCTIONS READ ALL INSTRUCTIONS BEFORE USING THE APPLIANCE. To reduce the risk of fire, electric shock, or personal injury when using your product, basic safety precautions should be followed, including the following: Z_ CAUTION Installation • The refrigerator must be properly installed in accordance with the Installer Instructions taped to the front of the refrigerator. • Be careful when you unpack and install the refrigerator. packing materials out of reach of children.
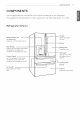
COMPONENTS 7 COMPONENTS Use this *The page to become appearance more familiar and specifications Refrigerator with the parts of the actual and features product of your may differ refrigerator. depending on the model. Exterior Handle Filtered Water and Ice Dispenser Dispenses purified water and ice. I the door. Opens and closes Button LED Display Displays the refrigerator and freezer temperature, the water filter condition and the dispenser status.
COMPONENTS Refrigerafor Inferior _ LED interior lamps The interior lamps light up the inside of the refrigerator. indoor The shelves in your refrigerator are adjustable djustable toRefrigerator meet your individual Shelf storage needs. --Door-In-Door Case The convenience of a "soft Cheese & Butter Bin Cheese & Butter and Condiment bins are specially designed for food that can be stored at a warmer temperature. This makes spreading butter and slicing cheese easier. Ice Bin automatically produced.
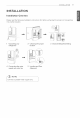
INSTALLATION 9 INSTALLATION Insfallafion Overview Please read the following it to another 1 installation instructions Unpacking your 2 refrigerator 4 Choosing the proper location Connecting supply first after purchasing this product or transporting location.
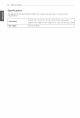
INSTALLATION Specificafions The appearance and specifications improvements. Dimensions Net weight listed in this manual may vary due to constant product _o_m (W) X 968 mm (D) X 1782 mm (H), 1221 mm (D w/door open) 35 3/4" (W) X 38 1/8" (D) X 70 1/4" (H), 48 1/8" (D w/door open) t [397 lb.
INSTALLATION Unpacking "_ Z_ Your Refrigerator Choosing the Proper 11 Location Select a place where a water supply can be easily connected for the automatic icemaker. WARNING Use two or more people to move and install the refrigerator. Failure to do so can result in back or other injury. ___) NOTE Your refrigerator is heavy. When moving the refrigerator for cleaning or service, be sure to protect the floor. Always pull the refrigerator straight out when moving it.
INSTALLATION Ambient Removing/Assembling Temperature Install this appliance in an area where the temperature is between 55°F (13°C) and 110°F (43°C). If the temperature around the appliance is too low or high, cooling ability may be adversely affected. Measuring the -__ Door Handles NOTE When it is necessary to move the refrigerator through a narrow opening, removing the doors is the recommendec procedure.
INSTALLATION 13 Removing/Assembling fhe Freezer Drawer Handle Removing/Assembling Doors and Drawers Removing When it is necessary to move the refrigerator through a narrow opening, removing the doors is the recommended procedure. 1 "the Handle Loosen the set screws Q located on the lower side of the handle with a 1/sin. Alien wrench and remove the handle.
INSTALLATION Removing the Left Refrigerat"or Door 3 Remove the cover and puff out the tube D. Disconnect all wire harnesses _. The water supply is connected to the upper right part of the rear surface of the refrigerator. Remove the ring in the joint area. Hold the water supply connection and gently push the Collet to detach the water supply line as shown in D 4 Rotate the hinge lever counterclockwise B. Lift the top hinge _ free of the hinge lever latch.
INSTALLATION Removing Door the Right Refrigerator 3 15 Rotate the hinge lever D clockwise. Lift the top hinge 8 free of the hinge lever latch. Remove the top hinge cover screw D. Lift the hook (not visible), located at the bottom of the front side of the cover _, with a flat-head screwdriver. Hinge Lever Latch D CAUTION "1 When lifting the hinge free of the hingeJ lever latch, be careful that the door 2 Detach the wire harness D. 4 Lift the door from the middle hinge pin and remove the door.
INSTALLATION Assembling Door fhe Right Refrigerator 3 Connect 4 Make sure that the door-switch the wire harness D. Install the right-side door first. 1 Make sure that the plastic sleeve is inserted in the bottom of the door. Lower the door onto the middle hinge pin as shown in the figure. located inside the cover is tightly connected. Position the cover in its place, insert and tighten the cover screw _. 2 Fit the hinge D over the hinge lever latch and slot it into place.
INSTALLATION Assembling Door "the Left Refrigerator 4 Push the water supply on the top case and pull it through tube into 17 the hole the backptate. Install the left refrigerator door after the right door is installed. 1 Make sure that the plastic sleeve is inserted in the bottom of the door. Install the refrigerator door onto the middle hinge. Hold the water gently push water supply suppty connection in the coiiet line as shown the tube at least connector. and to connect in B.
INSTALLATION ,-_(_]_ Removing NOTE the CusfomChiIP Drawer Pull the drawer open to full extension. Remove the basket by lifting the basket from the rail system. ) Gently insert the tube until only one line shows on the tube. _ NOTE (Correct) drawer, it must be disconnected from Before removing the CustomChill TM the temperature control. 2 Disconnect the wire harness connection at the end of the right rail by pressing on the tabs on either side.
INSTALLATION Assembling 1 fhe CusfomChilP Drawer Removing fhe Freezer 19 Drawer Grasp the door on each side and lower it "z_ into place on the rail system. CAUTION * Use two or more people to remove and install the freezer drawer. Failure to do so can result in back or other injury. * Do not hold the handle when removing or replacing the drawer. The handle may come off, causing personal injury. * Be careful of sharp hinges on both sides of the drawer.
3 INSTALLATION Remove the middle drawer by pulting the drawer out to full extension. Lift the front of the drawer up, then pull it straight out. 6 With both hands, grip both sides of the drawer and pull it up to remove it from the rails. Do not hold the handle when removing or replacing the drawer. The handle may come off and it could cause personal injury. 4 Remove the Durabase by opening the freezer drawer to full extension and lifting the basket off of the rail assembly.
INSTALLATION Assembling fhe Freezer Drawer 4 Insert the the top pullout drawer into the frame, and push the drawer back into place until you hear a click. With both hands, pull out each rail simultaneously until both rails are fully extended. Grasp the drawer on each side and hook the drawer supports into the rail tabs located on both sides. 5 Slightly tilt up the front of the middle drawer, insert the drawer into the frame, and push it back into place.
INSTALLATION Connecting Before the Wafer Line You Begin "_Z_ This water line installation is not covered by the refrigerator warranty. Follow these instructions carefully to minimize the risk of expensive water damage. Water hammer (water banging in the pipes) in house plumbing can cause damage to refrigerator parts and can lead to water leakage or flooding. Call a qualified plumber to correct water hammer before installing the water supply line to the refrigerator.
INSTALLATION • If your existing copper water line has a flared fitting at the end, you witl need an adapter (available at plumbing supply stores) to connect the water line to the refrigerator OR you can cut off the flared _Jf/f _'_ fitting with a tube cutter and then use a compression Water "Z_ fitting. Saddle-type shutoff valves are included in many water supply kits. Before purchasing, make sure a saddle-type valve complies with your local plumbing codes.
4 INSTALLATION 7 FASTEN THE SHUTOFF VALVE Fasten the shutoff valve to the cold water Place the compression nut and ferrule (sleeve) for the copper tubing onto the end of the tubing and connect it to the shutoff valve. Make sure the tubing is fully inserted into the valve. Tighten the compression nut securely. pipe with the pipe clamp.
INSTALLATION 10 TURN THE WATER ON ATTHE SHUTOFF Turning On The Power VALVE Tighten any connections I _ that leak. CAUTION Check tosee ifleaksoccur atthe water lineconnections. 1 1 PLUG IN THE REFRIGERATOR Arrange the coil of tubing so that it does not vibrate against the back of the refrigerator or against the wall. Push the refrigerator back to the wall. 12 START THE ICEMAKER Set the icemaker power switch to the ON position.
INSTALLATION Leveling and Door Alignmenf Leveling Door Alignment After installing, plug the refrigerator's power cord into a 3-prong grounded outlet and push the refrigerator into the final position. The left refrigerator door has an adjustable nut, located on the bottom hinge, to raise and lower the door for proper alignment. Your refrigerator has two front leveling legs-one on the right and one on the left. Adjust the legs to alter the titt from front-to-back or sideto-side.
HOWTO HOW Before USE 27 TO USE use Clean the refrigerator. Clean your refrigerator thoroughly and wipe off all dust that accumulated during shipping. F_ CAUTOON * Do not scratch the refrigerator with a sharp object or use a detergent that contains alcohol, a flammable liquid or an abrasive when removing any tape or adhesive from the refrigerator,. Do not peel off the model or serial number label or the technical information on the rear surface of the refrigerator.
HOWTO USE Panel Control * Depending on the model, some of the following functions may not be available. Control Panel Features IceType ___/ _ Press the Ice Type button to choose either cubed or crushed ice. The cubed or crushed ice icon will illuminate. Refrigerator Temperature L-IL-toc UUo_ indicates the set temperature of the refrigerator compartment in Celsius (°C) or Fahrenheit (°F).
HOWTO Control Change Panel Features Filter @[ @/On some] _" models) Ice Plus "_" The Lock function on the display. disables every other button When power is initially connected to the refrigerator, the Lock function is off. If you want to activate the Lock function to lock other buttons, press and hotd the Lock button for three seconds or more. The Lock icon will display and the Lock function is now enabled. This function increases both ice making and freezing capabilities.
HOWTO In-Door USE Ice Bin * Depending on the model, some of the following functions may not be available. F---_ 2 To remove the in-door ice bin, grip the front handle, slightly lift the lower part, and slowly pull out the bin as shown. CAUTION , Keep hands and tools out of the ice compartment door and dispenser chute. Failure to do so may result in damage or personal injury. , The icemaker will stop producing ice when the in-door ice bin is full.
HOWTO Automatic USE Icemaker Water {ills the ice tray. * Depending on the model, some of the following functions may not be available. Ice is made in the automatic icemaker and sent to the dispenser. The icemaker will produce 70-182 cubes in a 24-hour period, depending on freezer compartment temperature, room temperature, number of door openings and other operating conditions. 1 hour later from supplying water • It takes about 12 to 24 hours for a newly installed refrigerator to begin making ice.
HOWTO USE Aufomafi¢ Icemaker (confinued) F-z_ CAUTION • The first ice and water dispensed may include particles or odor from the water supply line or the water tank. • Throw away the first few batches of ice. This is also necessary if the refrigerator has not been used for a long time. • Never store beverage cans or other items in the ice bin for the purpose of rapid cooling. Doing so may damage the icemaker or the containers may burst.
HOWTO Ice and Wafer Dispenser incorrect way correct USE 33 way * Depending on the model, some of the following functions may not be available. Water ,----Zh Keep children away from the dispenser to prevent children playing with or damaging the controls.
HOWTO Sforing USE Food Food Preservation Location Each compartment inside the refrigerator is designed to store different Store your food in the optimal space to enjoy the freshest taste. Vegetablestorage (Crisper) Preserves Adjustable refrigerator shelf AdjustabJe sheJves to meet your individual storage needs, vegetables andfruit. Door-in-Door Recommendedtypes of food to store in the Door-in-Door section are butter, margarine, creamcheese, peanutbutter, ketchup,mustard, relish,etc.
HOWTO Food Storage Tips * The following tips may not be applicable depending on the model. Storing F(_} Frozen USE 35 Food NOTE -_ _ Check a freezer guide or a reliable cookbook Wrap or store food in the refrigerator in airtight and moisture-proof material unless otherwise noted. This prevents food odor and taste transfer throughout the refrigerator. For dated products, check date code to ensure freshness.
HOWTO Storing USE Frozen Food Glide'N_Access (confinued) Packaging Successful freezing depends on correct packaging. When you close and seal the package, it must not allow air or moisture in or out. If it does, you could have food odor and taste transfer throughout the refrigerator and could also dry out frozen food. TM The Glide'N'Access TM slides out for easy loading of large items, like sheet cakes or deti trays, and to give you easy access to items stored at the back of the shelf.
HOWTO Defaching Sforage and Assembling fhe To Remove Glide'N'Access USE 37 TM Bins Glide'NSAccess TM To remove the Glide'N'Access TM, pull out the shelf to full extension, lift the front up and pull straight out. Crisper To remove the Glide'N'Access TM Crisper, pull out the Crisper D to full extension, lift the front up, and pull straight out. Door Bins The door bins are removable and adjustment. To install, drawer place.
HOWTO USE Door-In-Door Door-in-Door 2 Compartment To replace the Door-In-Door case, line up the tabs on the Door-In-Door Case with the slots on the door and push the case down until it snaps into place. To access the Door-in-Door compartment, lightly press the button on the right refrigerator door handle to open the door. It is not necessary to grip the door handle when pressing the button to open the DoorIn-Door compartment.
HOWTO USE39 CusfomChill TM Drawer The CustomChill TM Drawer provides storage space with a variable temperature control that can be adjusted to keep the compartment either colder or warmer than the refrigerator. Panel CustomChill" is0,o0,i Setting the Temperafure i Lock n Control Lock Lack Press the Select/Lockbuttonrepeatedlyto toggle through the four temperature settings. Store meat and seafood at 29°F/-1 °C, cold drinks at 33°F/I °C, dell snacks at 37°F/3°C, or chilled wine at 42°F/5°C.
HOWTO Adjusting Shelves USE the Refrigerator Using The shelves in your refrigerator are adjustable to meet your individual storage needs. Your model may have glass or wire shelves. the Folding Shelf You can store taller items, such as a gallon container or bottles, by simply pushing the front half of the shelf underneath the back half of the shelf. Pult the front of the shelf toward you to return to a full shelf.
MAINTENANCE 41 MAINTENANCE Cleaning • Both the refrigerator and freezer sections defrost automatically; sections about once a month to prevent odors. however, clean both • Wipe up spills immediately. • Always unplug the refrigerator before cleaning. Inside Walls (allow freezer to warm up so the cloth will not stick) General Cleaning Tips • Unplug refrigerator or disconnect power. • Remove alt removable parts, such as shelves, crispers, etc.
MAINTENANCE Replacing the Fresh Air Filter Replacing It is recommended that you replace the air filter: the Water Filter {b NOTE "/ • Approximately every six months. This refrigerator does not require a filter / • When the CHANGE FILTER light turns on. bypass plug when the filter is not in place. It is recommended that you replace the water filter: • Approximately every six months. • When the water filter indicator turns on. • When the water dispenser output decreases.
MAgNTENANCE Performance 43 Data Sheet Use Replacement Cartridge: ADQ73613401 The concentration of the indicated substances in water entering the system was reduced to a concentration less than or equal to the permissible limit for water leaving the system as specified in NSF/ANSI Standard 42 and Standard 53. System tested and certified by NSF International against NSF/ANSt Standard 42 and Standard 53 for the reduction of substances listed below.
MAINTENANCE Application Guidelines / Water Supply Parameters Note that while standard the testing laboratory was performed conditions, under actual performance may vary. Service Flow It is essential that the manufacturer's recommended installation, maintenance and filter replacement requirements be carried out for the product to perform as advertised. 0.5 gpm (1.
MAgNTENANCE NSF International RECOGNIZE8 MCM Co., Ltd, Republicof Korea AS COMPLYING WITII NSF/ANS142, PRODUCTS 53 AND ALL APPLICABLE REQUIREMENTS, APPEARING IN THE NSF OFFICIAL LISTING AUTk[ORIZED TO BEAR THE NSF MAI_Z.
SMART SMART DIAGNOSIS DIAGNOSIS Should you experience any problems with your refrigerator, it has the capability of transmitting data via your telephone to the LG service center. This allows you to speak directly to our trained specialists. The specialist records the data transmitted from your machine and uses it to analyze the issue, providing a fast and effective diagnosis. If you experience problems with your refrigerator, can 1-800-243-0000.
TROUBLESHOOTING 47 TROUBLESHOOTING Review the Troubleshooting and money. Refrigerator and Freezer section are not cooling. Cooling System runs too much. section before calling for service; doing so will save you both time The refrigerator control is set to OFF (some models). Turn the control ON. Refer to the Setting the Controls section for proper temperature settings. Refrigerator is in the defrost cycle. i During the defrost cycle, the temperature of i each compartment may rise slightly.
TROUBLESHOOTING Refrigerator or Refrigerator was recently Freezer section is installed, too warm. It may take up to 24 hours for each compartment to reach the desired temperature. Air vents are blocked. Rearrange items to allow air to flow throughout the compartment. Refer to the Airflow diagram in the Using Your Refrigerator section. Doors are opened often or for long periods of time. When the doors are opened often or for long periods of time, warm, humid air enters the compartment.
TROUBLESHOOTING Interior moisture buildup, Food is freezing in the refrigerator compartment. 49 Doors are opened often or for long periods of time. When the doors are opened often or for long periods of time, warm, humid air enters the compartment. This raises the temperature and moisture level within the compartment. To lessen the effect, reduce the frequency and duration of door openings. Doors not closed correctly. See the Doors will not close correctly section in the Troubleshooting section.
TROUBLESHOOTING Frost orice Condensation from food witha This isnormal forfood items withahigh water crystals onfrozenhigh water content hasfrozencontent. food(inside of inside ofthefood package. sealed package). Food has been leftinthefreezer Donotstore food items withhigh water content foralong period oftime. inthefreezer foralong period oftime. Icemaker isnot Demand exceeds icestorageTheicemaker willproduce approximately 70~ 182 making enoughcapacity, cubes ina24hour period. ice.
TROUBLESHOOTING Icemaker is not making enough ice (continued). Doors are opened often or for long periods of time. If the doors of the unit are opened the refrigerator as well as not opening completely. Dispensing water slowly. ambient air will warm the refrigerator which will prevent the unit from maintaining the set temperature. Lowering Doors are not dosed often, 51 temperature can help, the doors as frequently. If the doors are not properly closed, ice production will be affected.
TROUBLESHOOTING Notdispensing Doors arenotclosed ice. completely, Icewillnotdispense ifanyoftherefrigerator doors areleftopen. Infrequent useofthedispenser. Infrequent use of the ice dispenser will cause the cubes to stick together over time, which will prevent them from properly dispensing. Check the ice bin for ice cubes clumping!sticking together. If they are, break up the ice cubes to allow for proper operation.
TROUBLESHOOTING Not dispensing water. New insta%tion recently or water line connected. 53 Dispense 2.5 gallons of water (flush for approximately 5 minutes) to remove trapped air and contaminants from the system. Do not dispense the entire 2.5 gallon amount continuously. Depress and release the dispenser pad for cycles of 30 seconds ON and 60 seconds OFF. The dispenser panel is locked. Press and hold the Lock button for three seconds to unlock the control panel and dispenser.
TROUBLESHOOTING Ice has bad taste or odor. Water supply contains minerals such as sulfur. A water filter may need to be installed to eliminate taste and odor problems. NOTE: In some cases, a filter may not help. It may not be possible to remove all minerals / odor / taste in all water supplies. Icemaker was recently installed. Discard the first few batches of ice to avoid discolored or bad tasting ice. Ice has been stored for too long.
TROUBLESHOOTING Icemaker is making too much ice. Icemaker shutoff (arm/sensor) is obstructed. 55 Empty the ice bin. If your icemaker is equipped with an ice shutoff arm, make sure that the arm moves freely. If your icemaker is equipped with the electronic ice shutoff sensor, make sure that there is a clear path between the two sensors. Reinstall the ice bin and wait 24 hours to confirm proper operation.
TROUBLESHOOTING Pulsating or High-Pitched Sound Your refrigerator is designed to run more efficiently to keep your food items at the desired temperature. The high efficiency compressor may cause your new refrigerator to run longer than your old one, but it is still more energy efficient than previous models. While the refrigerator is running, it is normal to hear a pulsating or high-pitched sound. Normal Operation Doors win not close correctly or Food packages are blocking the door open.
WARRANTY WARRANTY 57 (USA) Should your LG Refrigerator ("Product") fail due to a defect in materials or workmanship under normal home use, during the warranty period set forth below, LG will at its option repair or replace the product. This limited warranty is valid only to the original retail purchaser of the product and applies only when purchased and used within the United States including U.S. Territories.
WARRANTY THIS LIMITED WARRANTY DOES NOT COVER: 1. Service trips to deliver, pick up, install, or repair the product; instruct the customer on operation of the product; repair or replace fuses or correct wiring or plumbing, or correction of unauthorized repairs/insta%tion. 2. Failure of product to perform during power failures and interruptions service. 3. Damage caused by leaky or broken water pipes, frozen water pipes, restricted inadequate or interrupted water supply or inadequate supply of air.
WARRANTY WARRANTY 59 (Canada) WARRANTY: Should your LG Refrigerator ("Product") fail due to a defect in material or workmanship under normal home use during the warranty period set forth below, LG Canada will at its option repair or replace the Product upon receipt of proof of original retail purchase. This warranty is valid only to the originat retail purchaser of the product and applies only to a Product distributed in Canada by LG Canada or an authorized Canadian distributor thereof.
WARRANTY THIS LIMITED WARRANTY DOES NOT COVER: 1. Service trips to deliver, pick up, or install the product; instructing a customer on operation of the product; repair or replacement of fuses or correction of wiring or plumbing, or correction of unauthorized repairs/installation. 2. Failure of the product to perform during power failures and interruptions or inadequate electrical service. 3.
Life's Good For inquiries or corr_r-nents, visi¢ www_Og_com or c_:_ll; 1-800-243-0000 usA,c .......... ,e_;<_ 1-888-865-3026 usA,co_,.....