OWNER’S MANUAL AIR CONDITIONER Please read this manual carefully before operating your air conditioner and retain it for future reference. TYPE PORTABLE AIR CONDITIONER MODEL LP0814WNR www.lgappliances.
INTRODUCTION IMPORTANT SAFETY INSTRUCTIONS Basic Safety Precautions . . . . . . . . . . . . . . . . . . 3 - 6 Electrical Safety. . . . . . . . . . . . . . . . . . . . . . . . . . . 6, 7 PARTS AND FEATURES Key Parts and Components . . . . . . . . . . . . . . . . . . . 8 HOW TO USE Before Using Your Air Conditioner . . . . . . . . . . . 9, 10 Control Panel and Remote . . . . . . . . . . . . . . . . 11,12 THANK YOU! Congratulations on your purchase and welcome to the LG family.
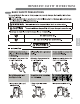
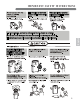
IMPORTANT SAFETY INSTRUCTIONS English English BASIC SAFETY PRECAUTIONS Do not store flammables like gasoline benzene thinner etc. near the air conditioner.
IMPORTANT SAFETY INSTRUCTIONS x Wa Thinner Unplug the unit when not using it for a long time.
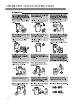
IMPORTANT SAFETY INSTRUCTIONS Hold the plug by the head (not the cable)when taking it out. When gas leaks, open the window for ventilation before operating the unit. For inner cleaning, contact an Authorized Service Center or a dealer. Do not use harsh detergent that causes corrosion or damage on the unit. English English Harsh detergent may also cause failure of product, fire, or electric shock.
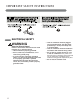
IMPORTANT SAFETY INSTRUCTIONS If the liquid from the battery gets onto your skin or clothers,wash it well with clean water. Do not use the remote if the battery has leaked. y If you eat the liquid from the battery,brush your teeth and see doctor.Do not use the remote if the battery has leaked. y ELECTRICAL SAFETY WARNING Electrical Shock Hazard Failure to follow these instructions can result in death, fire, or electrical shock. • This unit must be properly grounded.
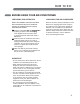
IMPORTANT SAFETY INSTRUCTIONS READ ALL INSTRUCTIONS BEFORE USE ELECTRICAL SAFETY For additional safety, the power cord features an integrated Reset circuit breaker. Test Test and reset buttons are provided on the plug case. The circuit breaker should be tested periodically by pressing the TEST button then the RESET button. If the TEST button does not cause the circuit breaker to trip, or if the RESET button will not stay engaged, unplug the air conditioner immediately and contact your LG service technician.
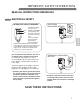
PARTS AND FEATURES KEY PARTS AND COMPONENTS 1 AIR DISCHARGE 2 The direction of air can be controlled wherever you want to cool by adjusting the horizontal louver. The horizontal direction is adjusted by moving the lever to the left or right. Touching the horizontal louvers adjusts the air direction up or down. 2 1 CONTROL PANEL AND DISPLAY Easy-to-read digital display shows the set temperature and indicator lights show the operating mode. Simple push buttons make changing settings quick and easy.
HOW TO USE BEFORE USING YOUR AIR CONDITIONER UNPACKING THE AIR CONDITIONER Refer to the Installation Instructions included in this manual before using the air conditioner. Once the air conditioner has been properly assembled and installed: Remove and store packing materials for reuse. Remove any shipping tape before using the air conditioner. If the tape leaves behind any adhesive, rub a small amount of liquid dish soap onto it and wipe with a damp cloth.
HOW TO USE BEFORE USING YOUR AIR CONDITIONER INSERTING BATTERIES IN THE REMOTE Before using your remote, install the provided AAA batteries. 1 Press and glide the battery cover on the back of the remote, then you can remove the cover. 2 Insert two new alkaline AAA batteries into the battery compartment, being sure to note the proper polarity. Be sure to note proper polarity! NOTE : Use only alkaline batteries. Do not use rechargeable batteries.
HOW TO USE CONTROL PANEL AND REMOTE 5 6 3 1 4 5 Timer 2 7 2 8 4 3 8 1 1 POWER Press the POWER button to turn the air conditioner ON or OFF. Any control settings such as Cool, Dry, Fan, and Fan Speed will be retained in memory when the power is off. When turned on after being unplugged, the air conditioner will automatically reset. Any settings will need to be re-entered. 2 MODE Press this button to select the operating mode such as Cool, Dry (Dehumidify), or Fan for the air conditioner.
Plug in, the LED display will light When you plug the power cord into grounded outlet, LED display will show room temperature.
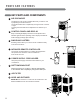
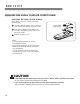
INSTALLATION INSTRUCTIONS PREPARING FOR INSTALLATION WARNING The air conditioner is heavy! Use two or more people to lift and install the unit! Failure to do so could result in back injury or other injuries. Panel B (9’’) EXHAUST COMPONENTS Flexible Venting Hose Panel C (17’’) Panel A (18’’) Diffuser 1 Window Vent Panel English The following components are used for window venting. Not all components are used for every installation.
INSTALLATION INSTRUCTIONS SELECTION OF INSTALLATION LOCATION 1 Place the unit on a level floor. 2 For best performance,allow at least 20 in of air space on all sides of the unit for good air circulation. 20 in 3 Place the unit near a window. The hose 20 in and diffuser will be used to connect the air conditioner to the window installation kit to vent exhaust air outside. WARNING The length of the exhaust hose is specially designed according to the specification of this product.
INSTALLATION INSTRUCTIONS WINDOW VENT PANEL AND EXTENSIONS The window installation kit allows you to install the air conditioner in most vertical-sliding windows 18" to 50" wide, or casement-style windows from 18 " to 50 " high. Panel Window Length 18" 19 " − 26" 27 " − 34" 35 " − 50" A 18" √ √ √ √ B 9" √ C D Fig. 17" 17" a b c √ √ √ d Panel B (9’’) 1. Please check your window length and choose the fit panels from the above tabel. 2.
INSTALLATION INSTRUCTIONS English INSTALLATION IN VERTICAL SLIDING WINDOWS 5 Insert the diffuser into the Vent Panel. And then slide. Small gap Type C screw Second Slide First Insert First insert to the vent panel fully and then slide for locking. If you want fix the diffuser more firmly, use the type C screw.
I N S TA L LA T I O N I N S T R U C T I O N S INSTALLATION IN CASEMENT STYLE WINDOWS NOTE: The window installation kit can be used with casement windows between 18″and 50 ″tall. Foam seal C (Adhesive type-shorter) Extension panel (if required) Vent Panel Foam seal A (Adhesive type) 1 Cut the foam seal A (adhesive type) & C (adhesive type-shorter) to the proper length, and attach it to the window sash and frame.
INSTALLATION INSTRUCTIONS English INSTALLATION IN CASEMENT STYLE WINDOWS 5 Insert the diffuser into the Vent Panel. And then slide. Small gap Type C screw Second Slide First Insert First insert to the vent panel fully and then slide for locking. If you want fix the diffuser more firmly, use the type C screw.
CARE AND CLEANING EMPTYING THE WATER COLLECTION TANK Using the bottom drain port When the internal water collection tank is full, FL will appear in the display and the air conditioner will turn off until the tank is emptied. 1 Unplug the air conditioner, disconnect Drain Cap Use Drain hose when use the DRY mode 1 When need running in high humidity, or during the DRY mode remove the drain cap and the exhaust from the back of the unit.
CARE AND CLEANING CLEANING THE CASE Wipe the case with a slightly damp cloth, then wipe dry with a dry cloth or towel. English • To prevent damage to the finish, do not use gasoline, benzene, thinner, etc., or any abrasive cleansers to clean the air conditioner; they may damage the finish. • Never pour water onto or into the air conditioner. It could damage internal components and create a shock and fire hazard.
CARE AND CLEANING STORING THE AIR CONDITIONER If the air conditioner will not be used for an extened period of time: 1 To drain the water collection tank completely, leave the bottom drain cap off long enough to allow any residual water to drain out. Once the tank is completely drained and no more water flows out, reinstall the cap. 2 Remove and clean the filter, allow it to dry completely, then reinstall it. 3 Remove the batteries from the remote.
TROUBLESHOOTING BEFORE CALLING FOR SERVICE The air conditioner is unplugged. Make sure the air conditioner plug is pushed completely into the outlet. The fuse is blown/circuit breaker is tripped. Check the house fuse/circuit breaker box and replace the fuse or reset the breaker. Power failure. If power failure occurs, turn the mode control to Off. When power is restored, wait 3 minutes to restart the air conditioner to prevent tripping of the compressor overload.
TROUBLESHOOTING BEFORE CALLING FOR SERVICE Code appears in the display. 24 Empty the water collection tank. See the Care and Cleaning section. FL The water collection tank is full. E1 Short or open circuit in the Unplug the air conditioner and contact your authorized LG service center. indoor air thermistor. E2 Short or open circuit in the Unplug the air conditioner and contact your authorized LG service center. indoor pipe thermistor.
INSTALLATION INSTRUCTIONS INSTALLATION IN VERTICAL SLIDING WINDOWS NOTE: The window installation kit can be used with vertical sliding windows between 18" and 50" wide. Foam seal C (Adhesive type-shorter) Vent Panel Extension panel (if required) Foam seal A (Adhesive type) 1 Cut the foam seal A (adhesive type) & C (adhesive type-shorter) toC the proper Tipo de sellado con espuma length, and attach it to the sash (tipo window adhesivo-más corto). and frame.
WARRANTY LG PORTABLE AIR CONDITIONER LIMITED WARRANTY - USA WHAT THIS WARRANTY COVERS: LG Electronics U.S.A., Inc. (“LG”) warrants your LG Portable Air Conditioner ("product") against defect in materials or workmanship under normal household use, during the warranty period set forth below, LG will, at its option, repair or replace the product.
LG Customer Information Center 1-800-243-0000 LG ELECTRONICS,INC. 1000 Sylvan Ave.,Englewood Cliffs,NJ 07632 Register your product Online! www.lgappliances.