website http://www.lgappliances.
Packaged Terminal Air Conditioner Owner’s Manual TABLE OF CONTENTS FOR YOUR RECORDS Safety Precautions.................3 Precautions...........................3 Prior to operation ..................5 Introduction ...........................6 Symbols Used in this Manual .....6 Features ...............................6 Operating Instructions...........7 Control operations ................7 Adjusting the air flow direction ................................8 Additional controls ................
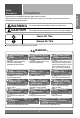
Safety Precautions Precautions WARNING CAUTION This symbol shows the possibility of death or serious injury. This symbol indicates the possibility of injury or damage to property. Never Do This Always Do This ■ The following items are classified by these symbols. WARNING Plug in the power plug properly. • Otherwise, it will cause electric shock or fire due to heat generation or electric shock. Do not modify power cord length or share the outlet with other appliances.
WARNING Ventilate before operating air conditioner when gas goes out. Do not disassemble or modify products randomly. • It may cause explosion, fire, and burn. • It may cause failure and electric shock. CAUTION Never touch the metal parts of the unit when removing the filter. • They are sharp and may cause injury. When cleaning the unit, first make sure the power and breaker are turned off. • Since the fan rotates at high speed during operation, it may cause injury.
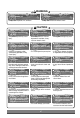
Safety Precautions Prior to Operation ENGLISH Preparing for operation 1 Contact an installation specialist for installation. 2 Plug in the power plug properly. 3 Do not share the same outlet with other appliances 4 Do not use an extension cord. 5 Do not start/stop operation by plugging/unplugging the power cord. 6 If cord/plug is damaged, replace only with an authorized part. Usage 1 Being exposed to direct airflow for an extended period of time could be hazardous to your health.
Introduction Introduction Symbols Used in this Manual This symbol alerts you to the risk of electric shock. This symbol alerts you to hazards that could cause harm to the air conditioner. NOTICE This symbol indicates special notes. Features WARNING This appliance should be installed in accordance with the National Electric Code. Expanded Metal Grille Should be applied for better performance in PTAC and PTHP Units.
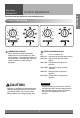
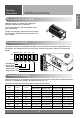
Operating Instructions Control Operations ENGLISH The control panel will look like one of the following pictures. Control Remote Operations Control Operations 1 2 1 2 2 OPERATION MODE SELECTOR 1 TEMPERATURE CONTROL Set the Thermostat control to the desired temperature mark 5 (the mid-point is a good starting position). If the room temperature is not satisfactory after a reasonable time, adjust the control to a cooler or warmer setting, as appropriate. OFF : Turns air conditioner off.
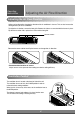
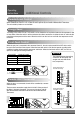
Operating Instructions Adjusting the Air Flow Direction Adjusting the Air Flow Direction Airflow can be adjusted by changing the direction of the air conditioner's louvers. This can also increase the cooling efficiency of the air conditioner. To adjust the air direction, remove the front grille. Remove the 4 louver screws that hold the louvers in place. Flip the louver section 180°, replace the screws and the front grille.
Operating Instructions Additional Controls ENGLISH Removing the Front Grille Additional controls are available after removing the front grille and option cover of control box. To remove the front grille, pull out the bottom of front grille and then lift up. To replace the front grille, place the tabs over the top of the unit and push the bottom of front grille until the clips snap into place. Additional Controls The additional controls are located behind the option cover of control box.
Operating Instructions Additional Controls Remote/Local Control When remote/local switch #1 is on, it allow the unit to operate by the control of Remote Wall Thermostat. The unit control by knobs are not available. Energy Saver The energy saver switch #2 is on. This switch is set at continuous fan to provide continuous fan operation in cool or heat modes. When the switch is off the continuous fan allows continuous circulation of room air and make the more balanced temperature of the room.
Care and Maintenance Care and Maintenance Grille and Wall sleeve Turn the air conditioner off and remove the plug from the wall outlet before cleaning. To clean, use water and a mild detergent. Do not use bleach or abrasives. Outdoor Coils The coils on the outdoor side of the air conditioner should be checked regularly. If they are clogged with dirt or soot they may be professionally steam cleaned, a service available through a dealer.
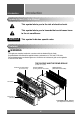
Hardware Installation Hardware Installation Product Features CAUTION This appliance should be installed in accordance with national wiring regulations. This guide acts as a guide to help to explain product features. 12 1 1 3 1 13 1 1 4 1 2 1 5 1 6 1 8 10 1 14 11 1 7 1 9 1. WALL SLEEVE 2. FRONT GRILLE 3. AIR FILTER 4. AIR INTAKE 5. AIR DISCHARGE 6. VERTICAL AIR DEFLECTOR (HORIZONTAL LOUVER) 7. EVAPORATOR 8. CONTROL PANEL 9. POWER CORD 10. COMPRESSOR 11. BASE PAN 12. BRACE 13. CONDENSER 14.
Hardware Installation Hardware Installation ENGLISH Suggested Tool Requirements SCREWDRIVER(+, -), RULER, KNIFE, HAMMER, PENCIL, LEVEL Prepare the wall sleeve and outdoor grille SLEEVE HARDWARE NUMBER NAME OF PARTS SLEEVE LOWER SLEEVE UPPER SCREW OUTDOOR GRILLE • Fasten the four screws as shown below. IN DO O O D 4 1 R 2 1 • Place sleeve upper on top of side panels. Q’TY 1 1 4 1 N OR I R O O D N 1 I • Assemble the outdoor grille and fasten the 4 screws as shown below.
Hardware Installation Hardware Installation 3 Remove the front grille by pulling it out at the 2 Remove the shipping screw from the ventilation door. bottom to release it, then lift it up along the unit top front. Install the unit into the wall sleeve Slide the unit into the wall sleeve and secure with four screws through the unit flange holes. NOTICE When you completed the installation, the new air conditioner unit should have a rearward slope, as shown below.
Hardware Installation Hardware Installation ENGLISH How to Install the Unit Dimension of air conditioner CAUTION • There are sharp edges that can cause serious cuts. 1,066 mm (42") • When lifting the air conditioner, it is HEAVY. Use 2 people to lift. For existing sleeve, you should measure the wall sleeve dimensions. 406 mm (16") You can install the new air conditioner according to these installation instructions to achieve the best performence.
Hardware Installation Hardware Installation Electrical Data 115V~ 265V~ Power cord may include a current 230V~ interrupter device. A test and reset button is provided on the plug case. The device should be tested on a periodic basis by first pressing the TEST button and then the RESET button. If the TEST button does not trip or if the RESET button will not stay engaged, discontinue use of the air conditioner and contact a qualified service technician.
Hardware Installation Hardware Installation IMPORTANT (PLEASE READ CAREFULLY) CAUTION FOR THE USER'S PERSONAL SAFETY, THIS APPLIANCE MUST BE PROPERLY GROUNDED The power cord of this appliance is equipped with a three-prong (grounding) plug. Use this with a standard three-slot (grounding) wall power outlet to minimize the hazard of electric shock. The customer should have the wall receptacle and circuit checked by a qualified electrician to make sure the receptacle is properly grounded.
Common Issues Common Problems and Solutions Before calling for service, please review the following list of common problems and solutions. The air conditioner is operating normally when: • You hear a pinging noise. This is caused by water being picked up by the condenser on rainy days or in highly humid conditions. This feature is designed to help remove moisture in the air and improve cooling efficiency. • You hear the thermostat click. This is caused by the compressor cycle starting and stopping.
Memo ENGLISH 19
LG ELECTRONICS, INC. LG Packaged Terminal Air Conditioner Limited Warranty - USA Should your LG Packaged Terminal Air Conditioner prove to be defective in materials or workmanship under normal use during the warranty period listed below, LG Electronics will replace the defective part(s). Replacement part(s) will meet intended fit and function of the original part(s). Replacement parts are warranted for the unexpired portion of the original warranty period.