
Owner's Manual


9
Introduction
The
AC
Power
Cord
Connection
1.
Before
connecting
the
AC
power
cord,
check
that
the
operating voltage
of
your
unit
is
identical
with
the
voltage
of
your
mains
supply.
2.
Connect
one
end
of
the
AC
power
cord
(supplied)
to
the
AC
IN
socket
located
at
the
backside
of
your
unit.
3.
Plug
the
other
end
into
the
wall
outlet.
Note:
?
Unplug
the
AC
power
cord
from
the
wall
outlet
if
you
do
not
to
use
for
an
extended
period
of
time.
Adjusting
the
voltage
(OPTIONAL)
If
your
unit
is
equipped
with
a
voltage
selector,
be
sure
to
set
it
to
your
local
power
supplied
before
connecting
the
AC
power
cord.
Battery
Installation
Remote
Control
1.
Remove
the
battery
cover
on
the
rear
of
the
remote
control.
2.
Insert
two
R03
(size
AAA)
batteries
with
and
aligned
correctly.
3.
Replace
the
battery
cover.
Notes:
?
To
avoid
damage
from
possible
battery
leakage,
remove
the
batteries
if
you
do
not
plan
to
use
the
unit
for
an
extended
period
of
time.
?
When
the
batteries
are
weak,
replace
all
the
batteries
with
new
ones.
?
Do
not
mix
old
and
new
batteries.
Installation
and
Setup
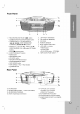
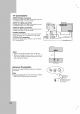
Display
Window
1.
function
indicator
2.
STEREO
indicator
3.
REPEAT
indicator
4.
CHAPTER/TRACK
indicator
5.
TITLE
indicator
6.
PROGRAM
indicator
7.
MP3
file
indicator
8.
Indicates
current
audio
stream
9.
ANGLE
active
indicator
10.
?
RECORD/
RECORD
PAUSE
indicator
?
TIMER
indicator
11.
PLAY/PAUSE
indicator
12.
MUTE
indicator
13.
?
TAPE
PLAY
(
/
)DIRECTION
indicators
(OPTIONAL)
?
TAPE
PLAY
MODE
( )
indicator
(OPTIONAL)
14.
SLEEP
indicator
3
4
65
2
14
1312
11
10
9
87
1