SAKAL_LPX-M930/M935(ENG)-27N CD/RADIO CASSETTE RECORDER OWNER'S MANUAL MODEL: LPX-M930A/X/S LPX-M935A/X/S Please read this manual carefully before operating your set. Retain it for future reference. Designs and specifications are subject improvement.
Precautions CAUTION Use of controls CAUTION procedures RISK OF ELECTRIC or adjustments or performance of specified herein may other than those result in hazardous radiation exposure. SHOCK DO NOT OPEN Laser tion component in this product is capable exceeding the limit for Class 1. of radia- emitting CAUTION:TO REDUCE THE RISK OF ELECTRIC SHOCK DO NOT REMOVE COVER(OR BACK) NO USER SERVICEABLE PARTS INSIDE. REFER SERVICING TO QUALIFIED SERVICE PERSONNEL.
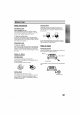
Before Use Safety Precautions shipping the unit The original shipping carton and packing materials come in handy. For maximum protection, re-pack the unit as it was originally packed at the factory. To discs Fingerprints and dust on the disc can cause poor picture quality and sound distortion. Before playing, clean the disc with a clean cloth. Wipe the disc from the unit Handling When Cleaning the center out. keep the surface clean Do not near use volatile liquids, such as the unit.
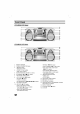
Front Panel LPX-M930A/X/S Model 18 1 17 2 16 15 14 3456789 13 12 11 910 LPX-M935A/X/S Model 18 1 17 2 16 15 14 3456789 13 12 11 910 1. REMOTE SENSOR 2. POWER 3. ? 4. (STANDBY/ON) MEMORY button ? PROG./SET button ? PRESET ) buttons )buttons / 6. HI-DUBBING 7. TAPE DOOR 8. ? ON/ ( OFF) (TAPE A DECK) CD PLAY/PAUSE ( ) button CD SKIP/SEARCH button 10. ? RECORD ( REC) ? 4 ( F.
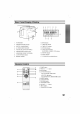
Rear Panel/Display Window 1 891 011 12 13 TIMER OFF STEREO 7 MEMORY 2 TIMER ON MP3 INTRODUC 6 ROCK FLAT CLASSIC SYNCHRO SLEEP REPEAT 1 ALL 17 16 15 345 1. FM ANTENNA 10. MP3 indicator 2. SPEAKER RELEASE LEVER 11. TIMER ON indicator 3. BATTERY COMPARTMENT 12. TIMER OFF indicator 4. AC POWER INPUT SOCKET 13. STEREO indicator 5. VOLTAGE SELECTOR 14. EQUALIZER PATTERN 6. SPEAKER INPUT SOCKET (OPTIONAL) (FLAT, ROCK, CLASSIC, POP) (R/L) 14 POP indicator 15.
Power Source The AC Power Cord Connection connecting the AC power cord, check that the operating voltage of your unit is identical with the voltage of your local power supplied. 1 Connect 2 one (supplied) before end of the AC power cord to the AC IN socket located at the Plug the other end into the wall outlet. voltage (OPTIONAL) If your unit is equipped with a voltage selector at the back side, be sure to set it to your local power supplied the AC power cord.
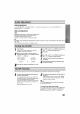
Audio Volume Adjustment Adjustment Press VOLUME (Unit: Remote control: UBB / EQ ) Remote control: , ) to increase the sound level, or press the VOLUME (Unit: , to decrease it. Adjustment UBB Repeatedly press UBB to emphasize the bass sound. "UBB ON" indicator appears in the display window. To cancel it, press this button again. "UBB OFF" indicator appears in the display window.
the TIMER Setting ? This function is ? Select your desired radio station automatically turned or on and off at the time you want. press CD and load a disc. Press CLOCK to check the current time. 1 For your reference If you don't set clock, timer function doesn't work. Press TIMER to enter the timer 2 mode. setting "TIMER ON" appears in the display window. "TUN-CD" flash in the display window in turn.
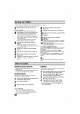
Radio You can Operation 50 stations for preset FM, AM (MW) and SW (OPTIONAL). Before tuning, make Press TUNER/BAND 1 To recall the radio stations Presetting (unit or control) remote to select radio function. Each time this button is the FM, Select AM(MW) pressed, you can (OPTIONAL). station you want buttons. 2 (- / +) Tuning select and SW a sure by pressing TUNING in manually (- / +) briefly and repeatedly. Tuning in automatically Press TUNING (- / +) for more than 1 second.
CD/MP3 Basic 1 Operation Playback Press CD/MP3 button to select CD/MP3 func- To Program Play tion. You can Press CD DOOR OPEN 2 compartment. 3 close the disc Load a disc with the side printed be shown in the the : display up and playing time will window. The total number of files will be shown in window. display Press CD PLAY/PAUSE 4 facing compartment. Audio CD: The total track number MP3 CD disc ()to open the ) button ( begin to play.
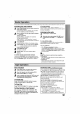
Recording Wind the tape to the Basic 1 2 3 point recording starts. normal Recording Select a function (TUNER or CD/MP3) you wish tapes.) 3 - the cassette TAPE A and insert Open Press RECORD - cassette into the cassette a blank The synchronized recording cally after about 7 seconds. To pause TAPE PLAY Press TAPE PAUSE ( REC) button. PLAY) button is pressed PAUSE CD/MP3 TUNER 4 CD Synchronized Recording playing your automatically programmed records or (RADIO).
Specifications Power Power External dimensions [CD] FM SW AM (OPTINAL)(MW [TAPE] Designs P/NO : panel of the unit. 30W Mass [Genral] [Tuner] Refer to the back supply consumption (W x H x D) Approx. 5.6kg Approx. 283.2 x 231.6 x 247.8 mm Output Power Speakers Battery Operation Frequency response Signal-to-noise ratio 5WX2 T.H.D 0.7 % Tuning Range Intermediate Frequency 65 -74 Antenna Telescopic Tuning Range Intermediate Frequency 522-1611kHzor530-1610kHz 3.