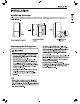
INSTALLATION 8 INSTALLATION Installation Overview Please read the following installation instructions first after purchasing this product or transporting it to another location. Unpacking the Refrigerator Unpacking the Refrigerator Ab WARNING + Use two or more people to move and install tha refrigerator. Failure fo do so can result in back injury or other injury. « The refrigerator is heavy. Protect the floor when moving the refrigerator for cleaning or service.
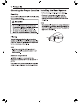
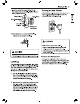
10 INSTALLATION Choosing the Proper Location Installing the Rear Spacers This feature is only available on some models. Electricity » There are 2 rear spacers included with the Use an individual, grounded outpatient Volts, 60 Hz, accessory kit inside the appliance. install the AC, 16 Amps minimum. spacers on the upper corners af the back of the appliance. Ab WARNING HOT » The spacers help improve the energy efficiency of the appliance by providing clearance between the back of the appliance and the wall.
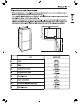
INSTALLATION 44 Dimensions and Clearances + Check the dimensions of the appliance and the installation path to ensure there is sufficient room to move the refrigerator through doors or narrow openings. + The installation location chosen for the refrigerator should allow space behind the unit for connections and airflow and space in front to open the doors. + Too small of 2 distance from adjacent! items may result in lowers freezing capability and increased electricity consumption charges.
12 INSTALLATION Reversing Doors This feature is only available on some models. Your appliance is designed with reversible doors which can bs assembled to open from either the iat or right hand side to slut your kitchen design. MOTE + Door reversal must be done by an authorized installer or service person. If it is not, the doors will not be covered by the warranty. Connecting the Water Line Before Beginning This water line installation is not covered by the refrigerator warranty.
INSTALLATION 13 + Two % in. cuter diameter compression noels and 2 ferrules {sleeves) to connect the copper tubing fo the shutoff valve and the refrigerator water valve. ® If your existing copper water line has a flared filing at the end, purchase an adapter (available at plumbing supply stores) to connect the water line fo the refrigerator OR cut off the flared tiffing with a tube cutter and then use a compression filing. = Shutoff valve to connect to the cold water line.
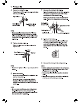
14 INSTALLATION 4 Fasten the shutoff valve. 7 Connect the tubing to the valve. Fasten the shutoff valve lo the cold water pips Place the compression nut and ferrule (sleeve) with the pipe clamp. for copper tubing onto the end of ths tubing and connect £ to the shutoff valve. Make sure the tubing is fully inserted into the valve. Tighten the compression nut securely.
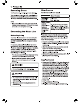
INSTALLATION 18 + [Insert the end of the copper tubing into the connection as far as possible. While holding the tubing, tighten the fighting. Tubing Clamp. 111 Yin. Compression \_ || / Nut oC 40) Turn the water on at the shutoff valve. Tighten any connections that leak. A, CAUTION « Check for leaks at all water line connections. Leveling The refrigerator has two front leveling legs. Adjust the legs to alter the {iit from front-few back or side-few side.