OWNER'S MANUAL BOTTOM FREEZER REFRIGERATOR Read this owner’s manual thoroughly before operating the appliance and keep it handy for reference at all times. ENGLISH LBNC12231*/LBNC12241*/ LBNC12251* LRDNC1004* MFL71400037 Rev.00_060120 www.lg.com Copyright © 2020 LG Electronics Inc.
TABLE OF CONTENTS 3 SAFETY INSTRUCTIONS 25 TROUBLESHOOTING 3 IMPORTANT SAFETY INSTRUCTIONS 7 PRODUCT OVERVIEW 25 FAQs: Frequently Asked Questions 26 Before Calling for Service 7 Interior 9 INSTALLATION 9 9 10 10 11 12 12 12 Installation Overview Unpacking the Refrigerator Choosing the Proper Location Installing the Rear Spacers Dimensions and Clearances Reversing Doors Leveling Turning on the Power 13 OPERATION 13 14 16 16 16 17 17 18 Before Use Control Panel Water Dispenser Water Dispense
SAFETY INSTRUCTIONS 3 SAFETY INSTRUCTIONS Your safety and the safety of others are very important. We have provided many important safety messages in this manual and on your appliance. Always read and follow all safety messages. This is the safety alert symbol. This symbol alerts you to potential hazards that can kill or injure you and others. All safety messages will follow the safety alert symbol and either the word WARNING or CAUTION.
SAFETY INSTRUCTIONS •• Do not, under any circumstances, cut or remove the third (ground) prong from the power cord. •• Keep packing materials out of the reach of children. Packaging material can be dangerous for children. There is a risk of suffocation. •• Do not install the refrigerator in a damp or dusty place where insulation on electrical parts may deteriorate. •• Do not place the refrigerator in direct sunlight or expose it to the heat from heating appliances such as stoves or heaters.
SAFETY INSTRUCTIONS 5 •• Do not use mechanical devices or other means to accelerate the defrosting process, other than those recommended by the manufacturer. •• Do not damage the refrigerant circuit. •• The refrigerant and insulation blowing gas used in the appliance require special disposal procedures. When disposing, please consult with service agent or a similarly qualified person. MAINTENANCE •• Do not use a hair dryer to dry the inside of the refrigerator.
SAFETY INSTRUCTIONS CAUTION To reduce the risk of minor or moderate injury to persons, malfunction, or damage to the product or property when using this product, follow basic precautions, including the following: INSTALLATION •• Do not install the refrigerator where there may be a danger of the unit falling. •• The refrigerator must be properly installed in accordance with the Installation Instructions. OPERATION •• Do not use aerosols near the refrigerator.
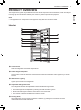
PRODUCT OVERVIEW 7 PRODUCT OVERVIEW The images in this guide may be different from the actual components and accessories, which are subject to change by the manufacturer without prior notice for product improvement purposes. •• The appearance or components of the appliance may differ from model to model. Interior a Control Panel Sets the refrigerator and freezer temperatures.
PRODUCT OVERVIEW f Bottle Rack† Stores tall bottles or containers. CAUTION •• Do not store short bottles or containers on the bottle rack. The items may fall and cause an injury or appliance damage. g Fresh Vegetable Drawer† Helps vegetables and fruit to stay crisp and controls humidity. h Fresh Converter† Stores food items at a different temperature than the regular refrigerator area. Slide the lever to set the temperature for storing vegetables, meat, or fish.
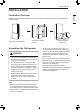
INSTALLATION 9 INSTALLATION Please read the following installation instructions first after purchasing this product or transporting it to another location. Unpacking the Refrigerator Choosing the Proper Location Unpacking the Refrigerator WARNING •• Use two or more people to move and install the refrigerator. Failure to do so can result in back injury or other injury. •• The refrigerator is heavy. Protect the floor when moving the refrigerator for cleaning or service.
INSTALLATION Choosing the Proper Location Installing the Rear Spacers Electricity Use an individual, grounded outlet:115 Volts, 60 Hz, AC, 15 Amps minimum. WARNING •• Do not overload house wiring and cause a fire hazard by plugging in multiple appliances in the same outlet with the refrigerator. •• To reduce the risk of electric shock, do not install the refrigerator in a wet or damp area. Flooring To avoid noise and vibration, the unit must be installed and leveled on a solidly constructed floor.
INSTALLATION 11 Dimensions and Clearances B E F A C - D List G LBNC12231*/ LBNC12241*/ LBNC12251* LRDNC1004* A Depth 26 5/8” (677mm) 26 5/8” (677mm) B Width 23 1/2’’ (595mm) 23 1/2’’ (595mm) C Height to Top of Case 73 1/4’’ (1860mm) 67 3/4’’ (1720mm) D Height to Top of Hinge 73 1/4’’ (1862mm) 67 3/4’’ (1722mm) E Back Clearance 2’’ (50 mm) 2’’ (50 mm) F Depth without Door 24” (610mm) 24” (610mm) G Depth (Total with Door Open 90°) 48 3/16” (1225mm) 48 3/16” (1225mm) K
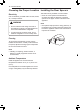
INSTALLATION Reversing Doors Turning on the Power This feature is only available on some models. ••After installing, plug the refrigerator’s power cord into a 3-prong grounded outlet and push the refrigerator into the final position. Your appliance is designed with reversible doors, so that they may open from either the left or right hand side to suit your kitchen design. NOTE •• Door reversal must be done by an authorized installer or service person.
OPERATION 13 OPERATION Clean the refrigerator. Clean the refrigerator thoroughly and wipe off all dust that accumulated during shipping. CAUTION ••Do not scratch the refrigerator with a sharp object or use a detergent that contains alcohol, a flammable liquid or an abrasive when removing any tape or adhesive from the refrigerator. Remove adhesive residue by wiping it off with your thumb or dish detergent.
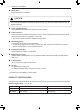
OPERATION Control Panel Depending on the model, some of the following functions may not be available. The control panel may differ from model to model. Control Panel Features Type A Type B a Freezer Temperature Indicates the set temperature of the freezer compartment in Celsius (°C) or Fahrenheit (°F). The default freezer temperature is 0°F (-18 °C). Press the Freezer button repeatedly to select a new set temperature from -9 °F to 5 °F (-23 °C to -15 °C).
OPERATION 15 d Express Cool Use this function to quickly cool a large amount of fresh food. e Vacation Set the refrigerator to this power saving mode to reduce energy consumption when you are away from home for a few days. •• Press the Vacation button to turn the function off or on. The LED stays lit when the function is on. •• When this function is on, the other buttons on the control panel are locked.
OPERATION Water Dispenser CAUTION This feature is only available on some models. • Press the dispenser paddle a with a glass or other container to dispense cold water. CAUTION • Keep children away from the dispenser to prevent them from playing with or damaging the controls. Water Dispenser Tank This feature is only available on some models. 1 Open the small cover on the top of the water tank. • Children should not be allowed near the dispenser tank.
OPERATION 17 Fresh Vegetable Drawer This feature is only available on some models. 2 To remove the rear half shelf, slide the front sliding shelf in under the rear half shelf. Then lift the rear half shelf to remove it. ENGLISH This drawer helps to keep fruit and vegetables fresh. You can control the amount of humidity by sliding the lever at the front of the drawer. NOTE b For storing vegetables. c For storing fruit. Folding Shelf This feature is only available on some models.
OPERATION Storing Food CAUTION •• Do not overfill or pack items too tightly into door bins. Doing so may cause damage to the bin or personal injury if items are removed with excessive force. •• Do not store glass containers in the freezer. Contents may expand when frozen, break the container and cause injury. Food Storage Tips Wrap or store food in the refrigerator in airtight and moisture-proof material unless otherwise noted. This prevents food odor and taste transfer throughout the refrigerator.
OPERATION 19 Do not use Check a freezer guide or a reliable cookbook for further information about preparing food for freezing or food storage times. ••Bread wrappers ••Non-polyethylene plastic containers ••Containers without tight lids ••Wax paper or wax-coated freezer wrap ••Thin, semi-permeable wrap Freezing Your freezer will not quick-freeze a large quantity of food.
SMART FUNCTIONS SMART FUNCTIONS Using Audible Diagnosis to Diagnose Issues LG ThinQ Application Follow the instructions below to use the audible diagnosis method. This feature is only available on models with the or logo. ••Launch the LG ThinQ application and select the Smart Diagnosis feature in the menu. Follow the instructions for audible diagnosis provided in the LG ThinQ application. The LG ThinQ application allows you to communicate with the appliance using a smartphone.
MAINTENANCE 21 MAINTENANCE WARNING •• Use non-flammable cleaner. Failure to do so can result in fire, explosion, or death. CAUTION •• Do not use an abrasive cloth or sponge when cleaning the interior and exterior of the refrigerator. •• Do not place your hand on the bottom surface of the refrigerator when opening and closing the doors. General Cleaning Tips •• Both the refrigerator and freezer sections defrost automatically; however, clean both sections once a month to prevent odors.
MAINTENANCE Door Bins Refrigerator Shelves Removing the Door Bins Removing the Shelves Hold both edges of the bin and remove it by lifting it upward. Lift the rear edge of the shelf and then pull it out. 1 2 Assembling the Door Bins 1 Hold both edges of the door bin, gently push one edge to assemble, and then in the same manner assemble the other edge. Assembling the Shelves Assemble the shelf in the reverse order of the removal process.
MAINTENANCE 23 Assembling the Vegetable Drawer 2 Push the front of the crisper cover up to snap the front tabs into place. 3 Hold the vegetable drawer cover at a 45-degree angle and insert it into the refrigerator. Supporting the cover with one hand, bring the cover to a horizontal position and lower it onto the guides. Push the cover back into place. Assemble the vegetable drawer in the reverse order of the removal process.
MAINTENANCE Cleaning the Water Dispenser Cleaning the Dispenser Tray The dispenser tray may become wet easily due to spilled water. Wipe the entire area with a damp cloth. Cleaning the Water Outlet Wipe the water outlet frequently with a clean cloth as it may get dirty easily. Please note that lint from a cloth may adhere to the outlet. Condenser Coils Use a vacuum cleaner with a brush or crevice attachment to clean the condenser cover and vents.
TROUBLESHOOTING 25 TROUBLESHOOTING Q: What are the best temperature settings for my freezer and refrigerator? A: The default setting for the freezer is 0° Fahrenheit (-18° Celsius). The default setting for the refrigerator is 37° Fahrenheit (3° Celsius). Adjust these settings as necessary to keep food at desired temperatures. Milk should be cold when stored on the inner shelf of the refrigerator. Ice cream should be firm and ice cubes should not melt in the freezer.
TROUBLESHOOTING Before Calling for Service Review this section before calling for service; doing so will save you both time and money. Cooling Problem Possible Cause & Solutions The refrigerator control is set to OFF (some models). ••Turn the control ON. Refer to the Setting the Controls section for proper temperature settings. Refrigerator and Freezer section are not cooling. Refrigerator is in the defrost cycle. ••During the defrost cycle, the temperature of each compartment may rise slightly.
TROUBLESHOOTING 27 Problem Possible Cause & Solutions Doors are not closed correctly. ••See the “Doors will not close correctly or pop open” section. Interior moisture buildup. Weather is humid. ••Humid weather allows additional moisture to enter the compartments when the doors are opened leading to condensation or frost. Maintaining a reasonable level of humidity in the home will help to control the amount of moisture that can enter the compartments. Defrost cycle recently completed.
TROUBLESHOOTING Problem Possible Cause & Solutions Doors are opened often or for long periods of time. ••When the doors are opened often or for long periods of time, warm, humid air enters the compartment. This raises the temperature and moisture level within the compartment. To lessen the effect, reduce the frequency and duration of door openings. Unit is installed in a hot location. ••The refrigerator should not be operated in temperatures above 110 °F. Refrigerator or Freezer section is too warm.
TROUBLESHOOTING 29 Making Ice Problem Possible Cause & Solutions Ice tray is not making enough ice. Doors are not closed completely. ••If the doors are not properly closed, ice production will be affected. See the “Doors will not close correctly or pop open” section in Parts & Features Troubleshooting for more information. The temperature setting for the freezer is too warm. ••The recommended temperature for the freezer compartment for normal ice production is 0°F.
TROUBLESHOOTING Parts & Features Problem Possible Cause & Solutions Food packages are blocking the door open. ••Rearrange food containers to clear the door and door shelves. Doors will not close correctly or pop open. Ice bin, crisper cover, shelves, door bins, or drawers are out of position. ••Push bins all the way in and put crisper cover, shelves and drawers into their correct positions. See the Operation section for more information.
TROUBLESHOOTING 31 Noises Problem The defrost control will click when the automatic defrost cycle begins and ends. The thermostat control (or refrigerator control on some models) will also click when cycling on and off. ••Normal Operation Rattling noises may come from the flow of refrigerant or items stored on top of or around the refrigerator. ••Normal Operation Rattling Refrigerator is not resting solidly on the floor. ••Floor is weak or uneven or leveling legs need to be adjusted.
LIMITED WARRANTY LIMITED WARRANTY FOR USA ARBITRATION NOTICE: THIS LIMITED WARRANTY CONTAINS AN ARBITRATION PROVISION THAT REQUIRES YOU AND LG TO RESOLVE DISPUTES BY BINDING ARBITRATION INSTEAD OF IN COURT, UNLESS YOU CHOOSE TO OPT OUT. IN ARBITRATION, CLASS ACTIONS AND JURY TRIALS ARE NOT PERMITTED. PLEASE SEE THE SECTION TITLED “PROCEDURE FOR RESOLVING DISPUTES” BELOW.
LIMITED WARRANTY 33 THIS LIMITED WARRANTY DOES NOT COVER: The cost of repair or replacement under these excluded circumstances shall be borne by the consumer. TO OBTAIN WARRANTY SERVICE AND ADDITIONAL INFORMATION Call 1-800-243-0000 and select the appropriate option from the menu. Or visit our website at http://www.lg.com Or by mail: LG Electronics Customer Service P.O.
LIMITED WARRANTY Fees/Costs. You do not need to pay any fee to begin an arbitration. Upon receipt of your written demand for arbitration, LG will promptly pay all arbitration filing fees to the AAA unless you seek more than $25,000 in damages, in which case the payment of these fees will be governed by the AAA Rules.
LIMITED WARRANTY 35 FOR CANADA WARRANTY PERIOD (Note: If the original date of purchase cannot be verified, the warranty will begin sixty (60) days from the date of manufacture) Refrigerator Sealed System (Condenser, Dryer, Connecting Tube and Evaporator) One (1) year from the One (1) year from date of original retail the date of original purchase retail purchase Parts and Labor (internal/ functional parts only) Parts and Labor Linear / Inverter Compressor Seven (7) years from the date of original ret
LIMITED WARRANTY THIS LIMITED WARRANTY DOES NOT COVER: ••Service trips to i) deliver, pick up, or install or; educate on how to operate the Product; ii) correct wiring or plumbing; or iii) correct unauthorized repairs or installations of the Product; ••Damage or failure of the Product to perform during power failures and interrupted or inadequate electrical service; ••Damage or failure caused by leaky or broken water pipes, frozen water pipes, restricted drain lines, inadequate or interrupted water suppl
LIMITED WARRANTY 37 Definitions. For the purposes of this section, references to “LG” mean LG Electronics Canada, Inc.
LIMITED WARRANTY Fees/Costs. You do not need to pay any fee to begin an arbitration. Upon receipt of your written demand for arbitration, LG will promptly pay all arbitration filing fees unless you seek more than $25,000 in damages, in which case the payment of these fees will be governed by the applicable arbitration rules.
MEMO 39
MEMO