Scan to see the online manual. OWNER'S MANUAL BOTTOM FREEZER REFRIGERATOR Read this owner's manual thoroughly before operating the appliance and keep it handy for reference at all times. ENGLISH LRBNC1104* / LRDNC1004* / LBNC12231* / LBNC12241* MFL71400037 Rev.05_010323 www.lg.com Copyright © 2020-2023 LG Electronics Inc. All Rights Reserved.
TABLE OF CONTENTS 3 IMPORTANT SAFETY INSTRUCTIONS 3 3 6 READ ALL INSTRUCTIONS BEFORE USE WARNING CAUTION 7 PRODUCT OVERVIEW 7 Product Features 10 INSTALLATION 10 10 12 13 Before Installing Choosing the Proper Location Reversing Doors and Leveling Turning on the Power 14 OPERATION 14 15 16 16 17 18 18 19 Before Use Control Panel Sabbath Mode Storing Food Humidity Controlled Crispers Drawers Refrigerator Shelves Door Bins 20 SMART FUNCTIONS 20 20 LG ThinQ Application Smart Diagnosis 21 MAINTE
IMPORTANT SAFETY INSTRUCTIONS 3 IMPORTANT SAFETY INSTRUCTIONS Safety Messages Your safety and the safety of others are very important. We have provided many important safety messages in this manual and on your appliance. Always read and follow all safety messages. This is the safety alert symbol. This symbol alerts you to potential hazards that can kill or injure you and others. All safety messages will follow the safety alert symbol and either the word WARNING or CAUTION.
IMPORTANT SAFETY INSTRUCTIONS • Do not bend or pinch the power cord excessively or place heavy objects on it. Operation • This appliance is intended to be used in household and similar applications such as: - staff kitchen areas in shops, offices and other working environments; - farm houses and by clients in hotels, motels and other residential type environments; - bed and breakfast type environments; - catering and similar non-retail applications.
IMPORTANT SAFETY INSTRUCTIONS 5 Maintenance • Do not use a hair dryer to dry the inside of the refrigerator. • Do not light a candle to remove odors in the refrigerator. • Keep flammable materials and vapors, such as gasoline, away from the refrigerator. • Unplug the power plug before cleaning or repairing the refrigerator. • The refrigerator and freezer compartment lights are interior LED lighting, and service should be performed by a qualified technician.
IMPORTANT SAFETY INSTRUCTIONS CAUTION CAUTION • To reduce the risk of minor or moderate injury to persons, malfunction, or damage to the product or property when using this product, follow basic precautions, including the following: Installation • Do not install the refrigerator where there may be a danger of the unit falling. • The refrigerator must be properly installed in accordance with the Installation Instructions. Operation • Do not use aerosols near the refrigerator.
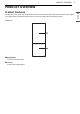
PRODUCT OVERVIEW 7 PRODUCT OVERVIEW The images in this guide may be different from the actual components and accessories, which are subject to change by the manufacturer without prior notice for product improvement purposes. Exterior a Refrigerator Fresh food compartment. b Freezer Frozen food compartment.
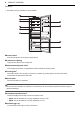
PRODUCT OVERVIEW Interior † This feature is only available on some models. a Control Panel Sets the refrigerator and freezer temperatures. b LED Interior Lighting Lights up the inside of the refrigerator. c Adjustable Refrigerator Shelf The refrigerator shelves are adjustable to meet individual storage needs. d Folding Shelf† Store taller items, such as gallon containers or bottles, by pushing the front half of the shelf underneath the back half of the shelf.
PRODUCT OVERVIEW 9 • Do not use the egg tray in the freezer. To keep eggs fresh longer, do not store them on the top shelf of the refrigerator or in the vegetable drawer. h Door Bin ENGLISH Stores chilled food, drinks, or condiments. i Ice Tray For producing and storing ice. • For additional storage space, remove the ice tray or ice bin. j Freezer Drawer Use for long-term storage of frozen items.
INSTALLATION INSTALLATION Before Installing Installation Overview Please read the following installation instructions first after purchasing this product or transporting it to another location. label, or the Tech Sheet that is located under the front of the refrigerator. • To remove any remaining tape or glue, rub the area briskly with your thumb. Tape or glue residue can also be easily removed by rubbing a small amount of liquid dish soap over the adhesive with your fingers.
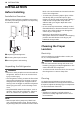
INSTALLATION 11 Ambient Temperature If the temperature around the appliance is too low or high, cooling ability may be adversely affected. Installing the Rear Spacers This feature is only available on some models. Install the spacers on the upper corners at the back of the appliance. The spacers are included with the accessory kit inside the appliance. NOTE • The spacers help improve the energy efficiency of the appliance by providing clearance between the back of the appliance and the wall.
INSTALLATION Dimensions and Clearances • Check the dimensions of the appliance and the installation path to ensure there is sufficient room to move the refrigerator through doors or narrow openings. • The installation location chosen for the refrigerator should allow space behind the unit for connections and airflow and space in front to open the doors and drawers. • Too small of a distance from adjacent items may result in lowered freezing capability and increased electricity consumption charges.
INSTALLATION 13 NOTE 2 Open both doors, and check to make sure that they close easily. If the doors do not close easily, tilt the refrigerator slightly more to the rear by turning both leveling legs to the left. It may take several more turns, and be sure to turn both leveling legs the same amount. Turning on the Power • After installing, plug the refrigerator’s power cord into a 3-prong grounded outlet and push the refrigerator into the final position. CAUTION • Connect to a rated power outlet.
OPERATION OPERATION Before Use Checklist Clean the refrigerator. Clean the refrigerator thoroughly and wipe off all dust that accumulated during shipping. CAUTION • Do not scratch the refrigerator with a sharp object or use a detergent that contains alcohol, a flammable liquid or an abrasive when removing any tape or adhesive from the refrigerator. Remove adhesive residue by wiping it off with your thumb or dish detergent.
OPERATION 15 Control Panel Depending on the model, some of the following functions may not be available. Control Panel Features a Freezer Indicates the set temperature of the freezer compartment in Celsius (°C) or Fahrenheit (°F). The default freezer temperature is 0°F (-18 °C). Press the Freezer button repeatedly to select a new set temperature from -7 °F to 5 °F (-23 °C to -15 °C). b Express Freeze This function increases both ice making and freezing capabilities.
OPERATION Sabbath Mode This feature is only available on some models. Using the Sabbath Mode Sabbath mode is used on the Jewish Sabbath and Holidays. • To turn Sabbath mode on, touch the display to activate it, then press and hold the Express Cool and Vacation buttons for 3 seconds until Express Freeze, Express Cool, Vacation are ON. • To turn Sabbath mode off manually, press and hold the Express Cool and Vacation buttons for 3 seconds. NOTE • Sabbath mode automatically turns off after 96 hours.
OPERATION 17 • Wash food before storing it in the refrigerator. Vegetables should be washed, and food packaging should be wiped down to prevent adjacent foods from being contaminated. Storing Frozen Food Check a freezer guide or a reliable cookbook for further information about preparing food for freezing or food storage times. Freezing Your freezer will not quick-freeze a large quantity of food.
OPERATION b For storing fruit. Removing/Assembling the Humidity Controlled Crispers 1 Store taller items, such as a gallon container or bottles, by pushing the front half of the shelf underneath the back half of the shelf. Pull the front of the shelf forward to return to a full shelf. Pull out the crisper to full extension, lift the front up, and pull straight out. CAUTION • Glass shelves are heavy. Use special care when removing them.
OPERATION 19 Door Bins Detaching/Assembling Door Bins 1 To remove the bin, simply lift the bin up and pull straight out. 2 To assemble the bin, slide it in above the desired support and push down until it snaps into place. CAUTION • Regularly detach and wash the storage bins and shelves; they can become easily contaminated by food. • Do not apply excessive force while detaching or assembling the storage bins. • Do not use the dishwasher to clean the storage bins and shelves.
SMART FUNCTIONS SMART FUNCTIONS LG ThinQ Application This feature is only available on models with the c or d logo. The LG ThinQ application allows you to communicate with the appliance using a smartphone. Installing the LG ThinQ Application Search for the LG ThinQ application from the Google Play Store or Apple App Store on a smartphone. Follow instructions to download and install the application. • Launch the LG ThinQ application and select the Smart Diagnosis feature in the menu.
MAINTENANCE 21 MAINTENANCE WARNING • Use non-flammable cleaner. Failure to do so can result in fire, explosion, or death. CAUTION • Do not use an abrasive cloth or sponge when cleaning the interior and exterior of the refrigerator. • Do not place your hand on the bottom surface of the refrigerator when opening and closing the doors. General Cleaning Tips • Both the refrigerator and freezer sections defrost automatically; however, clean both sections once a month to prevent odors.
TROUBLESHOOTING TROUBLESHOOTING FAQs Frequently Asked Questions Q: What are the best temperature settings for my refrigerator and freezer? A: The default setting for the refrigerator is 37° Fahrenheit (3° Celsius). The default setting for the freezer is 0° Fahrenheit (-18° Celsius). Adjust these settings as necessary to keep food at desired temperatures. Milk should be cold when stored on the inner shelf of the refrigerator. Ice cream should be firm and ice cubes should not melt in the freezer.
TROUBLESHOOTING 23 Before Calling for Service Review this section before calling for service; doing so will save you both time and money. Problem Refrigerator is not cooling or has no power. Possible Cause & Solution The refrigerator control is set to OFF (some models). • Turn the control ON. Refer to the Setting the Controls section for proper temperature settings. Refrigerator is in the defrost cycle. • During the defrost cycle, the temperature of each compartment may rise slightly.
TROUBLESHOOTING Problem Interior moisture buildup. Possible Cause & Solution Defrost cycle recently completed. • During the defrost cycle, the temperature of each compartment may rise slightly and condensation may form on the back wall. Wait 30 minutes and confirm that the proper temperature has been restored once the defrost cycle has completed. Food is not packaged correctly. • Food stored uncovered or unwrapped, and damp containers can lead to moisture accumulation within each compartment.
TROUBLESHOOTING 25 Problem A large amount of food or hot food was added to either compartment. • Adding food warms the compartment requiring the cooling system to run. Allowing hot food to cool to room temperature before putting it in the refrigerator will reduce this effect. Doors are not closed correctly. • See the "Doors will not close correctly or pop open" section in the Troubleshooting. Temperature control is not set correctly.
TROUBLESHOOTING Parts & Features Problem Doors will not close correctly or pop open. Possible Cause & Solution Food packages are blocking the door open. • Rearrange food containers to clear the door and door shelves. Ice bin, crisper cover, pans, shelves, door bins, or baskets are out of position. • Push bins all the way in and put crisper cover, pans, shelves and baskets into their correct positions. See the Operation section for more information.
TROUBLESHOOTING 27 Problem Whooshing Possible Cause & Solution Evaporator fan motor is circulating air through the refrigerator and freezer compartments. Air is being forced over the condenser by the condenser fan. • Normal Operation Gurgling Refrigerant flowing through the cooling system. • Normal Operation Popping Contraction and expansion of the inside walls due to changes in temperature. • Normal Operation Sizzling Water dripping on the defrost heater during a defrost cycle.
LIMITED WARRANTY LIMITED WARRANTY USA TERMS AND CONDITIONS ARBITRATION NOTICE: THIS LIMITED WARRANTY CONTAINS AN ARBITRATION PROVISION THAT REQUIRES YOU AND LG ELECTRONICS (“LG”) TO RESOLVE DISPUTES BY BINDING ARBITRATION INSTEAD OF IN COURT, UNLESS YOU CHOOSE TO OPT OUT. IN ARBITRATION, CLASS ACTIONS AND JURY TRIALS ARE NOT PERMITTED. PLEASE SEE THE SECTION TITLED “PROCEDURE FOR RESOLVING DISPUTES” BELOW.
LIMITED WARRANTY 29 • Damage or failure of the Product to perform during power failures and interrupted or inadequate electrical service. • Damage or failure of the Product resulting from operating the Product in a corrosive atmosphere or contrary to the Product owner’s manual. • Damage or failure of the Product caused by accidents, pests and vermin, lightning, wind, fire, floods, acts of nature, or any other causes beyond the control of LG.
LIMITED WARRANTY Notice of Dispute. In the event you intend to commence an arbitration proceeding, you must first notify LG in writing at least 30 days in advance of initiating the arbitration by sending a letter to LG at LG Electronics, USA, Inc. Attn: Legal Department- Arbitration 111 Sylvan Avenue, Englewood Cliffs, NJ 07632. You and LG agree to engage in good faith discussions in an attempt to amicably resolve your claim.
LIMITED WARRANTY 31 You may only opt out of the dispute resolution procedure in the manner described above (that is, by e-mail or telephone); no other form of notice will be effective to opt out of this dispute resolution procedure. Opting out of this dispute resolution procedure will not affect the coverage of the Limited Warranty in any way, and you will continue to enjoy the full benefits of the Limited Warranty.
LIMITED WARRANTY CANADA TERMS AND CONDITIONS ARBITRATION NOTICE: THIS LIMITED WARRANTY CONTAINS AN ARBITRATION PROVISION THAT REQUIRES YOU AND LG TO RESOLVE DISPUTES BY BINDING ARBITRATION INSTEAD OF IN COURT, UNLESS THE LAWS OF YOUR PROVINCE OR TERRITORY DO NOT PERMIT THAT, OR, IN OTHER JURISDICTIONS, IF YOU CHOOSE TO OPT OUT. IN ARBITRATION, CLASS ACTIONS AND JURY TRIALS ARE NOT PERMITTED. PLEASE SEE THE SECTION TITLED “PROCEDURE FOR RESOLVING DISPUTES” BELOW.
LIMITED WARRANTY 33 THIS LIMITED WARRANTY DOES NOT COVER: • Service trips to i) deliver, pick up, or install or; educate on how to operate the Product; ii) correct wiring or plumbing; or iii) correct unauthorized repairs or installations of the Product; • Damage or failure caused by leaky or broken water pipes, frozen water pipes, restricted drain lines, inadequate or interrupted water supply or inadequate supply of air; • Damage or failure resulting from operating the Product in a corrosive atmosphere or
LIMITED WARRANTY PROCEDURE FOR RESOLVING DISPUTES: EXCEPT WHERE PROHIBITED AT LAW, ALL DISPUTES BETWEEN YOU AND LG ARISING OUT OF OR RELATING IN ANY WAY TO THIS LIMITED WARRANTY OR THE PRODUCT SHALL BE RESOLVED EXCLUSIVELY THROUGH BINDING ARBITRATION, AND NOT IN A COURT OF GENERAL JURISDICTION. EXCEPT WHERE PROHIBITED AT LAW, YOU AND LG BOTH IRREVOCABLY AGREE TO WAIVE THE RIGHT TO A JURY TRIAL AND TO BRING OR PARTICIPATE IN A CLASS ACTION. Definitions.
LIMITED WARRANTY 35 Hearings and Location. If your claim is for $25,000 or less, you may choose to have the arbitration conducted solely (1) on the basis of documents submitted to the arbitrator, (2) through a telephonic hearing, or (3) by an in-person hearing as established by the applicable arbitration rules. If your claim exceeds $25,000, the right to a hearing will be determined by the applicable arbitration rules.
LG Customer Information Center For inquiries or comments, visit www.lg.com or call: 1-800-243-0000 1-888-542-2623 U.S.A. CANADA Register your product Online! www.lg.