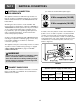
Website: http://us.lge.com Installation Manual Electric Range LRE30451S / LRE30755S Please read these instructions thoroughly before installing and operating the range. P/No.
Part 1 SAFETY 1 BEFORE YOU BEGIN PREPARE TO INSTALL THE RANGE Remove all tape and packing materials before using the range. Dispose all plastic bags after unpacking the range. Never allow children to play with packing materials. TOOLS NEEDED IMPORTANT SAFETY INSTRUCTIONS WARNING If the information in this manual is not followed exactly, a fire or electrical shock may result causing property damage, personal injury or death.
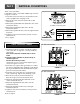
Part 2 PREPARE TO INSTALL THE RANGE 2 INSTALLATION DRAWINGS IMPORTANT SAVE FOR THE USE OF THE LOCAL ELECTRICAL INSPECTOR. CLEARANCES AND DIMENSIONS (Figure 1) To install range refer to the following Figure 1. For installation in CANADA, a Free-standing range is not to be installed closer than 12 mm from any adjacent surface. CAUTION This range has been designed to IMPORTANT comply with the maximum allowable wood cabinet temperatures of 194°F.
Part 3 ELECTRICAL CONNECTIONS 3 ELECTRICAL CONNECTION 3, 4 - Wire electrical wall Receptacle types REQUIREMENTS This appliance must be installed and grounded on a branch circuit by a qualified technician in accordance with the National Electrical code ANSI/NFPA NO. 70 latest edition. 4 Wire receptacle (14-50R) 3 Wire receptacle (10-50R) All wiring should conform to Local and NEC. This range requires a single-phase, 3 wire, A.C 120/208V or 120/240V 60Hz electrical system.
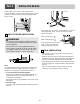
Part 3 ELECTRICAL CONNECTIONS 3-wire connection with a power supply cord WARNING The middle (neutral or ground) wire of the power cord or 3-wire conduit has to be connected to the middle post of the main terminal block. The remaining two wires of the power cord or conduit have to be connected to the outside posts of the main terminal connection block.
Part 3 ELECTRICAL CONNECTIONS 1. Remove the 3 nuts from the terminal block. (Refer to Figure 7.) Remove the ground screw and washer retain them. 2. Cut the center portion of ground strap as shown Figure 7. Do not discard any screws. 3. Attach the ground wire with the ground screw and washer. 4. Attach the 3 wires (L1, Neutral, L2) to the correct terminal block bolts. Be certain that the center wire (white/neutral) is connected to the center position of the terminal block.
Part 3 ELECTRICAL CONNECTIONS Third, connect the wires. If bare wire is used, connect with adapter lugs as shown in Figures 11 and 12. 1. Insert the end of each wire (L1, L2, Neutral) into the each lug. Tighten the clamping screw. 2. Remove the 3 nuts from the terminal block and retain them. 3. Attach the lug with white wire (Neutral) to the center terminal block bolt. 4. Attach the lug with black wire (L2) to the left terminal block bolt. 5.
Part 4 INSTALL THE RANGE Replace the access cover on the range back. To replace the wire cover, insert double projections in the pockets located below the opening and tighten the three screws. Use a spirit level to check your adjustments. Place the level diagonally on the oven rack, and check each direction for level.
Sitio Web: http://us.lge.com Manual de instalación Estufa eléctrica LRE30451S / LRE30755S Sírvase leer cuidadosamente estas instrucciones antes de instalar y poner a funcionar la estufa.
Sección 1 SEGURIDAD 1 ANTES DE COMENZAR PREPARATIVOS PARA INSTALAR LA ESTUFA Antes de usar la estufa, quite todas las cintas y materiales de empaque. Después de desempacar la estufa deseche todas las bolsas de plástico. Nunca permita que los niños jueguen con los materiales de empaque.
Sección 2 PREPARATIVOS PARA INSTALAR LA ESTUFA 2 ILUSTRACIONES DE INSTALACIÓN IMPORTANTE GUÁRDELO PARA EL USO DEL INSPECTOR LOCAL DE INSTALACIONES ELÉCTRICAS. HOLGURAS Y DIMENSIONES (Figura 1) Consulte la figura 1 a continuación para la instalación de la estufa. Si se va a instalar en CANADÁ, una estufa autónoma no podrá instalarse a menos de 12 mm de cualquier superficie adyacente.
Sección 3 CONEXIONES ELÉCTRICAS 3 REQUISITOS DE LAS CONEXIONES 3, Tipos de tomacorriente de pared de 4 alambres. ELÉCTRICAS Tomacorriente de 4 alambres (14-50R) Este artefacto deberá instalarse y conectarse a tierra en un circuito de red por un técnico certificado, de acuerdo con la edición más reciente del código de la National Electrical code ANSI/NFPA NO. 70 Tomacorriente de 3 alambres (10-50R) Todo el alambrado deberá conformarse a Local y NEC.
Sección 3 CONEXIONES ELÉCTRICAS Conexión de 3 alambres con un cable de alimentación ADVERTENCIA El cable central (neutro o tierra) del cable de alimentación o conducto portacables de 3 alambres debe conectarse al poste central del bloque de terminales principal. Los dos alambres restantes del cable de alimentación o conducto portacables de 3 alambres deberán conectarse a los postes externos del bloque de terminales principal.
Sección 3 CONEXIONES ELÉCTRICAS 1. Quite las 3 tuercas del bloque de terminales . (Consulte la Figura 7.) Quite el tornillo de tierra y la arandela y guárdelos. 2. Corte la parte central de la cinta de tierra como se muestra en la figura 7. No deseche los tornillos. 3. Afiance el alambre de tierra con el tronillo de tierra y la arandela. 4. Afiance los 3 alambres (L1, Neutral, L2) al perno del bloque de terminales correspondiente.
Sección 3 CONEXIONES ELÉCTRICAS En tercer lugar conecte los alambres. Si usa alambre desnudo, conecte con adaptadores de orejetas, como se muestra en las Figuras 11 y 12. 1. Inserte el extremo de cada alambre (L1, L2, Neutral) en cada orejeta. Apriete los tornillos de apriete. 2. Quite las 3 tuercas del bloque de terminales y guárdelas. 3. Afiance la orejeta con el alambre blanco (Neutral) al perno central del bloque de terminales. 4.
Sección 4 CÓMO INSTALAR LA ESTUFA Reponga la cubierta de acceso en la parte posterior de la estufa. Para reponer la cubierta de alambre, inserte las salientes dobles en las cavidades ubicadas debajo de la abertura y apriete los tres tornillos. Utilice un nivel de burbuja para verificar sus ajustes. Coloque el nivel en la parrilla del horno de la estufa en forma diagonal y verifique el nivel en cada dirección.