Website: http://www.us.lge.com ELECTRIC RANGE OWNER'S MANUAL & COOKING GUIDE LRE30757SW/SB/ST PLEASE READ THIS OWNER'S MANUAL THOROUGHLY BEFORE OPERATING. Printed in Korea P/NO.
Thank you for purchasing an LG electric oven. Please record the model number and serial number of this unit for future reference. We also suggest that you record the details of any contact with LG (LG Electronics USA, Inc.) concerning this unit. Model No.: Serial No.: Dealer: Dealer Phone No.: Customer Relations LG Electronics U.S.A., Inc. Service Division Bldg. #3 201 James Record Rd. Huntsville, AL 35824-0126 Staple your receipt here to verify your retail purchase.
SAFETY I M P O R TA N T S A F E T Y I N S T R U C T I O N S Read and follow all instructions before using your oven to prevent the risk of fire, electric shock, personal injury, or damage when using the range. This guide do not cover all possible conditions that may occur. Always contact your service agent or manufacturer about problems that you do not understand. This is the safety alert symbol. This symbol alerts you to potential hazards that can kill or hurt you and others.
SAFETY I M P O R TA N T S A F E T Y I N S T R U C T I O N S • Do Not Use Oven Cleaners. No commercial oven cleaner or oven liner protective coating of any kind should be used in or around any part of the oven. • Clean in the self-clean cycle only parts listed in this manual. Before self-clean the oven, remove the broiler pan and any utensils of foods from the oven. • Before Self-Cleaning the Oven. Remove broiler pan and other utensils. • Never keep pet birds in the kitchen.
SAFETY I M P O R TA N T S A F E T Y I N S T R U C T I O N S WARNING • DO NOT step or sit on the door and install the Anti-Tip Bracket packed with range. - The range could be tipped and injury might result from spilled hot liquid, food, or the range itself. - If the range is pulled away from the wall for cleaning, service, or any other reason, ensure that the Anti-Tip Device is properly reengaged when the range is pushed back against the wall. • Turn POWER OFF before removing the Warming Drawer.
SAFETY I M P O R TA N T S A F E T Y I N S T R U C T I O N S CAUTION • Storage in or on appliance. - Flammable materials should not be stored in an oven or near surface elements. • Be certain all packing materials are removed from the appliance before operating. - Keep plastics, clothes, and paper away from parts of the appliance that may become hot. • Wear proper apparel. - Loose-fitting or hanging garments should never be worn while using the appliance.
SAFETY I M P O R TA N T S A F E T Y I N S T R U C T I O N S CAUTION • Use caution with the TIMED BAKE or DELYAYED TIMED BAKE features. Use the automatic timer when cooking cured or frozen meats and most fruits and vegetables. Foods that can easily spoil, such as milk, eggs, fish, meat or poultry, should be chilled in the refrigerator first. Even when chilled, they should not stand in the oven for more than 1 hour before cooking begins, and should be removed promptly when cooking is completed.
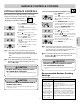
SURFACE CONTROLS COOKING PF(Power Failure) MESSAGE LOCATIONS OF THE RADIANT SURFACE ELEMENTS AND CONTROLS The PF message will appear whenever there has been a power interruption to the appliance. To clear the PF message press ON/OFF control pad to reset and be sure to reset the clock with the correct time of day. The radiant surface elements are located on the cooktop as below. The radiant control key locations are correlative to radiant surface elements on the cooktop as shown below.
SURFACE CONTROLS COOKING To turn on a dual surface unit (Right Front) SETTING SURFACE CONTROLS To turn on a single surface unit (Right Rear, Left Rear, Left Front) 1. Press ON/OFF for the desired element position. The display will flash . (If no further pads are pressed within 10 seconds, the display will disappear.) 2. Press once to turn on the power level Hi or once for Lo. 3. Use the / to choose the desired power setting. / is continuously accessible. (Adjustable at any time while the element is ON.
SURFACE CONTROLS COOKING OPERATING THE WARMING ZONE CAUTION • Use only cookware and dishes recommended as safe for oven and cooktop use. • Always use oven mitts when removing food from the warming center as cookware and plates will be hot. • When warming foods do not use containers that seal. Allow venting for heated air to escape. • DO NOT use plastic wrap to cover foods. English To set the warming zone control 1. Press ON/OFF at the warming zone control position.
SURFACE CONTROLS COOKING TIPS TO PROTECT THE GLASS COOKTOP SURFACE G L A S S COOKTOP SURFACE Cleaning (see pages 32~33 for more information) Before first use, clean the cooktop. Clean your cooktop daily or after each use. This will keep your cooktop looking good and can prevent damage. If a spillover occurs while cooking, immediately clean the spill from the cooking area while it is hot to prevent a tough cleaning chore later. Using extreme care, wipe spill with a clean dry towel.
SURFACE CONTROLS COOKING USING THE PROPER COOKWARE HOME CANNING TIPS Using the right cookware can prevent many problems, such as food taking longer to cook or achieving inconsistent results. Proper pans will reduce cooking times and cook food more evenly. Stainless steel is recommended. Be sure the canner is centered over the surface unit. Make sure the canner is flat on the bottom. The base must not be more than 1 inch larger than the element.
SETTING WARMING DRAWER CONTROLS ARRANGING WARMING DRAWER RACK POSITIONS To set the warming drawer control The rack can be used in 2 ways: • In the upright position to allow low profile food items to be placed both under and on top of the rack (for example, rolls or biscuits on top of the rack and a casserole dish underneath). • In the downward position to allow you to place light weight food items and empty cookware (for example, rolls or pastries and dinner plates) on the rack.
INFORMATION PARTS AND FEATURES Warming zone element Oven vent Single element Dual element Ceramic glass Automatic oven light switch English Self clean latch Standard racks (2 ea) Broiler pan & Grid Split rack Español Gasket Oven door Anti-tip bracket Model and serial number plate Warming drawer Common use Roast rack Grid Split rack Template Anti-tip bracket Screws (6 ea) Cleaner Cleaning pad Anchors (6 ea) Standard racks (2 ea) Broiler pan Warming drawer rack - 14 -
INFORMATION CONTROL PANEL FEATURES READ THE INSTRUCTIONS CAREFULLY BEFORE USING THE OVEN. For satisfactory use of your oven, become familiar with the various features and functions of the oven as described below. Detailed instructions for each feature and function follow later in this Owner’s manual. English . FAVORITES PAD: Press to set favorite cooking. . BROIL PAD: Press to select the broil function. . OPTIONS PAD: Press to set 6 different options. .
OPERATION SETTING THE CLOCK SETTING THE TIMER ON/OFF The CLOCK pad is used to set the clock. The clock has been preset at the factory for 12 hours operation. When the range is first plugged in, or when the power supply to the range has been interrupted, the timer in the display will show with power failure PF. You can make a choice between 12-hour clock and 24-hour clock (refer to the page 27): The TIMER ON/OFF serves as an extra timer in the kitchen that will beep when the set time has run out.
OPERATION (OPTIONS) SETTING CONVECTION AUTO CONVERSION FEATURE THERMOSTAT ADJUSTMENT The temperature in the oven has been preset at the factory. When first using the oven, be sure to follow recipe times and temperatures. If you think the oven is too hot or too cool, the temperature in the oven can be adjusted. Before adjusting, test a recipe by using a temperature setting that is higher or lower than the recommended temperature.
OPERATION (OPTIONS) SETTING LANGUAGE SELECTION (English or Spanish) SETTING TEMPERATURE UNIT — Fahrenheit or Centigrade The scroll display can be shown either ENGLISH or SPANISH. OPTIONS pad control the Fahrenheit or Centigrade temperature display modes. The oven control can be programmed to display temperatures in Fahrenheit or Centigrade. The oven has been preset at the factory to display in Fahrenheit. To set language option 1. Press the OPTIONS 3 times.
OPERATION SETTING BAKE To change the Bake Temperature while cooking (example changing from 375° to 425°F): The BAKE pad controls normal baking. The oven can be programmed to bake at any temperature from 170°F to 550°F. Default temperature is 350°F (175°C). 1. If the oven temperature needs to be changed to 425°F, press BAKE and 350° will show in the display. 2. Press 4, 2, and 5. To set the Bake Temperature to 375°F: 1. Press BAKE. 350° will appear in the display. 2. Press 3, 7, and 5. BAKE will flash.
OPERATION BAKING LAYER CAKES BEFORE USING OVEN RACKS Baking results will be better if baking pans are centered in the oven as much as possible. If baking with more than one pan, place the pans so each has at least 1” to 11/2” of air space around it. If cooking on multiple racks,place the oven racks in positions B and D (for 2 racks). Place in positions B, D, and F (for 3 racks). Place the cookware as shown in Fig. 1, 2. The oven has three racks (2 standard racks, 1 split rack).
OPERATION SETTING TIMED BAKE When the Timed Bake finishes: The oven will turn on immediately and cook for a selected length of time. At the end of the cooking time, the oven will turn off automatically. 1. END OF CYCLE and the time of day will show in the display. The oven will shut off automatically. 2. The control will continue to beep 3 times every minute until CLEAR/OFF is pressed.
OPERATION When the set bake time runs out: SETTING DELAYED TIMED BAKE 1. END OF CYCLE and the time of day will show in the display. The oven will shut off automatically. 2. The unit will continue to beep 3 times every minute until CLEAR/OFF is pressed. The BAKE , COOK TIME and START TIME pads control the Delayed Timed Bake feature. The automatic timer of the Delayed Timed Bake will turn the oven ON and OFF at the time you select in advance. SETTING BROIL Leave the door open to the broil stop position.
OPERATION RECOMMENDED BROILING GUIDE The size, weight, thickness, starting temperature, and your preference of doneness will affect broiling times. This guide is based on meats at refrigerator temperature. For best results when broiling, use a pan designed for broiling (refer to the Fig. 1) Fig.1 Food Rare Medium Well Done Chicken Fish Fillets Ham Slices (precooked) Pork Chops Well Done Lamb Chops Medium Well Done Medium Well Done Salmon Steaks First Side Time (min.) Second Side Time (min.) 1 lb.
OPERATION SETTING CONVECTION BAKE Note: The convection fan can stop during a convection bake cycle to allow for more even heating. This is not a failure of the range and should be considered normal operation. Benefits of Convection Bake: 1. Some foods cook up to 25 to 30% faster, saving time and energy. 2. Multiple rack baking. 3. No special pans or bakeware needed. To set the oven for Convection Bake and temperature to 375°F: Español English 1. Press CONV.
OPERATION Roasting Rack Instructions SETTING CONVECTION ROAST When preparing meats for convection roasting,use the broiler pan and grid along with the roasting rack. The broiler pan will catch grease spills and the grid will help prevent grease splatters. The roasting rack will allow the heat to circulate around the meat. The CONV. ROAST pad is designed to give optimum cooking performance for this feature.
OPERATION USING THE FAVORITES FEATURE SETTING THE COOK &WARM FEATURE The FAVORITES pad is used to record and recall your favorite recipe settings. This feature may store and recall up to 3 different settings. The Favorite Setting feature may be used with COOK TIME feature. This feature will not work with any other function including START TIME feature. The COOK & WARM feature will maintain an oven temperature of 170°F. This feature is not desired to reheat cold foods.
OPERATION SETTING OVEN LOCKOUT FEATURE SETTING THE PROOF FEATURE The proof feature maintains a warm environment useful for rising yeast-leavened products. The START pad controls the Oven Lockout feature. The Oven Lockout feature automatically locks the oven door, prevents the Warming Drawer and most oven controls from being turned ON. It does not disable the clock, timer, or the interior oven light. How to Set the Oven For Proofing 1. Place the covered dough in a dish in the oven on shelf B or C.
SELF-CLEAN Before a Self-Clean Cycle The self-clean cycle uses above normal cooking temperatures to clean the oven’s interior automatically. It is normal for flare-ups, smoking, or flaming to occur during cleaning if the oven is heavily soiled. It is better to clean the oven regularly rather than to wait until there is a heavy build-up of soil in the oven. During the cleaning process, the kitchen should be well ventilated to get rid of normal odors associated with cleaning.
SELF-CLEAN The SELF-CLEAN pad is used to start a Self-Clean cycle. When used with START TIME pad, a delayed Self-Clean cycle may also be programmed. The Self-Clean function has cycle times of 2, 3, or 4 hours. If it becomes necessary to stop or interrupt a Self-Cleaning cycle due to excessive smoke or fire in the oven: 1. Touch CLEAR/OFF. 2. After the oven has cooled down, the DOOR LOCK will automatically release allowing you to open the oven door.
MAINTENANCE To Replace the Warming Drawer: 1. Replace shield on the right glide of the drawer body. 2. Pull the bearing glides to the front of the chassis glide. 3. Align the glide on each side of the drawer with the glide slots on the range. 4. Push the drawer into the range until levers click (approximately 2 inches). Pull the drawer open again to seat bearing glides into position. If you do not hear the levers click or the bearing glides do not feel seated, remove the drawer and repeat steps 2-4.
MAINTENANCE CARE &CLEANING Stainless Steel Surfaces (on some models) Changing the Oven Light Do not use a steel-wool pad; it will scratch the surface. The oven light is a standard 40-watt appliance bulb. It will come on when the oven door is open. When the oven door is closed, press OVEN LIGHT to turn it on or off. It will not work during the Self-Clean cycle. 1. Shake bottle well. 2. Place a small amount of Stainless Steel Appliance Cleaner or polish on a damp cloth or damp paper towel. 3.
MAINTENANCE Oven door Cleaning the glass cooktop. Use soap & water to thoroughly clean the top, sides, and front of the oven door. Rinse well. You may use a glass cleaner on the outside glass of the oven door. DO NOT immerse the door in water. DO NOT spray or allow water or the glass cleaner to enter the door vents. DO NOT use oven cleaners, cleaning powders, or any harsh abrasive cleaning materials on the outside of the oven door. DO NOT clean the oven door gasket.
MAINTENANCE Heavy, Burned-On Residue Glass surface—potential for permanent damage. 1. Allow the cooktop to cool. 2. Use the single-edge razor blade scraper at approximately a 45° angle against the glass surface and scrape the soil. It will be Note: Do not use a necessary to apply pressure to dull or nicked the razor scraper in order to blade. remove the residue. 3. After scraping with the razor scraper, spread a few drops of Ceramic Cooktop Cleaner on the entire burned residue area.
MAINTENANCE REMOVING &REPLACING THE LIFT-OFF OVEN DOOR Step. 1 Firmly grasp both sides of the door at the top. Step. 2 CAUTION With the door at the same angle as the removal position, seat the indentation of the hinge arm into the bottom edge of the hinge slot. The notch in the hinge arm must be fully seated into the bottom of the slot. • Be careful when removing and lifting the door. • DO NOT lift the door by the handle. - The door is very heavy. To remove the door: Step.
TROUBLESHOOTING BEFORE CALLING FOR SERVICE Before you call for service, review this list. It may save you time and expense. The list includes common occurrences that are not the result of defective workmanship or materials in this appliance. Problem Range is not level. Possible cause / Solution • Poor installation. Place oven rack in center of oven. Place a level on the oven rack. Adjust leveling legs at base of range until the oven rack is level.
TROUBLESHOOTING Problem Oven will not work Possible cause / Solution • Plug on range is not completely inserted in the electrical outlet. - Make sure electrical plug is plugged into a live, properly grounded outlet. • A fuse in your home may be blown or the circuit breaker tripped. - Replace the fuse or reset the circuit breaker. • Oven controls improperly set. - See the Using the oven section. • Oven too hot. - Allow the oven to cool to below locking temperature. Appliance does not operate.
TROUBLESHOOTING Problem Food does not broil properly Possible cause / Solution • Aluminum foil used on the the broiling pan and grid has not been fitted properly and slit as recommended. - See the using the oven section. • In some areas the power (voltage) may be low. - Preheat the broil element for 10 minutes. - See the Broiling Guide, page 23. Oven temperature too hot or too cold Scratches or abrasions on cooktop surface • Oven Sensor needs to be adjusted.
TROUBLESHOOTING Español English Problem Possible cause / Solution CLEAN flashes in the display DOOR LOCKED light and icon are on when you want to cook Steam from the vent • The self-clean cycle has been selected but the door is not closed. - Close the oven door. Burning or oily odor emitting from the vent • This is normal in a new oven and will disappear in time. - To speed the process, set a self-clean cycle for a minimum of 3 hours. See the Self-Clean section, page 29.
LG ELECTRIC OVEN LIMITED WARRANTY – USA LG Electronics Inc. will repair or replace your product, at LG’s option, if it proves to be defective in material or workmanship under normal use, during the warranty period set forth below, effective from the date of original consumer purchase of the product. This limited warranty is good only to the original purchaser of the product and effective only when used in U.S.A.
MEMO