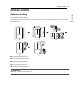
INSTALLATION 11 INSTALLATION Installation Overview Please read the following installation instructions first after purchasing this product or transporting it to another location. a Unpacking the Refrigerator b Choosing the Proper Location c Disassembling/Assembling d Connecting the Water Line e Leveling and Door Alignment WARNING Connect to potable water supply only.
12 INSTALLATION Unpacking the Refrigerator kPa), you can install a booster pump to compensate for the low pressure. WARNING Use two or more people to move and install the refrigerator. Failure to do so can result in back injury or other injury. The refrigerator is heavy. Protect the floor when moving the refrigerator for cleaning or service. Always pull the refrigerator straight out when moving it. Do not wiggle or walk the refrigerator when trying to move it, as floor damage could occur.
INSTALLATION 13 Dimensions and Clearances Check the dimensions of the appliance and the installation path to ensure there is sufficient room to move the refrigerator through doors or narrow openings. The installation location chosen for the refrigerator should allow space behind the unit for connections and airflow and space in front to open the doors and drawers. Too small of a distance from adjacent items may result in lowered freezing capability and increased electricity consumption charges.
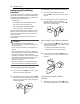
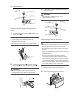
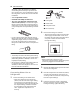
14 INSTALLATION Removing/Assembling Handles These instructions are for models which ship with the handles assembled. For models shipped with the handles disassembled, follow the instructions included in the handle package. Tools Needed Assembling Refrigerator Handles 1 If needed, reassemble the mounting fasteners a on the door with a 1/4 in. Allen wrench. 2 Place the handle on the door by fitting the handle footprints over the mounting fasteners and tightening the set screws b with a 3/32 in.
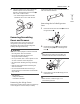
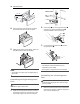
INSTALLATION 15 2 located at the bottom of the front side of the cover with a flat-head screwdriver. ENGLISH Place the handle on the door by fitting the handle footprints over the mounting fasteners and tightening the set screws b with a 3/32 in. Allen wrench. For models shipped with the handles assembled, use a 1/8 in. Allen wrench. Removing the Left Refrigerator Door 1 Disconnect all the wire harnesses a. Unscrew the ground wire b. 2 Rotate the hinge lever c counterclockwise.
16 INSTALLATION 3 Lift the door from the middle hinge pin and remove the door. CAUTION Place the door, inside facing up, on a nonscratching surface. Removing the Right Refrigerator Door 1 Detach all the wire harnesses a. Unscrew the ground wire b. NOTE The number of wire harnesses may vary depending on the model. Ground wire is only present on some models. Removing Freezer Drawers WARNING Use two or more people to remove and install the refrigerator doors and freezer drawer.
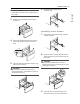
INSTALLATION 17 NOTE 6 3 ENGLISH The number of ice bins may vary depending on the model. Hold both rails and push them in simultaneously. Lift the front of the drawer up, then pull it straight out. Assembling Freezer Drawers 4 5 1 Pull out both rails simultaneously, until they are fully extended. 2 Grasp the drawer on each side and hook the drawer supports into the rail tabs located on both sides. Remove the Durabase basket from the rails. Remove the screws from the rails at both ends.
18 INSTALLATION 4 5 Insert the drawer into the frame, and push the drawer back until it clicks into place. 2 Fit the hinge a over the hinge lever latch b and slot it into place. Rotate the lever c counterclockwise to secure the hinge. 3 Connect all the wire harnesses d. Screw in the ground wire e. Replace the ice bin(s) in the drawer. Insert the Durabase basket in the rail assembly. NOTE The number of wire harnesses may vary depending on the model.
INSTALLATION 19 Turn the icemaker OFF if the refrigerator will be used before the water line is connected. WARNING Connect to potable water supply only. 2 CAUTION Fit the hinge a over the hinge lever latch b and slot it into place. Rotate the lever c clockwise and fasten the hinge. To prevent burns and product damage, only connect the refrigerator water line to a cold water supply. Wear eye protection during installation to prevent injury. Water Pressure You will need a cold water supply.
20 INSTALLATION add 8 feet (2.4 m). Be sure there is sufficient extra tubing (about 8 feet [2.4 m] coiled into 3 turns of about 10 in. [25 cm] diameter) to allow the refrigerator to move out from the wall after installation. ½ in. or adjustable wrench. Flat-blade and Phillips screwdrivers. a Packing Nut Two ¼ in. outer diameter compression nuts and 2 ferrules (sleeves) to connect the copper tubing to the shutoff valve and the refrigerator water valve.
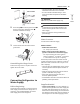
INSTALLATION 21 ENGLISH a Tubing Clamp b ¼ in. Tubing c ¼ in. Compression Nut d Ferrule (sleeve) e Refrigerator Connection 6 Turn the water on at the shutoff valve. Tighten any connections that leak. CAUTION Check to see if leaks occur at the water line connections. Make sure the house water valve is fully open. If it is not open completely, the icemaker and dispenser may not work properly. Leveling and Door Alignment 2 Open both doors and check to make sure that they close easily.
22 INSTALLATION Use the wrench (included with the owner's manual) to turn the nut in the door hinge to adjust the height. Turn the nut to the right to raise the door or to the left to lower it. Small parts are a swallowing hazard for small children. Keep snap rings out of the reach of children. Do not insert the snap ring on the hinge of the outer door section. Right Refrigerator Door The right refrigerator door does not have an adjustable nut.
INSTALLATION 23 automatically if the icemaker has been turned ON.