0 INSTALLATION INSTALLATION Before Installing Installation Overview Please read the following installation instructions first after purchasing this product or transporting it to another location. a Unpacking the Refrigerator b Choosing the Proper Location c Disassembling/Assembling d Connecting the Water Line e Leveling and Door Alignment WARNING water supply only.
INSTALLATION 11 Unpacking the Refrigerator install a booster pump to compensate for the low pressure. WARNING moving the refrigerator for cleaning or service. Always pull the refrigerator straight out when moving it. Do not wiggle or walk the refrigerator when trying to move it, as floor damage could occur. gasoline, away from the refrigerator. Failure to do so can result in fire, explosion, or death. NOTE your refrigerator before using.
12 INSTALLATION Dimensions and Clearances nce and the installation path to ensure there is sufficient room to move the refrigerator through doors or narrow openings. t the refrigerator through, remove the refrigerator doors. See Removing/ Assembling the Doors and Drawers in this manual. and airflow and space in front to open the doors and drawers. result in lowered freezing capability and increased electricity consumption charges.
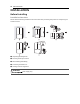
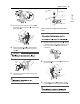
INSTALLATION 13 Removing/Assembling Handles The appearance of the handles may vary from what is shown. 1 If needed, reassemble the mounting fasteners a on the door with a 1/4 in. Allen wrench. 2 Place the handle on the door by fitting the handle footprints over the mounting fasteners and tightening the set screws b with a 3/32 in. Allen wrench. CAUTION refrigerator handles, grasp the handle firmly to avoid dropping it. animals.
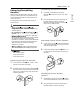
14 INSTALLATION fasteners and tightening the set screws b with a 1/8 in. Allen wrench. 1 The water supply is connected to the upper right part of the rear surface of the refrigerator. Remove the clip in the joint area. Hold the water supply connection and gently push the collet a to detach the water supply line as shown. models.
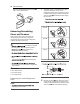
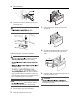
INSTALLATION 15 ENGLISH 3 Remove the cover and pull out the tube h. Disconnect all wire harnesses i. Unscrew the ground wire j. Removing the Right Refrigerator Door NOTE depending on the model. 4 1 Remove the top hinge cover screw a. Lift the hook (not visible), located at the bottom of the front side of the cover b, with a flat-head screwdriver. 2 Detach all the wire harnesses c. Unscrew the ground wire d. 3 Rotate the hinge lever e clockwise.
16 INSTALLATION 4 Lift the door from the middle hinge pin and remove the door. CAUTION 3 Lift the front of the drawer up, then pull it straight out. 4 Remove the Durabase basket from the rails. Remove the screws from the rails at both ends. 5 Grip both sides of the drawer and pull it up to remove it from the rails. nonscratching surface. Removing the Freezer Drawer WARNING to remove and install the refrigerator doors and freezer drawer. drawer. damage the floor.
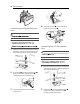
INSTALLATION 17 ENGLISH 6 Hold both rails and push them in simultaneously. 3 Lower the door into its final position and insert the screws in the rails on both sides. 4 Insert the drawer into the frame, and push the drawer back until it clicks into place. 5 Replace the ice bin in the drawer. Insert the Durabase basket in the rail assembly. Assembling the Freezer Drawer NOTE eezer drawers, assemble the second freezer drawer in the same way.
18 INSTALLATION Assembling the Right Refrigerator Door 4 Set the hinge cover d in place. Insert and tighten the cover screw e. CAUTION NOTE depending on the model. 1 Make sure that the plastic sleeve is inserted in the bottom of the door. Lower the door onto the middle hinge pin as shown in the figure. Assembling the Left Refrigerator Door CAUTION door is installed. ator door after the right NOTE depending on the model. 2 Fit the hinge a over the hinge lever latch b and slot it into place.
INSTALLATION 19 Type B ENGLISH 3 Type C Connect all the wire harnesses and the ground screw. NOTE 4 Push the water supply tube into the hole on the top case and pull it through the backplate. e Collet f Tube g Insert line h Clip d insert the tube until only one line shows on the tube. 5 Hold the water supply connection and gently push in the collet d to connect the water supply line as shown. Insert the tube at least 5/8 inch (15 mm) into the connector.
20 INSTALLATION Connecting the Water Line Before Beginning This water line installation is not covered by the refrigerator warranty. Follow these instructions carefully to minimize the risk of expensive water damage. If necessary, call a qualified plumber to correct water hammer before installing the water supply line to the refrigerator. Water banging in the pipes (water hammer) in residential plumbing can cause damage to refrigerator parts and lead to water leakage or flooding.
INSTALLATION 21 a saddle-type valve complies with your local plumbing codes. NOTE NOTE not be used. pe water valve should Water Line Installation Instructions Install the shutoff valve on the nearest frequently used drinking water line. WARNING 4 e to the cold water pipe with the pipe clamp. NOTE power drill) during installation, be sure the device is battery-powered, double-insulated or grounded in a manner that will prevent the hazard of electric shock. 1 Fasten the shutoff valve.
22 INSTALLATION d Outlet Valve e Ferrule (sleeve) 8 Flush out the tubing. supply on and flush out the tubing until the water is clear. Shut the water off at the water valve after about one quart of water has been flushed through the tubing. a Pipe Clamp b Inlet End c Clamp Screw d Washer 6 Route the tubing. tween the cold water line and the refrigerator. Route the tubing through a hole drilled in the wall or floor (behind the refrigerator or adjacent base cabinet) as close to the wall as possible.
INSTALLATION 23 CAUTION s occur at the water line Both the left and right refrigerator doors have an adjustable nut, located on the bottom hinge, to raise and lower them to align properly. If the space between the doors is uneven even after the door bins are filled, follow the instructions below to align the doors evenly: Use the wrench (included with the owner's manual) to turn the nut in the door hinge to adjust the height. Turn the nut to the right to raise the door or to the left to lower it.