website:::ht'_p:::Hus_gse_vice_¢om E E OWNER'S MANUAL & COOKING GUIDE PLEASE READ THIS OWNER'S MANUAL THOROUGHLY LRM1260SW/L RM 1260SB BEFORE OPERATING,,
SAFETY ................................................................................................................................................................. 3-4 Precautions to Avoid Possible Exposure to Excessive Microwave Energy ............................................................ 3 Grounding Instructions............................................................................................................................................ 3 Important Safety Instructions ............
PRECAUTIONS TO AVOID POSSIBLE EXPOSURE TO EXCESSIVE MICROWAVE ENERGY • Do not attempt to operate this oven with the door open, since open-door operation can result in harmful exposure to microwave energy. It is important not to defeat or tamper with the safety interlocks. • Do not place any object between the oven front face and the door, or allow soil or cleaner residue to accumulate on sealing surfaces. GROUNDING This appliance must be grounded.
IMPORTANT SAFETY INSTRUCTIONS The safety instructions below will tell you how to use your oven to avoid harm to yourself or damage to your oveR. WARN IN- , - To reduce the risk of burns, electric shock, fire, injury to persons, or exposure to excessive microwave energy: 1. Read all instructions before using the appliance. PRECAUTIONS TO AVOID POSSIBLE EXPOSURE TO EXCESSIVE MICROWAVE ENERGY found on page 3ofthis manual. 2. Read and foltowthe specific 3. This appliance must be grounded.
SPECIFICATIONS MODEL LRM 12608W/L RM 12608 B 120 V AC, 60 Hz Power Supply Rated Power Consumption 1650 W Microwave Output "1200 W 2450 MHz Frequency Rated Current 13.8A Overall Dimensions(WxHxD) 21 7/8"x12 1/2"x17 W' Oven Cavity Dimensions(WxHxD) 14 WtG"x9 %"x15 %" 1.2 Cu.ft. Effective Capacity of Oven Cavity *IEC 60705 RATING STANDARD Specifications subject to change without prior notice. INSTALLATION A. Circuits NOTES: For safety purposes this oven must be plugged into a 20 Amp circuit.
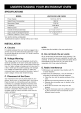
PARTS AND ACCESSORIES Your oven comes with the following accessories: • Owner's Manual and Cooking Guide : 1 each • Glass Turntable : 1 each • Rotating Ring : 1 each Oven Front Plate Window Door Screen Door Seal Display Window Control Panel -- Door Open Button Safety Door Lock System Glass Turntable Rotating Ring NOTE: This microwave oven is designed for household use only. It is not recommended for commercial use.
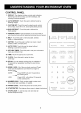
CONTROL PANEL 1. DISPLAY: The display includes a clock and indicators that tell you the time of day, cook time settings, and cooking functions selected. 2. AUTO DEFROST: Touch this pad to defrost foods by entering weight. 3. CUSTOM SET: Touch this pad to select sound control, time of day, clock Off or On, scroll speed,lbs/kg choice. 4.QUIG{ DEFROST: Touch this pad to defrost the foods quickly. 5.
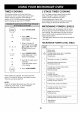
TIPS FOR MICROWAVE COOKING BROWNING Meat and poultry with high fat content cooked for at least 10 to 15 minutes wilt brown lightly. Foods cooked a shorter time can be brushed with a browning agent, such as Worcestershire sauce, soy sauce, or barbecue sauce. COVERING A cover will trap heat and steam and cause the food to cook more quickly. Use a lid or microwave-safe plastic wrap with one corner folded back to vent the excess steam.
PRECAUTIONS • Place the front surface of the door three inches or more from the countertop edge to avoid accidental tipping of the microwave oven during normal use. • To program the oven, make sure you touch the center of each pad firmly since the areas between the pads wilt not activate the oven. A tone wilt sound each time a pad is touched correctly. Do not touch several pads at once. • Do not strike the control panel with silverware, cookware, etc. Breakage may occur.
TIMED COOKING 2 STAGE TIMED COOKING This function allows you to cook food for a desired time. And in order to give you the best results, there are 10 power level settings in addition to HI-POWER because many food need slower cooking (at less than HI-POWER). For Two Stage cooking, repeat timed cooking steps 2 through 5 before touching the START pad for additional Time and Power program you want to add. Auto Weight Defrost can be programmed before the first stage to defrost first and then cook.
CHILD LOCK Ez-ON This is a unique safety feature that prevents unwanted oven operation such as used by children• Once the CHILD LOCK is set, no cooking can take place• A time-saving pad, this simplified control lets you quickly set and start microwave cooking without the need to touch START. 1. Touch STOP/CLEAR. Touch and hold START/ENTER until L_EI_E,T appears in the display• If the time of day was already set, the time of day wilt return to the display window• After you touch another Z.
CUSTOM SET CUSTOM SET provides five modes which make using your microwave oven quite handy. You can select SOUND ON/OFF, CLOCK SETTING, CLOCK ON/OFF. SCROLL SPEED, LBS/KG CHOICE. 1. Touch STOP/CLEAR. 2. CUSTOM SE_° 3. Touch CUSTOM SET. Five modes show in the display repeatedly. You can set them according to your intention: Touch1. Cill JI_ILII ll,lnILl ill,i I I_11 Till j UClt IF "lL./i 2. t.d 4;iT _()'vS I 3. _,FF,_,_,J-/c shows in the display. il 4. Till IF -I Touch CUSTOM SET.
SENSOR TOUCH SENSOR Use this function to cook food without entering a cook time or power. Refer to the Sensor touch table below more information. Category POTATO Direction Amount Popcorn lets you pop commercially packaged microwave popcorn. Pop only one package at a time. For best results, use fresh bag of popcorn. Place bag of prepackaged microwave popcorn on the center of turntable. Regular size. Use one fresh bag of popcorn.
AUTO COOK If you open the door or press STOP during cooking, the process will be canceled. This feature allows to cook foods that you select by touching AUTO COOK pad. It has 6 foods categories. CLOCK To 1. Touch STOP/CLEAR. 1. Touch STOP/CLEAR. AUTO CO0 K 2. Touch CLOCK " 2. Touch AUTO COOK. 5ELEET ,%I;;'_; I TO5 -SEEL_O,%;'G 5L,;',_'TE CLOCK shows in the display. 3. Il n _j 3. Touch number 1 0 3 0. Touch number 4. PRSTR...... H .... _.shows in the display. Till 4. OqO _o T#_ EI'ITEP, .
MELT SOFTEN The oven uses tow power to melt foods (butter, chocolate, marshmallows and cheese). See the following table. The oven uses low power to soften foods (butter, ice cream, cream cheese, and frozen juice) See the following table. 1. Touch STOP/CLEAR. 2. Touch 1. Touch STOP/CLEAR. 2. Touch MELT. -_ _,_'_E,£,,/E,,_, , ,_, '-/- - - SEE C M__I: T I /-'F ,'R kill ! T,_ D'2,_'7,_;';;5 5L,',_Eshows in the I--I-H-/ oO_.....__il _", 4. Touch number 2, then the oven will start automatically.
AUTO DEFROST *For best results, remove fish, shellfish, meat, and poultry from its original closed paper or plastic package (wrapper). Otherwise, the wrap will hold steam and juice close to the foods, which can cause the outer surface of the foods to cook. Three defrost sequences are preset in the oven. The defrost feature provides you with the best defrosting method for frozen foods. The cooking guide will show you which defrost sequence is recommended for the food you are defrosting.
AUTO DEFROST TABLE Meat setting FOOD SETTING AT BEEP SPECIAL INSTRUCTIONS BEEF Meat of irregular shape and large, fatty cuts of meat should have the narrow or fatty areas shielded with foil at the beginning of a defrost sequence. Ground Beef, Bulk MEAT Remove thawed portions with fork. Turn over. Return remainder to oven. Do not defrost tess than 1/4 lb. Freeze in doughnut shape. Ground Beef, Patties MEAT Separate and rearrange. Do not defrost tess than 2 oz. patties.
AUTO DEFROST TABLE (CONT.) Poultry setting FOOD CHICKEN Whole SETTING AT BEEP POULTRY Turn over (finish defrosting breastside down). Cover warm areas with aluminum foil. Place chicken breast-side up on a microwavable roasting rack. Finish defrosting by immersing in cold water. Remove giblets when chicken is partially defrosted. Separate pieces and rearrange. Place on a microwavable roasting rack. Turn over. Cover warm areas with aluminum foil. Finish defrosting by immersing in cold water.
To heat or reheat successfully in a microwave oven, it is important to follow several guidelines. Measure the amount of food in order to determine the time needed to reheat. Arrange the food in a circular pattern for best results. Room temperature food will heat faster than refrigerated food. Canned foods should be taken out of the can and placed in a microwave-safe container. The food wilt heat more evenly if covered with a microwave-safe lid or vented plastic wrap.
2 medium 4 medium Cook Time at High (Minute) 2-4 3-5 Asparagus, Fresh, Spears 1 lb. Beans, Green& Wax Vegetable Artichokes (8 oz. each) Amount Instructions Standing Time Trim.Add 2 tsp water and 2 tsp juice. Cover. 2-3 minutes 3-4 Add 1/2cup water. Cover. 2-3 minutes 1 lb. 4-6 Add 1/2cup water in 11/2qt. casserole.Stir halfway through cooking. 2-3 minutes Beets, Fresh 1 lb. 4-7 Add 1/2cup water in 11/2qt. coveredcasserole. Rearrangehalfway through cooking.
Questions and Answers Operation Question Answer Why is the oven light not on during cooking? There may be several reasons why the oven light is not on. Have you: • Set a cook time? • Touched START? Why does steam come out of the air exhaust vent? Steam is normally produced during cooking. The microwave oven has been designed to vent this steam. Will the microwave oven be damaged if it operates empty? Yes. Never operate the oven empty or without the glass turntable.
Questions and Answers (continued) Food Question Answer Why are scrambled eggs sometimes a little dry after cooking? Eggs wilt dry out when they are overcooked, even if the same recipe is used each time. The cooking time may need to be varied for one of these reasons: • Eggs vary in size. • Eggs are at room temperature one time and at refrigerator temperature another time. • Eggs continue cooking during standing time.
Before Calling for Service You can often correct operating problems yourself. If your microwave oven fails to work properly, locate the operating problem in the list below and try the solutions listed for each problem. If the microwave oven still does not work properly, contact the nearest LG Authorized Service Center. LG Authorized Service Centers are fully equipped to handle your service requirements.
LG Electronics, Inc. will repair or replace your product, material or workmanship under normal use, during the the date of original consumer purchase of the product. purchaser of the product and effective only when used WARRANTY LABOR: HOW SERVICE IS HANDLED: PERIOD: One Year from the Date of Purchase* PARTS (except as listed below): One Year from the Date of Purchase*. MAGNETRON: Ten Years from the Date of Purchase*.
LG El÷ P/NO.