Scan to see the online manual. OWNER'S MANUAL FRENCH DOOR REFRIGERATOR Read this owner's manual thoroughly before operating the appliance and keep it handy for reference at all times. ENGLISH LRYDS3106* / LRYKS3106* / LRYUS3106* / LRYXS3106* / LRYDC2606* / LRYKC2606* / LRYUC2606* / LRYXC2606* / LRFOC2606* / LRFXC2606* / LCFC26XS* / LRFXS3106* / LLFOC2606*/ LF26C6360* / LF31S6360* / LF31T6230* MFL69497046 Rev.03_032824 www.lg.com Copyright © 2022-2024 LG Electronics Inc. All Rights Reserved.
TABLE OF CONTENTS 3 IMPORTANT SAFETY INSTRUCTIONS 3 3 6 READ ALL INSTRUCTIONS BEFORE USE WARNING CAUTION 7 PRODUCT OVERVIEW 7 Product Features 13 INSTALLATION 13 14 17 18 23 25 26 Before Installing Choosing the Proper Location Removing/Assembling Handles Removing/Assembling Doors and Drawers Connecting Refrigerator to Water Supply Leveling and Door Alignment Turning on the Power 27 OPERATION 27 28 31 31 32 33 36 37 38 39 40 40 40 41 Before Use Control Panel Sabbath Mode Ice and Water Dispenser
IMPORTANT SAFETY INSTRUCTIONS 3 IMPORTANT SAFETY INSTRUCTIONS Safety Messages Your safety and the safety of others are very important. We have provided many important safety messages in this manual and on your appliance. Always read and follow all safety messages. This is the safety alert symbol. This symbol alerts you to potential hazards that can kill or injure you and others. All safety messages will follow the safety alert symbol and either the word WARNING or CAUTION.
IMPORTANT SAFETY INSTRUCTIONS • Do not bend or pinch the power cord excessively or place heavy objects on it. • When positioning the appliance, ensure the supply cord is not trapped or damaged. • Do not locate multiple portable socket-outlets or portable power supplies at the rear of the appliance.
IMPORTANT SAFETY INSTRUCTIONS 5 • Do not use electrical appliances inside the food storage compartments of the appliance, unless they are of the type recommended by the manufacturer. • Do not store explosive substances such as aerosol cans with a flammable propellant in this appliance. • This appliance incorporates an earth connection for functional purposes. • Connect to potable water supply only. - If connected to a water supply, connect to a potable water supply only. • Fill with potable water only.
IMPORTANT SAFETY INSTRUCTIONS Risk of Fire and Flammable Materials This symbol alerts you to flammable materials that can ignite and cause a fire if you do not take care. This appliance contains a small amount of isobutane refrigerant (R600a), which is combustible. When transporting and installing the appliance, care should be taken to ensure that no parts of the refrigerating circuit are damaged. Refrigerant squirting out of the pipes could ignite or cause an eye injury.
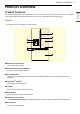
PRODUCT OVERVIEW 7 PRODUCT OVERVIEW The images in this guide may be different from the actual components and accessories, which are subject to change by the manufacturer without prior notice for product improvement purposes. Exterior † This feature is only available on some models. a Dispenser Control Panel Sets the dispenser mode. b Filtered Water and Ice Dispenser Dispenses purified water and ice.
PRODUCT OVERVIEW i Freezer Frozen food compartment Interior † This feature is only available on some models.
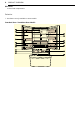
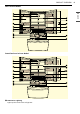
PRODUCT OVERVIEW 9 Door-in-Door Model: ENGLISH InstaView Door-in-Door Model: a LED Interior Lighting Lights up the inside of the refrigerator.
PRODUCT OVERVIEW b Air Filter Reduces odors inside the refrigerator compartment. c In-Door Icemaker (Refrigerator) Automatically produces and stores ice. d Door Mullion Prevents the cold air in the refrigerator from escaping when the doors are closed. CAUTION • To reduce the risk of scratching the door or breaking the center door mullion, make sure that the folding door mullion is folded in before closing the left-hand door.
PRODUCT OVERVIEW 11 r Durabase and Durabase Divider Provides storage for large frozen food items.
PRODUCT OVERVIEW Product Specifications The appearance and specifications listed in this manual may vary due to constant product improvements. Electrical requirements: 115 V, 60 Hz Min. / Max.
INSTALLATION 13 INSTALLATION Installation Overview Please read the following installation instructions first after purchasing this product or transporting it to another location. a Unpacking the Refrigerator b Choosing the Proper Location c Disassembling/Assembling d Connecting the Water Line e Leveling and Door Alignment WARNING • Connect to potable water supply only.
INSTALLATION Unpacking the Refrigerator kPa), you can install a booster pump to compensate for the low pressure. WARNING • Use two or more people to move and install the refrigerator. Failure to do so can result in back injury or other injury. • The refrigerator is heavy. Protect the floor when moving the refrigerator for cleaning or service. Always pull the refrigerator straight out when moving it. Do not wiggle or walk the refrigerator when trying to move it, as floor damage could occur.
INSTALLATION 15 Dimensions and Clearances • Check the dimensions of the appliance and the installation path to ensure there is sufficient room to move the refrigerator through doors or narrow openings. • The installation location chosen for the refrigerator should allow space behind the unit for connections and airflow and space in front to open the doors and drawers. • Too small of a distance from adjacent items may result in lowered freezing capability and increased electricity consumption charges.
INSTALLATION - Dimension/Clearance LRYKS3106* LRYKC2606* LRYXS3106* LRYXC2606* LF31S6360* LF26C6360* A Depth without Handle 34 1/4'' (869 mm) 29 1/8” (739 mm) B Width 35 3/4'' (908 mm) 35 /34” (908 mm) C Height to Top of Case 68 7/8'' (1750 mm) 68 7/8”(1750 mm) D Height to Top of Hinge 70 1/4''(1785 mm) 70 1/4''(1785 mm) E Back Clearance 2’’ (50 mm) 2’’ (50 mm) F Depth without Door 29 7/8'' (758 mm) 24 3/4” (628 mm) G Depth with Handle N/A N/A H Depth (Total with Fre
INSTALLATION 17 Removing/Assembling Handles • Tools Needed 1 If needed, reassemble the mounting fasteners a on the door with a 1/4 in. Allen wrench. 2 Place the handle on the door by fitting the handle footprints over the mounting fasteners and tightening the set screws b with a 3/32 in. Allen wrench.
INSTALLATION 2 Place the handle on the door by fitting the handle footprints over the mounting fasteners and tightening the set screws b with a 3/32 in. Allen wrench. located at the bottom of the front side of the cover with a flat-head screwdriver. • For models shipped with the handles assembled, use a 1/8 in. Allen wrench. Removing the Left Refrigerator Door 1 Removing/Assembling Doors and Drawers The water supply is connected to the upper right part of the rear surface of the refrigerator.
INSTALLATION 19 3 Rotate the hinge lever i counterclockwise. Lift the top hinge j free of the hinge lever latch k. ENGLISH CAUTION • When lifting the hinge free of the latch, be careful that the door does not fall forward. 2 Rotate the hinge lever c clockwise. Lift the top hinge d free of the hinge lever latch e. CAUTION 4 Lift the door from the middle hinge pin and remove the door. • When lifting the hinge free of the latch, be careful that the door does not fall forward.
INSTALLATION WARNING • Be careful of sharp hinges on both sides of the drawer. • When you lay the drawer down, be careful not to damage the floor. • Do not sit or stand on the freezer drawer. • To prevent accidents, keep children and pets away from the drawer. Do not leave the drawer open. If the Durabase® storage bin is removed from the freezer drawer, there is sufficient space for a small child or pet to crawl inside. 1 2 5 Pull the drawer open to full extension.
INSTALLATION 21 ENGLISH 2 Grasp the drawer on each side and hook the drawer supports into the rail tabs located on both sides. 5 Replace the ice bin(s) in the drawer. Insert the Durabase basket in the rail assembly. CAUTION • Do not hold the handle when removing or replacing the drawer. The handle may come off, causing personal injury. NOTE • The number of ice bins may vary depending on the model.
INSTALLATION 2 Fit the hinge a over the hinge lever latch b and slot it into place. Rotate the lever c counterclockwise to secure the hinge. 2 Fit the hinge a over the hinge lever latch b and slot it into place. Rotate the lever c clockwise and fasten the hinge. 3 Connect all the wire harnesses d. Screw in the ground wire e. 3 Connect all the wire harnesses and the ground wire. 4 Push the water supply lines into the hole on the top case and pull them through the backplate.
INSTALLATION 23 NOTE • Wear eye protection during installation to prevent injury. • Disassembling/Assembling the Water Lines You will need a cold water supply. e Collet f Tube g Insert line h Clip • Gently press the collet and insert the tube until only one line shows on the tube. Water Pressure • Models with water filter: - 20 - 120 psi (138 - 827 kPa) • Where reverse osmosis water filtration system is connected to a cold water supply: - 40 - 60 psi minimum to reverse osmosis system (2.8 kgf/cm2 - 4.
INSTALLATION it may already have the required fittings at either end. c Compression Nut d Ferrule (sleeve) 2 Flush out the tubing into a bucket. • Flush out the tubing coming from the home water supply until the water is clear. Shut the water off at the water valve after about one quart of water has been flushed through the tubing.
INSTALLATION 25 c ¼ in. Compression Nut d Ferrule (sleeve) 6 Turn the water on at the shutoff valve. • Tighten any connections that leak. CAUTION • Check to see if leaks occur at the water line connections. • Make sure the house water valve is fully open. If it is not open completely, the icemaker and dispenser may not work properly. Leveling and Door Alignment Door Alignment The door alignment method may differ depending on the model.
INSTALLATION the height. Turn the nut to the right to raise the door or to the left to lower it. Right Refrigerator Door The right refrigerator door does not have an adjustable nut. If the space between the doors is uneven, follow the instructions below to align the right door: 1 2 Lift up both the inner and outer door sections of the right door to raise them at the middle hinge. (It may be easier to lift them with the doors open.
OPERATION 27 OPERATION ENGLISH Before Use Checklist Clean the refrigerator. Clean the refrigerator thoroughly and wipe off all dust that accumulated during shipping. CAUTION • Do not scratch the refrigerator with a sharp object or use a detergent that contains alcohol, a flammable liquid or an abrasive when removing any tape or adhesive from the refrigerator. Remove adhesive residue by wiping it off with your thumb or dish detergent.
OPERATION Control Panel Depending on the model, some of the following functions may not be available. The actual control panel may differ from model to model. Control Panel Features Refrigerator Control Panel † This feature is only available on some models. Type A Type B Type C Type D a Refrigerator Indicates the set temperature of the refrigerator compartment in Celsius (°C) or Fahrenheit (°F). The default refrigerator temperature is 37 °F (3 °C).
OPERATION 29 b Water Filter c Freezer Indicates the set temperature of the freezer compartment in Celsius (°C) or Fahrenheit (°F). The default freezer temperature is 0 °F (-18 °C). Press the Freezer button repeatedly to select a new set temperature from - 7 °F to 5 °F (-23 °C to -15 °C). d Air Filter The air filter helps remove odors from the refrigerator. NOTE • Replace the air filter when the air filter indicator turns on.
OPERATION j Mini Cubed Ice† Press and hold the Mini Cubed Ice button for three seconds to turn the Mini Cubed Ice icemaker on/ off. k Cubed Ice† Press the Cubed Ice button to turn the Cubed Ice icemaker on/off. l Self Care† UV light is used to keep the water outlet clean. UV clean function runs automatically for 10 minutes every hour or can be manually activated at any time. Press and hold this button for 3 seconds to activate it manually.
OPERATION 31 Dispenser Control Panel Type A Type B ENGLISH Type A • Select the desired dispenser mode from the buttons on the dispenser control panel. From left to right, the icons indicate cubed ice a, water b, and crushed ice c. Press the dispenser switch with a glass or other container to dispense cubed ice, water or crushed ice. Type B • Select the desired dispenser mode from the Select button on the dispenser control panel.
OPERATION CAUTION • When dispensing ice from the dispenser, do not use a fragile container. • Do not hang on to or place heavy objects on the refrigerator’s dispenser. NOTE • The dispenser will not operate when either of the refrigerator doors is open. • If discolored ice is dispensed, check the water filter and water supply. If the problem continues, contact an LG Electronics Customer Information Center. Do not use the water or ice until the problem is corrected.
OPERATION 33 the ice bin when the icemaker is turned OFF for more than a few hours. ENGLISH The ice passage may become blocked with frost if only crushed ice is used. Remove the frost that accumulates by removing the ice bin and clearing the passage with a rubber spatula. Dispensing cubed ice can also help prevent frost buildup. • Avoid touching the auto shutoff (feeler arm) when replacing the ice bin. See the label on the ice compartment door for details.
OPERATION NOTE around the appliance, frequency of the door being opened, amount of food stored in the appliance, water pressure, etc.). • To increase ice production, use the Ice Plus function. The function increases both ice making and freezing capabilities. • In the event of a power outage, throw away the ice stored in the ice bin. In-Door Icemaker Freezer Icemaker (Cubed Ice) This feature is only available on some models.
OPERATION 35 NOTE • Ice cubes which are stored in the ice bin for a long time may clump together and be difficult to separate. If this happens, empty the ice bin completely and clean it before reinstalling it. • Depending on the water pressure or other conditions, the icemaker may produce linked cubes rather than individual pieces. The cubes easily separate when added to drinks. • After a short-term power outage, it will take longer to make the first batch of ice, and the ice may not be round.
OPERATION CAUTION - If you have both Craft Ice and Mini Cubed Ice, the bin for the Craft Ice must be located on the left and the bin for the Mini Cubed Ice on the right. Storing Food NOTE • If you are leaving home for a short period, like a short vacation, the refrigerator should be left on. Refrigerated foods that are able to be frozen will stay preserved longer if stored in the freezer. • If you are leaving the refrigerator turned off for an extended period, remove all food and unplug the power cord.
OPERATION 37 • Fruit • Leafy Vegetables - Remove store wrapping, trim or tear off bruised and discolored areas, wash in cold water, and drain. Place in plastic bag or plastic container and store in crisper. • Vegetables with skins (carrots, peppers) - Place in plastic bags or plastic container and store in crisper. • Fish - Freeze fresh fish and shellfish if they are not being eaten the same day purchased. Eating fresh fish and shellfish the same day purchased is recommended.
OPERATION • Fruit lets moist air out of the crisper for best storage of fruit. Removing/Assembling the Humidity Controlled Crispers 1 To remove, pull the crisper out to full extension, lift the front up, and pull straight out. Glide‘N’Serve Using the Glide‘N’Serve This feature is only available on some models. This function provides storage space with a variable temperature control that can keep the compartment at a slightly different temperature than the refrigerator section.
OPERATION 39 2 exposed to sudden temperature changes or impact. To assemble, slightly tilt up the front, insert the drawer into the frame and push it back into place. To detach a shelf, hold the adjoining shelf so that it does not move. 2 Pull the two shelves apart in the middle and tilt up the front of the shelf you want to remove until it's free from the other shelf. 3 Support the shelf from the bottom and lift it straight up. 4 Pull the shelf out.
OPERATION 6 Lower the front of the shelf so that the hooks drop into the slots. CAUTION Door-in-Door Compartment To access the Door-in-Door compartment, lightly press the button on the right refrigerator door handle. • Make sure that shelves are level from one side to the other. Failure to do so may result in the shelf falling or spilled food. InstaView This feature is only available on some models.
OPERATION 41 with the rubber drawer stops on the top is toward the inside of the freezer. ENGLISH 2 To assemble the bin, slide it in above the desired support and push down until it snaps into place. CAUTION • Regularly detach and wash the storage bins and shelves; they can become easily contaminated by food. • Do not apply excessive force while detaching or assembling the storage bins. • Do not use the dishwasher to clean the storage bins and shelves.
SMART FUNCTIONS SMART FUNCTIONS LG ThinQ Application This feature is only available on models with Wi-Fi. The LG ThinQ application allows you to communicate with the appliance using a smartphone. LG ThinQ Application Features Installing LG ThinQ Application and Connecting an LG Appliance Models with QR Code Scan the QR code attached to the product using the camera or a QR code reader application on your smartphone. † This feature is only available on some models.
SMART FUNCTIONS 43 • The surrounding wireless environment can make the wireless network service run slowly. • If the appliance is having trouble connecting to the Wi-Fi network, it may be too far from the router. Purchase a Wi-Fi repeater (range extender) to improve the Wi-Fi signal strength. • The network connection may not work properly depending on the Internet service provider. • The Wi-Fi may not connect or the connection may be interrupted because of the home network environment.
SMART FUNCTIONS the party responsible for compliance could void the user’s authority to operate the equipment. FCC RF Radiation Exposure Statement This equipment complies with FCC radiation exposure limits set forth for an uncontrolled environment. This transmitter must not be colocated or operating in conjunction with any other antenna or transmitter. This equipment should be installed and operated with a minimum distance of 20 cm (7.8 inches) between the antenna and your body.
SMART FUNCTIONS 45 company as long as product performance is maintained. Delay Appliance Load (DAL) The refrigerator responds to a DAL signal by providing a moderate load reduction for the duration of the delay period. This mode controls functions that consume a lot of energy such as adjusting the cooling system, running the defrost cycle, and making ice. You can manage Smart Grid features for the LG Smart Refrigerator. Please check the detailed specifications on the notice page on us.smartthinq.com.
SMART FUNCTIONS Using Audible Diagnosis to Diagnose Issues Follow the instructions below to use the audible diagnosis method. • Launch the LG ThinQ application and select the Smart Diagnosis feature in the menu. Follow the instructions for audible diagnosis provided in the LG ThinQ application. 1 Open the right refrigerator door. 2 Hold the mouthpiece of your phone in front of the speaker that is located on the right hinge of the refrigerator door.
MAINTENANCE 47 MAINTENANCE WARNING • Use non-flammable cleaner. Failure to do so can result in fire, explosion, or death. CAUTION • Do not use an abrasive cloth or sponge when cleaning the interior and exterior of the refrigerator. • Do not place your hand on the bottom surface of the refrigerator when opening and closing the doors. General Cleaning Tips • Both the refrigerator and freezer sections defrost automatically; however, clean both sections once a month to prevent odors.
MAINTENANCE vents. Do not remove the panel covering the condenser coil area. Air Filter 4 Align tabs a on the filter cover with hooks b on the refrigerator wall. 5 Rotate the air filter cover clockwise until the hooks engage and the cover locks in place. 6 Press and hold the Air Filter button on the control panel for 3 seconds to reset the filter sensor. This feature is only available on some models. Replacing the Air Filter Replace the Air Filter: • Approximately every six months.
MAINTENANCE 49 • Do not install where water hammer conditions may occur. If water hammer conditions exist you must install a water hammer arrester. Contact a plumbing professional if you are uncertain how to check for this condition. 2 Remove the disposable water filter. ENGLISH • Do not install if water pressure exceeds 120 psi (827 kPa). If your water pressure exceeds 80 psi, you must install a pressure limiting valve. Contact a plumber if uncertain how to check your water pressure.
MAINTENANCE CAUTION • LG strongly recommends that you use LGauthorized water filters to prevent water quality issues, water leakage and appliance malfunction.
MAINTENANCE 51 Performance Data Sheet Model: LT1000P, LT1000PC, LT1000PCS NSF System Trade Name Code: MDJ64844601 System tested and certified by NSF International against NSF/ANSI Standard 42, Standard 53 and Standard 401 for the reduction of substances listed below.
MAINTENANCE * Based on the use of Cryptosporidium parvum oocysts. Guidelines for Application / Water Supply Parameters Service Flow 0.5 gpm (1.9 lpm) Water Supply Community or Private Well - Potable Water Water Pressure 20 – 120 psi (138 – 827 kPa) Water Temperature 33 °F – 100 °F (0.6 °C – 37.
TROUBLESHOOTING 53 TROUBLESHOOTING Frequently Asked Questions Q: What are the best temperature settings for my refrigerator and freezer? A: The default setting for the refrigerator is 37° Fahrenheit (3° Celsius). The default setting for the freezer is 0° Fahrenheit (-18° Celsius). Adjust these settings as necessary to keep food at desired temperatures. Milk should be cold when stored on the inner shelf of the refrigerator. Ice cream should be firm and ice cubes should not melt in the freezer.
TROUBLESHOOTING Before Calling for Service Review this section before calling for service; doing so will save you both time and money. Cooling Problem Refrigerator is not cooling or has no power. Possible Cause & Solution The refrigerator control is set to OFF (some models). • Turn the control ON. Refer to the Setting the Controls section for proper temperature settings. Refrigerator is set to Demo Mode.
TROUBLESHOOTING 55 Problem Interior moisture buildup. Possible Cause & Solution Weather is humid. Defrost cycle recently completed. • During the defrost cycle, the temperature of each compartment may rise slightly and condensation may form on the back wall. Wait 30 minutes and confirm that the proper temperature has been restored once the defrost cycle has completed. Food is not packaged correctly.
TROUBLESHOOTING Problem Refrigerator or Freezer section is too warm. Possible Cause & Solution Unit is installed in a hot location. • The refrigerator should not be operated in temperatures above 110 °F (43 °C). A large amount of food or hot food was added to either compartment. • Adding food warms the compartment requiring the cooling system to run. Allowing hot food to cool to room temperature before putting it in the refrigerator will reduce this effect. Doors are not closed correctly.
TROUBLESHOOTING 57 Problem Icemaker is not making enough ice. Possible Cause & Solution Reverse osmosis filtration system is used. Tubing connecting refrigerator to house supply valve is kinked. • The tubing can kink when the refrigerator is moved during installation or cleaning resulting in reduced water flow. Straighten or repair the water supply line and arrange it to prevent future kinks. Doors are opened often or for long periods of time.
TROUBLESHOOTING Problem Possible Cause & Solution Ice has bad taste or odor. The ice storage bin needs to be cleaned. Icemaker is making too much ice. Icemaker shutoff (arm/ sensor) is obstructed. Ice is not dispensing. • Empty and wash the bin (discard old cubes). Make sure that the bin is completely dry before reinstalling it. • Empty the ice bin. If your icemaker is equipped with an ice shutoff arm, make sure that the arm moves freely.
TROUBLESHOOTING 59 Problem Water is not dispensing. Possible Cause & Solution New installation or water line recently connected. The dispenser panel is locked. • Press and hold the Lock button for three seconds to unlock the control panel and dispenser. The dispenser is not set for water dispensing. • The dispenser can be set for ice or water. Make certain that the control panel is set for the proper operation. Press the Water button on the control panel to dispense water.
TROUBLESHOOTING Problem Water has bad taste or odor. Possible Cause & Solution Refrigerator was recently installed. • Dispense 2.5 gallons of water (flush for approximately 5 minutes) to remove trapped air and contaminants from the system. Do not dispense the entire 2.5 gallon amount continuously. Depress and release the dispenser pad for cycles of 30 seconds ON and 60 seconds OFF. Parts & Features Problem Doors will not close correctly or pop open.
TROUBLESHOOTING 61 Problem The refrigerator is located near a fire source, such as a fireplace, chimney, or candle. • Make sure that the refrigerator is not located near a fire source, such as a fireplace, chimney or candle. Noises Problem Clicking Possible Cause & Solution The defrost control will click when the automatic defrost cycle begins and ends. The thermostat control (or refrigerator control on some models) will also click when cycling on and off.
TROUBLESHOOTING Wi-Fi Problem Trouble connecting appliance and smartphone to Wi-Fi network Possible Cause & Solution The password for the Wi-Fi network was entered incorrectly. • Delete your home Wi-Fi network and begin the connection process again. Mobile data for your smartphone is turned on. • Turn off the Mobile data on your smartphone before connecting the appliance. The wireless network name (SSID) is set incorrectly.
LIMITED WARRANTY 63 LIMITED WARRANTY TERMS AND CONDITIONS ARBITRATION NOTICE: THIS LIMITED WARRANTY CONTAINS AN ARBITRATION PROVISION THAT REQUIRES YOU AND LG ELECTRONICS (“LG”) TO RESOLVE DISPUTES BY BINDING ARBITRATION INSTEAD OF IN COURT, UNLESS YOU CHOOSE TO OPT OUT. IN ARBITRATION, CLASS ACTIONS AND JURY TRIALS ARE NOT PERMITTED. PLEASE SEE THE SECTION TITLED “PROCEDURE FOR RESOLVING DISPUTES” BELOW.
LIMITED WARRANTY • Damage or failure of the Product to perform during power failures and interrupted or inadequate electrical service. • Damage or failure of the Product caused by leaky or broken water pipes, frozen water pipes, restricted drain lines, inadequate or interrupted water supply or inadequate supply of air. • Damage or failure of the Product resulting from operating the Product in a corrosive atmosphere or contrary to the Product owner’s manual.
LIMITED WARRANTY 65 Agreement to Binding Arbitration and Class Action Waiver. Upon failure to resolve the dispute during the 30 day period after sending written notice to LG, you and LG agree to resolve any claims between us only by binding arbitration on an individual basis, unless you opt out as provided below. Any dispute between you and LG shall not be combined or consolidated with a dispute involving any other person’s or entity’s product or claim.
LIMITED WARRANTY 800-980-2973. You must include in the opt out e-mail or provide by telephone: (a) your name and address; (b) the date on which the product was purchased; (c) the product model name or model number; and (d) the serial number (the serial number can be found (i) on the product; or (ii) online by accessing https:// www.lg.com/us/support/repair-service/schedule-repair-continued and clicking on “Find My Model & Serial Number”).
LIMITED WARRANTY 67 Canada TERMS AND CONDITIONS Should your LG Refrigerator ("Product") fail due to a defect in materials or workmanship under normal and proper use, during the warranty period set forth below, LG Electronics Canada, Inc. ("LGECI") will, at its option, repair, replace or pro rate the Product upon receipt of proof of the original retail purchase.
LIMITED WARRANTY THIS LIMITED WARRANTY DOES NOT COVER: • Service trips to i) deliver, pick up, or install or; educate on how to operate the Product; ii) correct wiring or plumbing; or iii) correct unauthorized repairs or installations of the Product; • Damage or failure of the Product to perform during power failures and interrupted or inadequate electrical service; • Damage or failure caused by leaky or broken water pipes, frozen water pipes, restricted drain lines, inadequate or interrupted water supp
LIMITED WARRANTY 69 PROCEDURE FOR RESOLVING DISPUTES: Definitions. For the purposes of this section, references to “LG” mean LG Electronics Canada, Inc.
LIMITED WARRANTY considering factors including, but not limited to, the purchase amount and claim amount. Notwithstanding the foregoing, if applicable law allows for an award of reasonable attorneys’ fees and expenses, an arbitrator can award them to the same extent that a court would.
Memo 71
LG Customer Information Center For inquiries or comments, visit www.lg.com or call: 1-800-243-0000 1-888-542-2623 U.S.A. CANADA Register your product Online! www.lg.