ENGLISH FRANÇAIS OWNER’S MANUAL ELECTRIC RANGE Please read this guide thoroughly before operating and keep it handy for reference at all times. MODELS LSB5682SS LSB5682SB LSB5682SW P/NO : MFL55646602 www.lg.
Thank you for purchasing an LG electric oven. Please record the model number and serial number of this unit for future reference. We also suggest that you record the details of any contact with LG (LG Electronics Canada, Inc.) concerning this unit. Model No.: Serial No.: Dealer: Dealer Phone No.: Staple your receipt here to verify your retail purchase. TABLE OF CONTENTS SAFETY................................................................................................3-8 - Setting bake ..............
SAFETY Read and follow all instructions before using your oven to prevent the risk of fire, electric shock, personal injury, or damage when using the range. This guide do not cover all possible conditions that may occur. Always contact your service agent or manufacturer about problems that you do not understand. This is the safety alert symbol. This symbol alerts you to potential hazards that can kill or hurt you and others.
SAFETY IMP O R TA N T S A F E T Y IN S T R U C T IO N S OVEN • Do Not Use Oven Cleaners. No commercial oven cleaner or oven liner protective coating of any kind should be used in or around any part of the oven. • Clean in the self-clean cycle only parts listed in this manual. Before self-clean the oven, remove the broiler pan and any utensils of foods from the oven. • Before Self-Cleaning the Oven. Remove broiler pan and other utensils. • Never keep pet birds in the kitchen.
SAFETY WARNING • DO NOT step or sit on the door. Install the Anti-Tip Bracket packed with range. - The range could be tipped and injury might result from spilled hot liquid, food, or the range itself. - If the range is pulled away from the wall for cleaning, service, or any other reason, ensure that the Anti-Tip Device is properly reengaged when the range is pushed back against the wall. • Turn POWER OFF before removing the Warming Drawer.
SAFETY IMP O R TA N T S A F E T Y IN S T R U C T IO N S CAUTION • Storage in or on appliance. - Flammable materials should not be stored in an oven or near surface elements. • Be certain all packing materials are removed from the appliance before operating. - Keep plastics, clothes, and paper away from parts of the appliance that may become hot. • Wear proper apparel. - Loose-fitting or hanging garments should never be worn while using the appliance.
SAFETY CAUTION • Use caution with the TIMED BAKE or DELAYED TIMED BAKE features. Use the automatic timer when cooking cured or frozen meats and most fruits and vegetables. Foods that can easily spoil, such as milk, eggs, fish, meat or poultry, should be chilled in the refrigerator first. Even when chilled, they should not stand in the oven for more than 1 hour before cooking begins, and should be removed promptly when cooking is completed. - Eating spoiled food can result in sickness from food poisoning.
SAFETY Appliance outlets The 120V appliance outlets located on the control console may be used to run portable appliances placed on countertops beside the range. The outlets operate independently and are not affected by range control settings. Circuit Breakers Appliance Outlet Note: Do not place portable appliances on the cooktop. Damage to the portable appliance could result if the cooktop is hot.
SURFACE CONTROLS COOKING LOCATIONS OF THE RADIANT SURFACE ELEMENTS AND CONTROLS The PF message will appear whenever there has been a power interruption to the appliance. To clear the PF message press ON/OFF control pad to reset and be sure to reset the clock with the correct time of day. The radiant surface elements are located on the cooktop as below. The radiant control key locations are same with radiant surface elements on the cooktop.
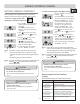
SURFACE CONTROLS COOKING SETTING SURFACE CONTROLS To turn on a dual surface unit (Right Front) 1. Press the ON/OFF pad. The display will flash “ ”. (If no further pads are pressed within 10 seconds, the display will disappear.) 2. Press the ELEMENT SIZE pad as needed to select the desired burner size. Default size is 9”. When first selected, 12” size is ON. The light above the ELEMENT SIZE pad indicates which size surface unit is on. 3.
SURFACE CONTROLS COOKING CAUTION • Use only cookware and dishes recommended as safe for oven and cooktop use. • Always use oven mitts when removing food from the warming center as cookware and plates will be hot. • When warming foods do not use containers that seal. Allow venting for heated air to escape. • DO NOT use plastic wrap to cover foods. To set the warming zone control 1. Press ON/OFF pad at the warming zone control position. The warming zone indicator light will flash.
SURFACE CONTROLS COOKING TIPS TO PROTECT THE SMOOTHTOP SURFACE Cleaning SMOOTHTOP SURFACE Smoothtop Surface Notes: • Cooktop may emit light smoke and odor the first few times the cooktop is used. This is normal. • Smoothtop cooktops retain heat for a period of time after the element is turned off. Turn the elements off a few minutes before food is completely cooked and use the retained heat to complete cooking. When the hot surface light turns off, the cooking area will cool down enough to touch.
SURFACE CONTROLS COOKING HOME CANNING TIPS Using the right cookware can prevent many problems, such as food taking longer to cook or achieving inconsistent results. Proper pans will reduce cooking times and cook food more evenly. Stainless steel is recommended. Be sure the canner is centered over the surface unit. And Make sure the canner is flat on the bottom. The base must not be more than 1 inch larger than the element.
INFORMATION PARTS AND FEATURES Appliance outlet Appliance outlet circuit breaker Warming zone element Oven vent Single element Dual element Ceramic glass Automatic oven light switch Self clean latch Oven racks (2 ea) Broiler fan & Grid Gasket Oven door Anti-tip bracket Model and serial number plate Storage drawer Roast rack Oven racks (2ea) Template Anti-tip bracket Screws (6ea) Cleaning pad Anchors (6ea) Grid Broiler pan Cleaner - 14 -
INFORMATION READ THE INSTRUCTIONS CAREFULLY BEFORE USING THE OVEN. For satisfactory use of your oven, become familiar with the various features and functions of the oven as described below. Detailed instructions for each feature and function follow later in this Owner’s manual. BAKE PAD: Press to select the bake function. PROOF PAD: Press to select a warm environment useful for rising yeast-leavened products. BROIL PAD: Press to select the broil function.
OPERATION SETTING THE CLOCK SETTING THE TIMER ON/OFF The CLOCK pad is used to set the clock. The clock has been preset at the factory for 12 hours operation. When the range is first plugged in, or when the power supply to the range has been interrupted, the timer in the display will show with power failure "PF". You can make a choice between 12-hour clock and 24-hour clock (refer to the page 28): The TIMER ON/OFF serves as an extra timer in the kitchen that will beep when the set time has run out.
OPERATION (OPTIONS) THERMOSTAT ADJUSTMENT The temperature in the oven has been preset at the factory. When first using the oven, be sure to follow recipe times and temperatures. If you think the oven is too hot or too cool, the temperature in the oven can be adjusted. Before adjusting, test a recipe by using a temperature setting that is higher or lower than the recommended temperature. The baking results should help you to decide how much of an adjustment is needed.
OPERATION (OPTIONS) SETTING PREHEATING ALARM LIGHT ON/OFF SETTING TEMPERATURE UNIT — FAHRENHEIT OR CENTIGRADE The interior oven light automatically turn on when the oven door is opened. When oven reaches set-temperature after preheat, the oven notifies preheat-end by flashing oven lamp until door is opened. You can activate or deactivate smart oven light feature. Default Setting is on. COOK & WARM pad control the Fahrenheit or Centigrade temperature display modes.
OPERATION To change the Bake Temperature while cooking (example changing from 375° to 425°F): The BAKE pad controls normal baking. The oven can be programmed to bake at any temperature from 170°F to 550°F. Default temperature is 350°F (175°C). 1. If the oven temperature needs to be changed to 425°F, press BAKE pad and "350°" will show in the display. 2. Press 4, 2, 5. pads. To set the Bake Temperature to 375°F: 1. Press BAKE pad. "350°" will appear in the display. 2. Press 3, 7, 5. "BAKE" will flash. 3.
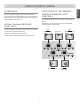
OPERATION BAKING LAYER CAKES BEFORE USING OVEN RACKS Baking results will be better if baking pans are centered in the oven as much as possible. If baking with more than one pan, place the pans so each has at least 1” to 11/2” of air space around it. If cooking on multiple racks,place the oven racks in positions B and D (for 2 racks). Place in positions B, D and F (for 3 racks). Place the cookware as shown in Fig. 1, 2. The oven has three racks (2 standard racks, 1 split rack).
OPERATION When the Timed Bake finishes: The oven will turn on immediately and cook for a selected length of time. At the end of the cooking time, the oven will turn off automatically. 1. "END" and the time of day will show in the display. The oven will shut off automatically. 2. The control will continue to beep 3 times every 1 minute until CLEAR/OFF pad is pressed. To program the oven to begin baking immediately and to shut off automatically: (example below to bake at 300°F for 30 minutes): CAUTION 1.
OPERATION SETTING DELAYED TIMED BAKE When the set bake time runs out: 1. "END" and the time of day will show in the display. The oven will shut off automatically. 2. The unit will continue to beep 3 times every 1 minute until CLEAR/OFF pad is pressed. The BAKE , COOK TIME and START TIME pads control the Delayed Timed Bake feature. The automatic timer of the Delayed Timed Bake will turn the oven ON and OFF at the time you select in advance.
OPERATION ENGLISH RECOMMENDED BROILING GUIDE The size, weight, thickness, starting temperature and your preference of doneness will affect broiling times. This guide is based on meats at refrigerator temperature. For best results when broiling, use a pan designed for broiling (refer to the Fig. 1) Fig.
OPERATION SETTING CONVECTION BAKE Note: The convection fan can stop during a convection bake cycle to allow for more even heating. This is not a failure of the range and should be considered normal operation. Benefits of Convection Bake: 1. Some foods cook up to 25 to 30% faster, saving time and energy. 2. Multiple rack baking. 3. No special pans or bakeware needed. To set the oven for Convection Bake and temperature to 375°F: 1. Press CONV. BAKE pad.
OPERATION When preparing meats for convection roasting,use the broiler pan and grid along with the roasting rack. The broiler pan will catch grease spills and the grid will help prevent grease splatters. The roasting rack will allow the heat to circulate around the meat. The CONV. ROAST pad is designed to give optimum cooking performance for this feature. The Convection Roast pad combines a cook cycle with the convection fan and element to roast meats and poultry.
OPERATION SETTING THE COOK &WARM FEATURE SETTING OVEN & COOKTOP LOCKOUT FEATURE The COOK & WARM feature will maintain an oven temperature of 170°F. This feature is not desired to reheat cold foods. The Cook & Warm feature will keep cooked food warm for serving up to 3 hours after cooking has finished. After 3 hours the COOK & WARM feature will shut the oven OFF automatically.
OPERATION SETTING THE PROOF FEATURE The proof feature maintains a warm environment useful for rising yeast-leavened products. Your control is set to use a 12-hour clock. If you would prefer to have a 24-hour time clock, follow the steps below. How to Set the Oven For Proofing 1. Place the covered dough in a dish in the oven on shelf B or C. Note: For best results, cover the dough with a cloth or with plastic wrap. Changing between 12 or 24 hour time of day 1. Press and hold COOK & WARM pad for 3seconds.
SELF-CLEAN Before a Self Clean Cycle The self-clean cycle uses above normal cooking temperatures to automatically clean the oven interior. It is normal for flare-ups, smoking, or flaming to occur during cleaning if the oven is heavily soiled. It is better to clean the oven regularly rather than to wait until there is a heavy build-up of soil in the oven. During the cleaning process, the kitchen should be well ventilated to get rid of normal odors associated with cleaning.
SELF-CLEAN Stopping or Interrupting a Self-Clean cycle: If it becomes necessary to stop or interrupt a Self-Cleaning cycle due to excessive smoke or fire in the oven: 1. Touch CLEAR/OFF. 2. After the oven has cooled down, the DOOR LOCK will automatically release allowing you to open the oven door. To start an immediate Self-Clean cycle and shut off automatically 1. Be sure the clock is set with the correct time of day, the oven is empty and the oven door is closed. 2.
MAINTENANCE REMOVING & REPLACING THE WARMING DRAWER To Replace the Warming Drawer: 1. Replace shield on the right glide of the drawer body. 2. Pull the bearing glides to the front of the chassis glide. 3. Align the glide on each side of the drawer with the glide slots on the range. 4. Push the drawer into the range until levers “click” (approximately 2 inch). Pull the drawer open again to seat bearing glides into position.
MAINTENANCE Changing the Oven Light Do not use a steel-wool pad; it will scratch the surface. The oven light is a standard 40-watt appliance bulb. It will come on when the oven door is open. When the oven door is closed, press LIGHT to turn it on or off. It will not work during the Self-Clean cycle. 1. Shake bottle well. 2. Place a small amount of Stainless Steel Appliance Cleaner or polish on a damp cloth or damp paper towel. 3.
MAINTENANCE Oven door CLEANING THE GLASS COOKTOP Use soap & water to thoroughly clean the top, sides and front of the oven door. Rinse well. You may use a glass cleaner on the outside glass of the oven door. DO NOT immerse the door in water. DO NOT spray or allow water or the glass cleaner to enter the door vents. DO NOT use oven cleaners, cleaning powders or any harsh abrasive cleaning materials on the outside of the oven door. DO NOT clean the oven door gasket.
MAINTENANCE Metal Marks and Scratches To clean the glass-ceramic 1. Be careful not to slide pots and pans across your cooktop. It will leave metal markings on the cooktop surface. These marks are removable using the Ceramic Cooktop Cleaner or included cleaner with the Cleaning Pad for Ceramic Cooktops. 2. If pots with a thin overlay of aluminum or copper are allowed to boil dry, the overlay may leave black discoloration on the cooktop.
MAINTENANCE REMOVING & REPLACING THE LIFT-OFF OVEN DOOR To replace the door: Step. 1 Firmly grasp both sides of the door at the top. CAUTION Step. 2 • Be careful when removing and lifting the door. • DO NOT lift the door by the handle. With the door at the same angle as the removal position, seat the indentation of the hinge arm into the bottom edge of the hinge slot. The notch in the hinge arm must be fully seated into the bottom of the slot. - The door is very heavy. To remove the door: Step.
TROUBLESHOOTING Before you call for service, review this list. It may save you time and expense. The list includes common occurrences that are not the result of defective workmanship or materials in this appliance. Problem Range is not level. Possible cause / Solution • Poor installation. Place oven rack in center of oven. Place a level on the oven rack. Adjust leveling legs at base of range until the oven rack is level.
TROUBLESHOOTING Problem Oven will not work Possible cause / Solution • Plug on range is not completely inserted in the electrical outlet. - Make sure electrical plug is plugged into a live, properly grounded outlet. • A fuse in your home may be blown or the circuit breaker tripped. - Replace the fuse or reset the circuit breaker. • Oven controls improperly set. - See the Using the oven section. • Oven too hot. - Allow the oven to cool to below locking temperature. Appliance does not operate.
TROUBLESHOOTING Food does not broil properly Possible cause / Solution • Aluminum foil used on the the broiling pan and grid has not been fitted properly and slit as recommended. - See the using the oven section. • In some areas the power (voltage) may be low. - Preheat the broil element for 10 minutes. - Broil for the longest period of time recommended in the Broiling Guide. Oven temperature too hot or too cold Scratches or abrasions on cooktop surface • Oven Sensor needs to be adjusted.
TROUBLESHOOTING Problem Possible cause / Solution “CLEAN” flashes in the display “DOOR LOCKED” light is on when you want to cook • The self-clean cycle has been selected but the door is not closed. - Close the oven door. Steam from the vent • When using the convection feature, it is normal to see steam coming out of the oven vent. As the number of racks or amount of food being cooked increases, the amount of visible steam will increase. - This is normal.
LG ELECTRONICS CANADA, INC. LG ELECRIC OVEN LIMITED WARRANTY - Canada WARRANTY : Should your LG Electric Oven (“Product”) fail due to a defect in material or workmanship under normal home use during the warranty period set forth below, LG Canada will at its option repair or replace the Product upon receipt of proof of original retail purchase.
MEMO
To contact LG Electronics 24 hours a day, 7 days a week: Pour contacter LG Electronics 24h/24 et 7jours/7: 1-888-542-2623 (CANADA) Or visit us on the Web at: www.lg.com 1-888-542-2623 (CANADA) Ou consultez notre site Internet au: www.lg.