ENGLISH OWNER’S MANUAL SXS REFRIGERATOR Please read this owner's manual thoroughly before operating and keep it handy for reference at all times. LSC24971ST LSSC243ST P/No. : MFL59475225 www.lg.
Table of contents Installation Model/Serial record 3 Basic safety precautions 3 Identification of parts 10 Where to install 11 Door removal 12 Mount the freezer and refrigerator compartment doors 13 Water supply installation 13 Water connection instruction guide 14 17 Height adjustment Dimensions Operation Suggestion on food storage Care and maintenance 2 19 Starting 20 Adjusting the temperatures and functions 20 Adjusting the temperatures and display 21 Operating the dispenser
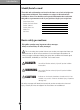
Introduction Model/Serial record The model and serial numbers are found on the inner case or back of refrigerator compartment of this unit. These numbers are unique to this unit and not available to others. You should record requested information here and retain this guide as a permanent record of your purchase. Staple your receipt here. Date of purchase Dealer purchased from Dealer address Dealer phone no. Model no. Serial no.
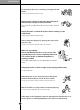
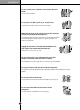
Introduction To reduce the risk of fire, electric shock, or injury to persons when using your product, basic safety precautions should be followed, including the following. Read all instructions before using this appliance. 1. When connecting the power The dedicated outlet should be used. • Using several devices at one outlet may cause a fire. Do not allow the power plug to face upward or to be squeezed at the back of the refrigerator.
Introduction Do not pull out the cord or touch the power plug with wet hands. It may cause electric shock or injury. Remove water or dust from the power plug and insert it with the ends of the pins securely connected. Dust, water or unstable connection may cause a fire or electric shock. Unplug the power cord from the power outlet for cleaning or other requirements. It may cause electric shock or injury. Pull out the power plug not by grasping the cord but the plug of its end.
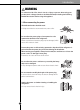
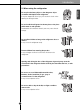
Introduction 2. When using the refrigerator ENGLISH Do not place the heavy object or the dangerous object (container with liquid) on the refrigerator. It may be dropped to cause injury, fire or electric shock when opening or closing the door. Do not install the refrigerator in the wet place or the place which water or rain splashes. Deterioration of insulation of electric parts may cause electric leakage. Do not allow children to hang on the refrigerator doors or shelves.
Introduction Do not use the combustible spray near the refrigerator. It may cause fire. Install in places away from the fire such as the place where flammable gas is leaked. It may cause fire. Do not place flower vase, cup, cosmetics, medicine or any container with water on the refrigerator. It may cause fire, electric shock or injury by falling. Do not put heavy things on the Home Bar. (Only for the models with the Home Bar) Falling objects may hurt people.
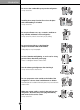
Introduction Do not use the refrigerator for non-domestic purpose (storing medicine or testing material, using at the ship, etc.). It may cause an unexpected risk such as fire, electric shock, deterioration of stored material or chemical reaction. When disposing the refrigerator, remove the packing materials from the door or take off the doors but leave the shelves in place so that children may not easily climb inside. It may cause to lock out the child.
Introduction Do not touch food or containers at the freezer with wet hands. It may cause frostbite. Do not put ice in thin crystal cup or ceramic ware. It may break cup or ceramic ware to cause injury. When the electricity is off, remove ice from the ice bucket (only for the model with the dispenser). The long-time power failure may thaw ice to damage the floor. When the long-time power failure is expected, remove ice from the ice bucket.
Introduction ENGLISH Because opening or closing the door of the refrigerator may cause injury to the person around it, be careful, please. Opening or closing the door may cause feet or hands to be caught in the chink in door or the child to be get hurt by the corner. Do not put any living animal in the refrigerator.
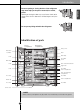
Installation Where to install Unstable installation may cause vibration and noise. If the floor to install the refrigerator on is not even, make the refrigerator level by rotating the height adjusting screw. Carpet or floor covering on which a refrigerator is installed may be discolored by heat from the bottom of the refrigerator. Do not allow carpet or flooring to block airflow under the refrigerator.
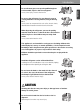
Installation Door removal Electric Shock Hazard Disconnect electrical supply to refrigerator before installing. Failure to do so could result in death or serious injury. Feed water tube If your access door is too narrow for the refrigerator to pass through, remove the refrigerator door and pass the refrigerator laterally. Remove lower cover and then feed water tube Remove 2 screws holding the lower cover in place. Pull up the feed water tube while pressing area shown in the figure to the right.
Installation Pass the refrigerator laterally through the access door as shown in the right figure. Pass the refrigerator Max 5 4 3 2 1 Min 1 FRZ TEMP 2 REF TEMP 3 4 5 Max Mount the freezer and refrigerator compartment doors Mount them in the reverse sequence of removal after they pass through the access door. Water supply installation Before installation Automatic icemaker operation needs water pressure of 21~121 psi (1.5~8.5 kgf/cm2) (That is, a paper cup (6 oz.
Installation Water connection instruction guide Read all directions carefully before you begin. WARNING Connect to a potable water supply only. IMPORTANT Tools required • If operating the refrigerator before installing the water connection, turn icemaker to the OFF position to prevent operation without water. • All installations must be in accordance with local plumbing code requirements. • Use copper tubing and check for leaks.
Installation Connect the tubing to water line 1. Unplug refrigerator or disconnect power. 2. Turn OFF main water supply. Turn on the nearest faucet to relieve the pressure on the line. It may help to open an outside faucet to allow the water to drain from the line in the house. 3. Find a 1/2-inch vertical COLD water pipe near the refrigerator. NOTE • Horizontal pipe will work, but the following precaution must be taken: Drill on the top of the pipe, not the bottom.
Installation Before making the connection to the refrigerator, be sure the refrigerator power cord is not plugged into the wall outlet. • If your refrigerator does not have a water filter, we recommend installing one. If your water supply has sand or particles, that could clog the screen of the refrigerator’s water valve. Install the filter in the water line near the refrigerator. Tubing Clamp 1/4" Tubing 1/4" Compression Nut Ferrule (sleeve) Refrigerator Connection 1.
Installation Height adjustment When the floor is not leveled - To level the door when the floor not level. When the freezer door is lower – Use the (-) driver or spanner to turn the groove or nut of the height adjustment screw on the left to the clockwise direction to level the door. When the refrigerator door is lower – Use the (-) driver or spanner to turn the groove or nut of the height adjustment screw on the right to the clockwise direction to level the door.
Installation To move the refrigerator through a house door, it may be necessary to remove the refrigerator door handles. NOTE • Handle appearance may vary from illustrations on this page. Mounting Fasteners Set Screw Allen Wrench Loosen the set screws with a 3/32" (2.5 mm) Allen wrench and remove the handle. NOTE • If the handle mounting fasteners need to be tightened or removed, use a 1/4" Allen wrench.
Installation Dimensions Overall Dimensions Door Swing Dimension D E C F G D 4 1/4” (108mm) H A 1 7/8” (without handle) B A B C 90° LSC249**/LSSC243** A 68 7/8” B 68 15/16” C 70 1/4” D - E 35 13/16” F 24 1/4” G 28 1/8” H 31” 155° Model A B C D LSC249**/ LSSC243** 40 1/4” 44 7/8” 13 7/8” 18” Clearances Cabinet Dimensions Allow the following clearances for ease of installation, proper air circulation and plumbing and electrical connections.
Operation Starting Adjusting the temperatures and functions DISPENSER SELECTION INDICATOR Shows Cubed ice or Crushed Ice selection that will be dispensed when the push switch is pressed. FREEZER TEMPERATURE Indicates the set temperature of the freezer compartment in Celsius or Fahrenheit. REFRIGERATOR TEMPERATURE Indicates the set temperature of the refrigerator compartment in Celsius or Fahrenheit.
Operation Adjusting The Temperatures And Display Adjust Freezer Temperature To adjust the temperature in the freezer compartment, press the FREEZER button to cycle through the range of available settings. Adjust Refrigerator Temperature To adjust the temperature in the refrigerator compartment, press the REFRIGERATOR button to cycle through the range of available settings.
Operation Operating The Dispenser Press the ICE TYPE button to illuminate the Crushed Ice icon. Press the ice switch with a glass or other container and crushed ice will be dispensed. ICE TYPE Press the ICE TYPE button to illuminate the Cubed Ice icon. Press the ice switch with a glass or other container and cubed ice will be dispensed.
Operation Setting The Functions Press the button for the desired function to view and select other settings. Setting The Dispenser Lock ALARM / LOCK 3SECS Setting The Door Alarm ALARM / LOCK 3SECS Press and hold the ALARM/LOCK button for three seconds to lock the dispenser and all of the other control panel functions. Press and hold again for 3 seconds to unlock.
Operation ENGLISH After dispenser is used The water collector has no self-drainage function, so it should be cleaned regularly. Remove the cover by pulling the front of the water collector cover and dry it with a cloth. ON/OFF Switch Automatic icemaker lcemaker Automatic Shutoff Arm The automatic icemaker can automatically make 6 cubes at a time, 70~120 pieces per day. This quantity may vary by circumstance, including ambient temperature, door opening, freezer load. etc.
Operation When ice maker does not operate smoothly Ice is lumped together When ice is lumped together, take the ice lumps out of the ice storage bin, break them into small pieces, and then place them into the ice storage bin again. When the ice maker produces too small or lumped together ice, the amount of water supplied to the ice maker need to adjusted. Contact the service center. ❈ If ice is not used frequently, it may lump together. Power failure Ice may drop into the freezer compartment.
Operation Water is cooled while stored in the water tank in freezer door, and then sent to the dispenser. Ice is made in the automatic ice maker and sent to the dispenser. NOTE • It is normal that the water is not very cold at first. If you want colder water, add ice into the glass. Throw away the ice (about 20 pieces) and water (about 7 glasses) first made after refrigerator installation. The first ice and water may include particles or odor from the feed water pipe or feed water box.
Operation Shelf How to use You can store side dish or refrigerated food on the shelf with sufficient space in between the containers. How to disassemble 1. Hold the front part of the shelf and pull it out until it gets blocked by the hooking part. 2. When you cannot pull out the shelf any more, lift it up slightly. 3. While holding the shelf slightly, tilt the shelf to pull it out. Egg holder You can move the egg holder to wherever you want. NOTE Never use the egg holder as an ice storage bin.
Operation Fresh compartment How to disassemble the upper fresh compartment 1. Hold the front handle of the fresh compartment and pull it out until it stops. How to disassemble the lower fresh compartment When pulling out the lower fresh compartment 2. When you cannot pull out the fresh compartment any more, lift it up slightly to pull it out completely to the front side (outer side). * The fresh compartment can be reassembled in the reverse order. 1.
Operation Push ’N Seal Crisper compartment You can store vegetables or fruits freshly for a long period of time. - In the middle Push ’N Seal Crisper compartment, you can store the vegetable or fruit for a longer period of time with the improved seal and vacuum effect. How to use 1. Hold the front handle of the Push ’N Seal Crisper compartment and pull it out until it stops. 2.
Operation Freezer/Refrigerator basket How to disassemble Hold the basket with both hands and slightly lift up the front part to pull it out. Hold the basket with both hands and reassemble one side at a time by pushing it in. How to reassemble Dairy corner You can store dairy goods such as butter, cheese etc. How to use How to disassemble Hold the basket with both hands and pull it out by pulling it up(1).
Operation How to exchange the water purifier filter It is recommended that you replace the water filter approximately every 6 months, when the water filter indicator light reaches 0, or whenever the water or ice cube taste deteriorates noticeably. Exchanging the water filter How to exchange 1. Disassemble the water purifier filter. - Turn the filter to exchange in counterclockwise direction by 90 degrees. (1) Pull out the filter to the front side (2).
Suggestion on food storage Location of foods Freezer compartment shelf Store various frozen foods such as meat, fish, ice cream, frozen snacks, etc.. Freezer compartment door rack Freezer compartment drawer Store small packed frozen food. Temperature is likely to increase as door opens. So, do not store long-term food such ice cream, etc.. Store meat, fish, chicken, etc.. after wrapping them with thin foil. Store dry. Dairy corner Store milk products such as butter, cheese, etc..
Suggestion on food storage Storing foods Store fresh food in the refrigerator compartment. How food is frozen and thawed is an important factor in maintaining its freshness and flavor. Do not store food which goes bad easily at low temperatures, such as bananas, and melons. Allow hot food to cool prior to storing, placing hot food in the refrigerator could spoil other food, and lead to higher energy consumption. When storing the food, cover it with vinyl wrap or store in a container with a lid.
Care and maintenance General information During average length vacations, you will probably find it best to leave the refrigerator in operation. Place freezable items in freezer for longer life. When you plan not to operate, remove all food, disconnect the power cord, clean the interior thoroughly, and leave each door OPEN to prevent odor formation. Power failure Most power failures that are corrected in an hour or two will not affect your refrigerator temperatures.
Care and maintenance Trouble shooting Before calling for service, review this list. It may save you both time and expense. This list includes common occurrences that are not the result of defective workmanship or materials in this appliance. Occurrence Possible cause Solution Runing of refrigerator Refrigerator compressor does not run. Refrigerator runs too much or too long Refrigerator control is off. Set refrigerator control. See setting the controls. Refrigerator is in defrost cycle.
Care and maintenance Occurrence Possible cause Solution Temperature in the freezer is too cold but the refrigerator temperature is satisfactory. Freezer control is set too cold Set the freezer control to a warmer setting until the freezer temperature is satisfactory. Temperature in the refrigerator is too cold but the freezer temperature is satisfactory. Refrigerator control is set too cold. Set the refrigerator control to a warmer setting until the refrigerator temperature is satisfactory.
Care and maintenance Possible cause Occurrence Solution Sound and noise Louder sound levels when refrigerator is on. Today’s refrigerators have increased storage capacity and maintain more even temperatures. It is normal for sound levels to be higher. Louder sound levels when compressor comes on. Refrigerator operates at higher pressures during the start of the ON cycle. This is normal. The sound will level off as the refrigerator continues to run. Vibrating or rattling noise.
Care and maintenance Occurrence Solution Odors in refrigerator Interior needs to be cleaned. Clean interior with sponge, warm water and baking soda. Food with strong odor is in the refrigerator. Cover food completely. Some containers and wrapping materials produce odors. Use a different container or brand of wrapping materials. Food package is keeping door open. Move packages that keep door from closing. Door was closed too hard, causing other door to open slightly. Close both doors gently.
Care and maintenance Occurrence Possible cause Dispenser will not dispense ice. Ice has melted and frozen around auger due to infrequent use, temperature fluctuations and/or power outrages. Remove ice storage bin, and thaw and the contents. Clean bin, wipe dry and replace in proper position. When new ice is made, dispenser should operate. Ice dispenser is jammed. Ice cubes are jammed between the ice maker arm and back of the bin. Remove the ice cubes that are jamming the dispenser.
Care and maintenance It is Normal... Occurrence Noise Solution When you hear "Tick" or "Click" sound This is the sound of various parts expanding/contracting or various control devices operating depending on the temperature change within the refrigerator. When you hear "Deureureuk~", "Dulkuk" or "Woong" sound This is the count of compressor or fan operating when the operation of the refrigerator is starting or ending.
LG ELECTRONICS U.S.A., INC. LG REFRIGERATOR LIMITED WARRANTY - U.S.A. Should your LG Refrigerator ("Product") fail due to a defect in materials or workmanship under normal home use, during the warranty period set forth below, LG will at its option repair or replace the product. This limited warranty is valid only to the original retail purchaser of the product and applies only when purchased and used within the United States including U.S. Territories.
LG ELECTRONICS CANADA, INC.
LG Customer Information Center For inquires or comments, visit www.lg.com or call; 1-800-243-0000 1-888-865-3026 1-888-542-2623 USA, Consumer User USA, Commercial User CANADA Register your product Online! www.lg.