
Owner’s Manual
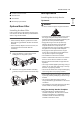


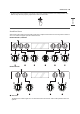
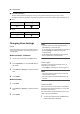
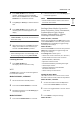

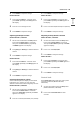
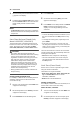
Table Of Contents
- IMPORTANT SAFETY INSTRUCTIONS
- PRODUCT OVERVIEW
- INSTALLATION
- OPERATION
- Control Panel
- Changing Oven Settings
- Clock
- Oven Light
- Timer On/Off
- Wi-Fi
- Settings (Hour Mode, Convection Auto Conversion, Oven Thermostat, Preheat Alarm Light, Beeper Volume, Fahrenheit or Celsius, Cooktop On Alert Volume)
- Control Lock
- Start Time (Delayed Timed Cook, Model LSEL6333*, LSEL633CF)
- Cook Time (Timed Cook)
- Minimum & Maximum Default Settings
- Cooktop
- Oven
- Before Using the Oven
- Oven Vent
- Using Oven Racks
- Bake
- Convection Mode (Model LSEL6333*, LSEL633CF)
- Recommended Baking and Roasting Guide
- Broil
- Recommended Broiling Guide
- Proof
- Warm
- Keep Warm
- Air Fry (Model LSEL6333*, LSEL633CF)
- Recommended Air Frying Guide
- Frozen Meal (Model LSEL6333*, LSEL633CF)
- Slow Cook (Model LSEL6333*, LSEL633CF)
- Remote Start
- Using the Sabbath Mode
- SMART FUNCTIONS
- MAINTENANCE
- TROUBLESHOOTING
- LIMITED WARRANTY

21INSTALLATION
ENGLISH
g Conduit Connection Plate
h Ground Screw
i Ground Wire
j Bend strap up and attach.
Optional Rear Filler
Installing the Rear Filler
If the counter does not bridge the opening at the
rear wall, the rear filler kit that is provided with the
slide-in range will be needed.
NOTE
• If the countertop depth is greater than 25 3/8"
there will be a gap between the filler kit and the
back wall.
• If the countertop depth is less than 24 3/4", the
control panel will not sit flush with the
countertop.
1 Using a screwdriver, remove the 3 screws
holding the rear top plate in place.
2 Attach the rear top plate and filler assembly
as shown, using the 3 screws removed in step
1.
a Rear filler
Anti-tip Device
Installing the Anti-tip Device
Tip Hazard
WARNING
• A child or adult can tip the range and be killed.
• Install the anti-tip device to the structure and/or
the range. Verify the anti-tip device has been
properly installed and engaged by following the
guide on the anti-tip bracket template.
• Engage the range to the anti-tip device by
following the guide on the anti-tip bracket
template. Ensure the anti-tip device is re-
engaged when the range is moved by following
the guide on the anti-tip bracket template.
• Re-engage the anti-tip device if the range is
moved. Do not operate the range without the
anti-tip device in place and engaged.
• See installation instructions for details.
• Failure to follow these instructions can result in
death or serious burns to children or adults.
• Range must be secured with an approved anti-
tip device.
• The range could be tipped by standing, sitting or
leaning on an open door if the range or anti-tip
device is not properly installed.
• The use of this device does not preclude tipping
of the range when not properly installed.
• After installing the anti-tip device, verify that it is
in place by carefully attempting to tilt the range
forward.
• This range has been designed to meet all
recognized industry tip standards for all normal
conditions.
• The installation of the anti-tip device must meet
all local codes for securing the appliance.
Using the Anti-tip Bracket Template
• The anti-tip bracket is packaged with an
installation template. The instructions include
necessary information to complete the
installation. Read and follow the range
installation instruction sheet.