
Owner’s Manual
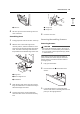
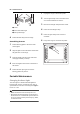
Table Of Contents
- IMPORTANT SAFETY INSTRUCTIONS
- PRODUCT OVERVIEW
- INSTALLATION
- OPERATION
- Control Panel
- Changing Oven Settings
- Clock
- Oven Light
- Timer On/Off
- Wi-Fi
- Settings (Hour Mode, Convection Auto Conversion, Oven Thermostat, Preheat Alarm Light, Beeper Volume, Fahrenheit or Celsius, Cooktop On Alert Volume)
- Control Lock
- Start Time (Delayed Timed Cook, Model LSEL6333*, LSEL633CF)
- Cook Time (Timed Cook)
- Minimum & Maximum Default Settings
- Cooktop
- Oven
- Before Using the Oven
- Oven Vent
- Using Oven Racks
- Bake
- Convection Mode (Model LSEL6333*, LSEL633CF)
- Recommended Baking and Roasting Guide
- Broil
- Recommended Broiling Guide
- Proof
- Warm
- Keep Warm
- Air Fry (Model LSEL6333*, LSEL633CF)
- Recommended Air Frying Guide
- Frozen Meal (Model LSEL6333*, LSEL633CF)
- Slow Cook (Model LSEL6333*, LSEL633CF)
- Remote Start
- Using the Sabbath Mode
- SMART FUNCTIONS
- MAINTENANCE
- TROUBLESHOOTING
- LIMITED WARRANTY

64 MAINTENANCE
a Lever
b Push down with finger
c Pull up with finger
4 Pull the drawer away from the range.
Assembling Drawers
1 Pull the bearing glides to the front of the
chassis glide.
2 Align the glide on each side of the drawer with
the glide slots on the range.
3 Push the drawer into the range until levers
click (approximately 2 inches).
4 Insert and tighten the screws on the back of
the drawer.
5 Pull the drawer open again to seat the
bearing glides into position.
Periodic Maintenance
Changing the Oven Light
The oven light is a standard 40-watt appliance
halogen bulb. It turns on when the oven door is
open. When the oven door is closed, press Light to
turn it on or off.
WARNING
• Make sure that the oven and lamp are cool.
• Disconnect the electrical power to the range at
the main fuse or circuit breaker panel. Failure to
do so can result in severe personal injury, death,
or electrical shock.
1 Unplug the range or disconnect power.
2 Turn the glass lamp cover in the back of the
oven counterclockwise to remove.
3 Remove the halogen lamp from the socket.
4 Insert the new halogen lamp.
5 Insert the glass lamp cover and turn it
clockwise.
6 Plug in the range or reconnect the power.