
Owner Manual


20 INSTALLATION
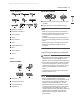
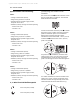
3 Attach the ground (green) bare wire end to
the range frame and secure it in place with
the ground screw.
4 Insert the bare wire (white/neutral) end
through the center terminal block opening.
The center screw now attaches the bent up
ground strap to the block.
5 Insert the two side bare wire ends into the left
and the right terminal block openings.
Tighten the 3 screws securely into the
terminal block. (approximately 35 - 50 IN-LB)
a Black
b White
c Red
d Terminal block
e Wire ends
f Ground strap
g Conduit connection plate
h Ground screw
i Ground wire
j Bend strap up and attach.
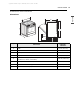
Optional Rear Filler
Installing the Rear Filler
If the counter does not bridge the opening at the
rear wall, the rear filler kit which is provided with
the slide in range will be needed.
NOTE
• If the countertop depth is greater than 25 3/8"
there will be a gap between the filler kit and the
back wall.
• If the countertop depth is less than 24 3/4", the
control panel will not sit flush with the
countertop.
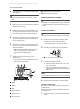
1 Using a screwdriver, remove the three screws
holding the rear top plate in place.
2 Attach the rear top plate and filler assembly
as shown, using three screws removed in step
1.
a Rear filler
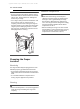
Anti-Tip Device
Installing the Anti-Tip Device
Tip Hazard
WARNING
• A child or adult can tip the range and be killed.
us_main.book.book Page 20 Thursday, June 17, 2021 8:05 AM