OWNER'S MANUAL GAS RANGE Read this owner’s manual thoroughly before operating the appliance and keep it handy for reference at all times. The complete owner’s manual can be found on the LG website at: http://gscs-manual.lge.com/CVZ/MFL33029632/main.html or by scanning the QR code. ENGLISH LSGL5833* / LSGL5831* MFL33029632 Rev.04_120321 www.lg.com Copyright © 2021 LG Electronics Inc. All Rights Reserved.
Safety for a Gas Range WARNING: If the information in these instructions is not followed exactly, a fire or explosion may result causing property damage, personal injury or death. • • • Do not store or use gasoline or other flammable vapors and liquids in the vicinity of this or any other appliance. WHAT TO DO IF YOU SMELL GAS - Do not try to light any appliance. - Do not touch any electrical switch. - Do not use any phone in your building. - Immediately call your gas supplier from a neighbor's phone.
TABLE OF CONTENTS 5 IMPORTANT SAFETY INSTRUCTIONS 5 READ ALL INSTRUCTIONS BEFORE USE 6 9 5 Safety Messages 5 Anti-Tip Device 6 Installation 7 Operation 8 Maintenance 8 Grounding Instructions 8 Risk of Fire and Flammable Materials CAUTION 9 Installation 9 Operation 9 Maintenance 20 Checking Ignition of the Surface Burners 20 Adjusting the Surface Burner to the Low Flame (Simmer) Setting 21 21 22 23 OPERATION 23 24 24 Oven Light 24 Timer On/Off 25 Wi-Fi 25 Settings 27 Control Lo
37 Broil 63 Cooking 39 Recommended Broiling Guide 65 Parts & Features 41 Proof 67 Noises 41 Warm 68 Wi-Fi 42 Keep Warm 42 Air Fry (Model LSGL5833*) 44 Recommended Air Frying Guide 45 Frozen Meal (Model LSGL5833*) 45 Slow Cook (Model LSGL5833*) 46 Remote Start 46 Using the Sabbath Mode 47 SMART FUNCTIONS 47 LG ThinQ Application 47 LG ThinQ Application Features 47 Before Using LG ThinQ Application 48 Installing the LG ThinQ Application 48 Connecting to Wi-Fi 48 Wireless LAN Module Specifications
IMPORTANT SAFETY INSTRUCTIONS 5 IMPORTANT SAFETY INSTRUCTIONS Download this owner's manual at http://www.lg.com Safety Messages Your safety and the safety of others are very important. We have provided many important safety messages in this manual and on your appliance. Always read and follow all safety messages. This is the safety alert symbol. This symbol alerts you to potential hazards that can kill or injure you and others.
IMPORTANT SAFETY INSTRUCTIONS WARNING • Do not step or sit on the oven door. The range could be tipped and injury might result from spilled hot liquid, food, or the range itself. • Never remove the oven legs. The range will not be secured to the anti-tip bracket if the legs are removed.
IMPORTANT SAFETY INSTRUCTIONS 7 • This product should not be installed below ventilation type hood systems that direct air in a downward direction. • To prevent poor air circulation, place the range out of the kitchen traffic path and out of drafty locations. Operation WARNING NEVER cover any slots, holes or passages in the oven bottom or cover an entire rack with materials such as aluminum foil. Doing so blocks air flow through the oven and may cause carbon monoxide poisoning.
IMPORTANT SAFETY INSTRUCTIONS • Do not line oven walls or bottom with aluminum foil or allow them to contact exposed heating elements in the oven. Doing so could create a fire hazard or cause damage to the range. • During oven operation, the upper surface of the drawer cavity becomes hot and may cause burns. Never allow children to remain unsupervised near the oven or cooktop. • Do not put your hand inside the drawer during the oven operation.
IMPORTANT SAFETY INSTRUCTIONS 9 CAUTION • To reduce the risk of minor injury to persons, malfunction, or damage to the product or property when using this product, follow basic precautions, including the following: Installation • After using your range for an extended period of time high floor temperatures may result. Many floor coverings will not withstand this kind of use. Never install the range over vinyl tile or linoleum that cannot withstand such type of use.
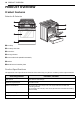
PRODUCT OVERVIEW PRODUCT OVERVIEW Product Features Exterior & Interior a Cooktop b Cooktop controller c Oven door d Storage drawer e Oven mode knob (Model LSGL5833*) f Gasket g Model & serial number plate Product Specifications The appearance and specifications listed in this manual may vary due to constant product improvements. Oven Range Models LSGL5833*, LSGL5831* Description Gas Slide In Oven Range Electrical requirements 0.
PRODUCT OVERVIEW 11 Accessories Included Accessories a Anti-tip Bracket (1ea) b Screws (4ea) c Anchors (4ea) d Template (1ea) LP Nozzle Conversion Kit a Cooktop Nozzles (5ea) b Oven Nozzles (2ea) c Installation Guide (1ea) Other Accessories a Standard rack (2ea) b Griddle (1ea, Model LSGL5833*) c Rear filler(1ea) d Air fry tray (1ea, Model LSGL5833*) e Spray bottle (1ea) f Non-scratch scouring pad (1ea) Optional Accessories a Grid b Broiler pan ENGLISH Anti-tip Kit
PRODUCT OVERVIEW NOTE • Contact LG Customer Service at 1-800-243-0000 (1-888-542-2623 in Canada) if any accessories are missing. • For your safety and for extended product life, only use authorized components. • The manufacturer is not responsible for product malfunction or accidents caused by the use of separately purchased, unauthorized components or parts.
INSTALLATION 13 INSTALLATION Tools Needed a Phillips screwdriver b Flat-blade screwdriver c Pencil and ruler d Open-end or adjustable wrench e Pipe wrench (2) (one for support) f Level Parts Parts You May Need • Gas line shut-off valve • Pipe joint sealant that resists action of natural and LP gases • Flexible metal appliance connector (3/4" or 1/2" NPT x 1/2" I.D.) - Never use an old connector when installing a new range.
INSTALLATION NOTE • Your range is heavy and can be installed on soft floor coverings such as cushioned vinyl or carpeting. Use care when moving the range on this type of flooring. Use a belt when moving the range to prevent damaging the floor. Or slide the range onto cardboard or plywood to avoid damaging the floor covering. level or higher than the floor covering. This will allow the range to be moved for cleaning and servicing, as well as provide proper air flow to the range.
INSTALLATION 15 Dimensions and Clearances • Provide proper clearance between the range and adjacent combustible surfaces. • These dimensions must be met for safe use of your range. • The range may be placed with 0" clearance (flush) at the back wall.
INSTALLATION Clearances 30" (76.2 cm) 30" (76.2 cm) 13" (33.0 cm) 5" (12.7 cm) 18" (45.7 cm) 36" (91.4 cm) 1/ 4" (0.6 cm) a Minimum b Minimum clearance to left/right wall c Maximum depth for cabinets above countertops d Front edge of the range side panel forward from cabinet e To cabinets below cooktop and at the range back Gas Pipe and Electrical Outlet Locations 30" (76.2 cm) 7 1/2" (19 cm) 14 61/64" (38.0cm) 3" (7.6 cm) 6 1/2" (16.5 cm) 11 1/2" 2 21/64" 23 1/2" (30 cm) (5.
INSTALLATION 17 make it easier to insert the rear leg into the anti-tip bracket. • The pressure regulator located at the inlet of the range must remain in the supply line regardless of which type of gas is being used. Checking Adjustments 1 Place the level diagonally on the oven rack, and check each direction for level. • First check direction a. Then check direction b.
INSTALLATION 2 Install a male 1/2" flare union adapter to the 1/2" NPT internal thread at the inlet of the pressure regulator. Use a backup wrench on the pressure regulator fitting to prevent damage. Flexible Connector Hookup Have the installer show you the location of the range gas shut-off valve and how to shut it off if necessary. • Check that the gas pressure regulator valve is in the open position.
INSTALLATION 19 Connecting Electricity Electrical Requirements NOTE • Ground Fault Circuit Interrupters - Ground Fault Circuit Interrupters (GFCI’s) are devices that sense leakage of current in a circuit and automatically switch off power when a threshold leakage level is detected. These devices must be manually reset by the consumer. The National Electrical Code requires the use of GFCI’s in kitchen receptacles installed to serve countertop surfaces.
INSTALLATION 3 Make sure the hole in the burner head is positioned over the electrode. Yellow flames Call for service. Yellow tips on outer cones This is normal for LP gas. Soft blue flames This is normal for natural gas. NOTE a Oval (Center) burner head/cap assembly • With LP gas, some yellow tipping on outer cones is normal. b Medium burner head and cap d Large burner head and cap Adjusting the Surface Burner to the Low Flame (Simmer) Setting e Front of range 1 Light all surface burners.
INSTALLATION 21 Replace the knob. Anti-Tip Device 7 Test the flame stability. Installing the Anti-Tip Device • Test 1: Turn the knob from Hi to Lo quickly. If the flame goes out, increase the flame size and test again. Tip Hazard • Test 2: With the burner on a Lo setting, open and close the oven door quickly. If the flame is extinguished by the air currents created by the door movement, increase the flame height and test again. 8 Repeat steps 1~7 for each surface burner.
INSTALLATION • Screws c must enter wood or concrete. 2 Turn oven mode knob to select Bake. 350 °F appears in the display. • Make sure the door is closed. 3 Press START. Model LSGL5831* a Anti-tip bracket 1 Remove all packing materials from inside the oven cavity. 2 Press Bake. 350℉ appears in the display. (Make sure the door is closed.) 3 Press START. b Wall plate Engaging the Anti-tip Device NOTE a Anti-tip bracket • It may take between 30 and 90 seconds for the burner to start heating.
OPERATION 23 OPERATION Control Panel Features Model: LSGL5833* Model: LSGL5831* a Features b Oven Control c +/- buttons d START e CLEAR/OFF f Smart DiagnosisTM NOTE • Flashing Clock - If the colon in the clock display flashes, press Clock and reset the time, or press any key to stop the flashing.
OPERATION NOTE • For best results, press buttons in the center, even when activating a button's secondary function. The buttons may not work properly if pressed too far from the center. Changing Oven Settings Clock The clock must be set to the correct time of day in order for the automatic oven timing functions to work properly. Oven Light The interior oven light automatically turns on when the door is opened. • Press Light to manually turn the oven light on.
OPERATION 25 5 When the set time runs out, End shows in the display. The indicator tones sound every 15 seconds until Timer On/Off is pressed. • If the remaining time is not in the display, recall the remaining time by pressing Timer On/Off. • set the hour mode on the clock (12 or 24 hours) • enable/disable convection auto conversion (Model LSGL5833*) • adjust the oven temperature • activate/deactivate the preheating alarm light • set the beeper volume Canceling the Timer 1 Press Timer On/Off once.
OPERATION 3 4 Press plus(+) or minus(-) to enable or disable the feature. Press START to accept the change. oven temperature can be increased (+) or decreased (-) as much as 35 °F or 19 °C. • Once the temperature is increased or decreased, the display shows the adjusted temperature until it readjusts. Adjusting the Oven Thermostat Your new oven may cook differently from the one it replaced. Use your new oven for a few weeks to become more familiar with it before changing the temperature settings.
OPERATION 27 3 Press START to accept the change. Selecting Fahrenheit or Celsius Model LSGL5833* 1 Set the oven mode knob to the Off position. Press and hold Start Time for 3 seconds. Then press Start Time repeatedly until Unit appears in the display. 2 Press +/- to select F (Fahrenheit) or C (Celsius). 3 Press START to accept the change. Model LSGL5831* 1 Press Settings repeatedly until Unit appears in the display. 2 Press +/- to select F (Fahrenheit) or C (Celsius).
OPERATION 2 Set the temperature. For this example, press minus(-) until 300 °F appears in the display. • If the oven clock is set as a 12-hour clock, you can delay the cook time for 12 hours. If the oven clock is set as a 24-hour clock, you can delay the cook time for 24 hours. 3 Press Cook Time. Timed flashes in the display. Bake, 0:00 and 300 °F appear in the display. The oven will continue to cook for the set amount of time and then turn off automatically.
OPERATION 29 Min. Max. CookTime 1 min. 11 hr. 59 min. Conv. Bake† 300 ℉ / (*275℉) 550 ℉ / (*525℉) 350 ℉ (*325 ℉) / 12 Hr. Roast† 300 ℉ (*275℉) 550 ℉ / (*525℉) 350 ℉ (*325 ℉) / 12 Hr. Lo Hi Hi / 3 Hr. 550 ℉ 350 ℉ / 12 Hr. Conv. Broil Bake 170 ℉ Default Frozen Meal† 300 ℉ 550 ℉ 400 ℉ / 12 Hr. Air Fry† 300 ℉ 550 ℉ 400 ℉ / 12 Hr. Slow Cook† Lo Hi Hi / 12 Hr. Proof 12 Hr. Warm 3 Hr. Self Clean 3 Hr. 5 Hr. EasyClean® 4 Hr. 10 min.
OPERATION CAUTION • Never leave any items on the cooktop. The hot air from the vent may ignite flammable items and will increase pressure in closed containers, which may cause them to burst. • Use care when cleaning the cooktop. The pointed metal ends on the electrodes could cause injury. • Make sure that all burners are properly placed. • Carefully watch foods being fried at a high flame setting. • Always heat fat slowly, and watch as it heats.
OPERATION 31 b Small burner c Extra large burner The extra large burner is the maximum output burner. Like the other four burners, it can be turned down from Hi to Lo for a wide range of cooking applications. This burner is also designed to quickly bring large amounts of liquid to a boil. It can be used with cookware 10 inches or larger in diameter. Turn the control knob to control the flame size. CAUTION • Do not attempt to disassemble or clean around any burner while another burner is on.
OPERATION • Stainless Steel - This metal alone has poor heating properties and is usually combined with copper, aluminum or other metals for improved heat distribution. Combination metal skillets work satisfactorily if they are used with medium heat as the manufacturer recommends. • Enamelware - Under some conditions, the enamel of this cookware may melt. Follow cookware manufacturer’s recommendations for cooking methods. Using Stove-Top Grills Do not place stove-top grills on the burner.
OPERATION 33 CAUTION • Do not remove the griddle plate until the cooktop grates, surfaces and griddle plate have completely cooled. • The griddle plate on the cooktop may become very hot when using the cooktop, oven or broiler systems. Always use oven mitts when placing or removing the griddle plate. • After cooking on the griddle for an extended period, adjust the griddle temperature settings as the griddle retains heat.
OPERATION CAUTION • Do not cover racks or oven bottom with aluminum foil. • Handles of pots and pans on the cooktop may become hot if left too close to the vent. • Avoid opening the oven door more than necessary during use. This helps the oven maintain temperature, prevents unnecessary heat loss, and saves on energy use. • Make sure the electrical power cord and the gas valve are properly connected. • Confirm the correct usage of the range for the type of food you will cook.
OPERATION 35 CAUTION • Do not cover the racks with aluminum foil, or any other material, or place anything on the bottom of the oven. Doing so will result in poor baking and may damage the oven bottom. • Only arrange oven racks when the oven is cool. Remove food from the oven. Model LSGL5831* 1 Press Bake. 350˚F appears in the display. 2 Set the oven temperature: For example, press plus(+) until 375 °F appears in the display. 3 Press START. The oven starts to preheat.
OPERATION Convection Mode (Model LSGL5833*) Setting the Convection Function (example, 375 °F) The Convection Roast feature is designed to give optimum roasting performance. Convection Roast combines cooking with the convection fan to roast meats and poultry. The heated air circulates around the food from all sides, sealing in juices and flavors. Foods are crispy brown on the outside while staying moist on the inside. Convection roasting is especially good for large tender cuts of meat, uncovered.
OPERATION 37 Rack and Pan Placement Rack position Food Cheesecake, crème brulée 3 Soufflés Sweet or savory 3 Casserole Frozen lasagna 4 Roasting Rack Guide Standard rack (Position 2) Standard rack (Position 5) Beef Single rack baking Pork Standard rack Poultry Baking Rack Guide Food Rack position Food Multiple rack baking Rack position Cakes Layer cakes Bundt cakes Angel food cake 3 3 3 Cookies Sugar cookies Chocolate chips Brownies 4 4 4 Pizza Fresh Frozen 3 3 Pastry Crust F
OPERATION CAUTION • When using your broiler, the temperature inside the oven will be extremely high. Take caution to avoid possible burns by: - Keeping the door closed when broiling - Always wearing oven mitts when inserting or removing food items NOTE • This range is designed for closed-door broiling. Close the door to set the Broil function. If the door is open, the Broil function cannot be set and "door" appears on the display. Close the door and reset the Broil function.
OPERATION 39 Recommended Broiling Guide The size, weight, thickness, starting temperature, and your preference of doneness will affect broiling times. a Grid (sold separately) b Broiler pan (sold separately) * : This feature is for the offset rack use. Food Hamburgers Rack Position First Side (minutes ) Second Side (minutes ) Comments 6 5-7 3-5 Space evenly. Up to 9 patties may be broiled at once.
OPERATION Quantity and/or Thickness Food Lamb Chops Rack Position First Side (minutes ) Second Side (minutes ) 2 (1" thick) about 10 to 12 oz. Medium 5 6 4-7 Well Done 5 10 10 2 (1 1/2" thick) about 1lb. Medium 5 10 4-6 Well done 5 17 12-14 Bacon 1/2 lb. (about 8 thin slices) 4 8 3 Lobster Tails 2-4 6 to 8 oz. each 3 13-16 Do not turn over. Comments Slash fat. Arrange in single layer. Cut through back of shell. Spread open.
OPERATION 41 Proof This feature maintains a warm oven for rising yeast leavened products before baking. Model LSGL5833* 1 Use rack position 2 or 3 for proofing. • To avoid lowering the oven temperature and lengthening proofing time, do not open the oven door unnecessarily. Check bread products early to avoid over proofing. • Do not use the proofing mode for warming food or keeping food hot. The proofing oven temperature is not hot enough to keep foods at safe temperatures.
OPERATION NOTE • The Warm function is intended to keep food warm. Do not use it to cool food down. 3 Press Cook Time and enter the cook time using the +/- keys. 4 Press Proof/Warm. Warm appears in the display. Keep Warm This function will maintain an oven temperature of 170 °F. The Keep Warm function will keep cooked food warm for serving up to 3 hours after cooking has finished. The Keep Warm function should be used with any other cooking operations except Broil and Proof.
OPERATION 43 NOTE • If cooking multiple batches, the later batches may take less time to cook. • Wet batters and coatings will not crisp or set when using the Air Fry mode. Tips for Air Fry • For best results, use the provided air fry tray. - The mesh section of the air fry tray can be cleaned in a dishwasher. • Use a food thermometer to make sure food has reached a safe temperature for consumption. Eating undercooked meats can increase your risk of food-borne illness.
OPERATION Recommended Air Frying Guide • Arrange food evenly in a single layer. • Put a foil-lined baking pan on a rack in position 1 to catch drips. If needed, add parchment paper to absorb oil and reduce smoking. • Flip food over during cooking to avoid burning it. * High-fat items may produce more smoke when cooked using Air Fry. For less smoke, cook using Convection Roast mode. Time Approx.Q uantity(oz ) Temp.
OPERATION 45 Time Approx.Q uantity(oz ) Temp. (°F) Rack Position Scallops on Half Shell Fresh 35 425 4 20-30 Shrimp - Fresh 50 425 4 20-30 Mixed Vegetables 35 425 4 15-25 Brush or lightly spray with 4 tbsp. of olive oil. Add salt and pepper to taste. Thin Sausage* - 2.5 oz each, 3/4" diam. (70 g each, 2 cm diam.) 90 425 4 20-30 *High-fat items may produce more smoke when cooked using Air Fry. For less smoke, cook using Convection Roast mode.
OPERATION 4 When cooking is complete, turn the oven mode knob to the OFF position. NOTE Sabbath mode is deactivated. In Sabbath mode, all function buttons are inactive. sb will appear in display. Model LSGL5833* • To cancel Slow Cook during use, turn the oven mode knob to the OFF position at any time. 1 Turn the oven mode knob to select Bake. • For best results, use a single rack in position 1 or 2. 2 Set the Bake temperature using the +/- keys. 3 Press START.
SMART FUNCTIONS 47 SMART FUNCTIONS Before Using LG ThinQ Application This feature is only available on models with Wi-Fi. 1 The LG ThinQ application allows you to communicate with the appliance using a smartphone. • If the distance between the appliance and the wireless router is too far, the signal becomes weak. It may take a long time to register or fail to install the application.
SMART FUNCTIONS FCC Notice NOTE • If the appliance cannot be registered due to problems with the wireless signal transmission, unplug the appliance and wait about a minute before trying again. • If the firewall on your wireless router is enabled, disable the firewall or add an exception to it. • The wireless network name (SSID) should be a combination of English letters and numbers. (Do not use special characters.
SMART FUNCTIONS 49 Open Source Software Notice Information 1 Press the START button for three seconds. • If the display has been locked, you must deactivate the lock and then reactivate it. 2 LG Electronics will also provide open source code to you on CD-ROM for a charge covering the cost of performing such distribution (such as the cost of media, shipping, and handling) upon email request to opensource@lge.com. This offer is valid for a period of three years after our last shipment of this product.
MAINTENANCE MAINTENANCE Cleaning CAUTION • Do not clean this appliance with bleach. • To prevent burns, wait until the cooktop has cooled down before touching any of its parts. • Always wear gloves when cleaning the cooktop. • To clean the knobs, make sure that they are in the OFF position and pull them straight off the stems. • To replace the knobs, make sure the knob has the OFF position centered at the top, and slide the knob directly onto the stem.
MAINTENANCE 51 Oven Door CAUTION • Both the broiler pan and grid may be cleaned with a commercial oven cleaner or in the dishwasher. Oven Racks • Use soapy water to thoroughly clean the oven door. Rinse well. Do not immerse the door in water. 1 • You may use a glass cleaner on the outside glass of the oven door. Do not spray water or glass cleaner on the door vents. • Do not use oven cleaners, cleaning powders, or harsh abrasive cleaning materials on the outside of the oven door.
MAINTENANCE Grates and burner heads/caps can be removed for care and cleaning. cause injury. Hitting an electrode with a hard object may damage it. • To remove burnt-on food, soak the burner heads in a solution of mild liquid detergent and hot water for 20–30 minutes. For stubborn stains, use a toothbrush or wire brush. • The burners will not operate properly if the burner ports or electrodes are clogged or dirty. • Burner caps and heads should be cleaned routinely, especially after excessive spillover.
MAINTENANCE 53 Cleaning the Burner Grates CAUTION • Do not put the grate in the oven during self cleaning mode. (On some models) • Grates should be washed regularly and after spillovers. • EasyClean Stainless Steel Cooktop - To avoid scratching the cooktop surface, do not use abrasive or metal scouring sponges or pads. - Rub in the direction of the grain to avoid damaging the surface. • Wash the grates in hot, soapy water and rinse with clean water. • The grates are dishwasher safe.
MAINTENANCE cavity is above 150 °F (65 °C), Hot will appear in the display, and the EasyClean cycle will not be activated until the oven cavity cools down. • For hard to reach areas such as the back surface of the oven, it is better to use the Self Clean cycle.
MAINTENANCE 55 5 NOTE • If cleaning multiple ovens, use an entire bottle of water to clean each oven. Do not spray water directly on the door. Doing so will result in water dripping to the floor. 6 NOTE • Do not use any steel scouring pads, abrasive pads or cleaners as these materials can permanently damage the oven surface. 10 Once the oven cavity is cleaned, wipe any excess water with a clean dry towel. Replace racks and any other accessories.
MAINTENANCE Self Clean This feature is only available on some models. The Self Clean cycle uses extremely hot temperatures to clean the oven cavity. While running the Self Clean cycle, you may notice smoking or an odor. This is normal; especially if the oven is heavily soiled. During Self Clean, the kitchen should be well ventilated to minimize the odors from cleaning. Before Starting Self Clean • Clean only parts listed in manual.
MAINTENANCE 57 • If oven racks were left in the oven and do not slide smoothly after a Self Clean cycle, wipe racks and rack supports with a small amount of vegetable oil to make them glide more easily. • The Self Clean cycle cannot be started if the Control Lock feature is active. • Once the Self Clean cycle is set, the oven door locks automatically. You will not be able to open the oven door until the oven is cooled. The lock releases automatically.
MAINTENANCE 2 Turn the oven mode knob to select Self Clean or press Self Clean. The oven defaults to the recommended four-hour self clean for a moderately soiled oven. Press plus(+) or minus(-) to select a self clean time from 3 to 5 hours. 3 Press Start Time. 4 Set the time of day you would like the Self Clean to start by pressing plus(+) or minus(-). a Slot b Hinge Lock c Lock 5 Press START.
MAINTENANCE 59 further cleaning is needed. Use warm water to thoroughly clean. Fully open the drawer. 2 Unscrew the screw a on the back of the drawer. 3 Locate the glide lever on each side of the drawer. Push down on the left glide lever and pull up on the right glide lever. a Hinge arm b Bottom edge of slot c Indentation 3 Open the door fully. If the door will not open fully, the indentation is not seated correctly in the bottom edge of the slots.
MAINTENANCE Periodic Maintenance Changing the Oven Light The oven light is a standard 40-watt appliance halogen. It turns on when the oven door is open. When the oven door is closed, press Light to turn it on or off. WARNING • Make sure that the oven and lamp are cool. • Disconnect the electrical power to the range at the main fuse or circuit breaker panel. Failure to do so can result in severe personal injury, death, or electrical shock. 1 Unplug the range or disconnect power.
TROUBLESHOOTING 61 TROUBLESHOOTING Frequently Asked Questions Q: What types of cookware are recommended for use with the cooktop? A: • The pans must have a flat bottom and straight sides. • Only use heavy-gauge pans. • The pan size must match the amount of food to be prepared and the size of the surface element. • Use tight fitting lids. • Only use flat-bottom woks. Q: My new oven doesn’t cook like my old one. Is there something wrong with the temperature settings? A: No.
TROUBLESHOOTING Q: What should I do if my racks are sticky and have become hard to slide in and out? A: Over time, the racks may become hard to slide in and out. Apply a small amount of olive oil to the sides of the racks. This will work as a lubricant for easier gliding. Q: What should I do for hard to remove stains on my cooktop? A: The cooktop should be cleaned after every use to prevent permanent staining.
TROUBLESHOOTING 63 Yes. It is highly recommended that 1 cup (8 oz or 240 ml) of water be sprayed or poured on the bottom and an additional ¼ cup (2 oz or 60 ml) of water be sprayed on walls and other soiled areas to fully saturate the soils for better cleaning performance. Q: I see smoke coming out of my oven range’s cooktop vents during EasyClean. Is this normal? A: This is normal. This is not smoke. It is actually water vapor (steam) from the water in the oven cavity.
TROUBLESHOOTING Problem Possible Cause & Solution Burner flames are very large or yellow. It may be due to improper installation or setting. Surface burners light but the oven does not. Shut-off vavle is not fully open. Food does not bake or roast properly Oven controls improperly set. • If the range is connected to LP gas, contact the technician who installed your range or made the conversion. • Make sure that the oven gas shut-off valve, located behind the range, is fully open.
TROUBLESHOOTING 65 Problem Oven will not work Possible Cause & Solution Plug on range is not completely inserted in the electrical outlet. • Make sure electrical plug is plugged into a live, properly grounded outlet. • Replace the fuse or reset the circuit breaker. Oven controls improperly set. • See the "Oven" section in the Operation chapter. Oven too hot. • Allow the oven to cool to below locking temperature. Steam is exhausted through the oven vent. Cooking foods with high moisture produces steam.
TROUBLESHOOTING Problem Oven light does not work. Possible Cause & Solution It is time to replace the lamp or the lamp is not tightened enough. • Replace or tighten lamp. See "Changing the Oven Light" section in this Owner’s Manual. The plug on the range is not completely inserted in the electrical outlet. • Make sure the electrical plug is inserted into a live, properly grounded outlet. Oven will not Self Clean. (On some models) The oven temperature is too high to set a Self Clean operation.
TROUBLESHOOTING 67 Problem Range is not level. Possible Cause & Solution Poor installation. • Be sure floor is level and strong and stable enough to adequately support range. • If floor is sagging or sloping, contact a carpenter to correct the situation. Kitchen cabinet alignment may make range appear unlevel. • Be sure cabinets are square and have sufficient room for range clearance. Cannot move appliance easily. Appliance must be accessible for service. Cabinets not square or are built in too tightly.
TROUBLESHOOTING Wi-Fi Problem Trouble connecting appliance and smartphone to Wi-Fi network Possible Cause & Solution The password for the Wi-Fi network was entered incorrectly. • Delete your home Wi-Fi network and begin the registration process again. Mobile data for your smartphone is turned on. • Turn off the Mobile data on your smartphone before registering the appliance. The wireless network name (SSID) is set incorrectly.
LIMITED WARRANTY 69 LIMITED WARRANTY TERMS AND CONDITIONS ARBITRATION NOTICE: THIS LIMITED WARRANTY CONTAINS AN ARBITRATION PROVISION THAT REQUIRES YOU AND LG TO RESOLVE DISPUTES BY BINDING ARBITRATION INSTEAD OF IN COURT, UNLESS YOU CHOOSE TO OPT OUT. IN ARBITRATION, CLASS ACTIONS AND JURY TRIALS ARE NOT PERMITTED. PLEASE SEE THE SECTION TITLED “PROCEDURE FOR RESOLVING DISPUTES” BELOW.
LIMITED WARRANTY • Damage or failure resulting from misuse, abuse, improper installation, repair, or maintenance. Improper repair includes use of parts not authorized by LG. Improper installation or maintenance includes installation or maintenance contrary to the Product owner’s manual. • Damage or failure caused by incorrect electrical current, voltage, or plumbing codes.
LIMITED WARRANTY 71 Problem Uneven flame Possible Cause & Prevention Improper burner cap installation • Check installation of burner head and cap. Burner ports clogged by food residue c Ports blocked by dirt d Flames uneven • Hardened residue should be removed using a toothbrush. NOTE • Cleaning oval burner 1) Open burner cap e. 2) Release 2 screws f. 3) Clean residue using toothbrush. g Clean highlighted part with toothbrush.
LIMITED WARRANTY Problem Knobs melt Possible Cause & Prevention Improper usage • Do not leave door at stop position during Broil/Bake mode or right after cooking. Oven or racks are stained after using aluminum foil Aluminum foil has melted in the oven • Never cover the oven bottom or cover an entire rack with materials such as aluminum foil. • If the foil has already melted onto the oven, it will not affect the performance of the oven.
LIMITED WARRANTY 73 Problem The gas pressure regulator valve is closed. ENGLISH Oven shows error code (F9, F19) but cooktop burners are working. Possible Cause & Prevention a Lever’s closed position • Check that the regulator valve is in the open position. • If the regulator valve is closed, rotate the lever to open the valve. a Lever’s closed position c Lever’s open position Flames too big on converted cooktop (NP ~LP) The installer missed part of the conversion.
LIMITED WARRANTY Problem Gas smell Possible Cause & Prevention Improper connection Flexible Connector Hookup a Pressure regulator b 1/2" Adapter c 1/2" Adapter d Gas Flow into Range e Flex connector (6 ft. max.) f Gas shut-off valve g 1/2" Adapter h 1/2" or 3/4" Gas pipe • Check with installer first. The cost of repair or replacement under these excluded circumstances shall be borne by the consumer.
LIMITED WARRANTY 75 subject of the claim; and describe the nature of the claim and the relief being sought. If you and LG are unable to resolve the dispute within 30 days, either party may proceed to file a claim for arbitration. Arbitration Rules and Procedures. To begin arbitration of a claim, either you or LG must make a written demand for arbitration.
LIMITED WARRANTY You may only opt out of the dispute resolution procedure in the manner described above (that is, by e-mail or telephone); no other form of notice will be effective to opt out of this dispute resolution procedure. Opting out of this dispute resolution procedure will not affect the coverage of the Limited Warranty in any way, and you will continue to enjoy the full benefits of the Limited Warranty.
Memo 77
Memo
Memo 79
Memo
Memo 81
Memo
Memo 83
LG Customer Information Center For inquiries or comments, visit www.lg.com or call: 1-800-243-0000 1-888-542-2623 U.S.A. CANADA Register your product Online! www.lg.