
Owner's Manual English 01/18/2022 10396K
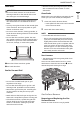
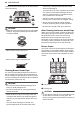
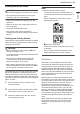
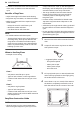
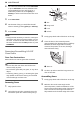
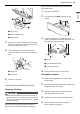
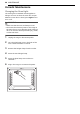
Table Of Contents
- IMPORTANT SAFETY INSTRUCTIONS
- PRODUCT OVERVIEW
- INSTALLATION
- OPERATION
- Control Panel
- Changing Oven Settings
- Gas Surface Burners
- Oven
- Before Using the Oven
- Oven Vent
- Using Oven Racks
- Bake
- Convection Mode (Model LSGL5833*)
- Recommended Baking and Roasting Guide
- Broil
- Recommended Broiling Guide
- Proof
- Warm
- Keep Warm
- Air Fry (Model LSGL5833*)
- Recommended Air Frying Guide
- Frozen Meal (Model LSGL5833*)
- Slow Cook (Model LSGL5833*)
- Remote Start
- Using the Sabbath Mode
- SMART FUNCTIONS
- MAINTENANCE
- TROUBLESHOOTING
- LIMITED WARRANTY

58 MAINTENANCE
2 Turn the oven mode knob to select Self Clean
or press Self Clean. The oven defaults to the
recommended four-hour self clean for a
moderately soiled oven. Press plus(+) or
minus(-) to select a self clean time from 3 to 5
hours.
3 Press Start Time.
4 Set the time of day you would like the Self
Clean to start by pressing plus(+) or minus(-).
5 Press START.
NOTE
• It may become necessary to cancel or interrupt a
Self Clean cycle due to excessive smoke or fire in
the oven. To cancel the Self Clean function, turn
the oven mode knob to the OFF position or press
CLEAR/OFF.
Removing/Assembling Lift-Off
Oven Doors
Door Care Instructions
Most oven doors contain glass that can break.
CAUTION
• Do not close the oven door until all the oven
racks are fully in place.
• Do not hit the glass with pots, pans, or any other
object.
• Scratching, hitting, jarring, or stressing the glass
may weaken its structure causing an increased
risk of breakage at a later time.
Removing Doors
1 Fully open the door.
2 Unlock the hinge locks, rotating them as far
toward the open door frame as they will go.
a Slot
b Hinge Lock
c Lock
d Unlock
3 Firmly grasp both sides of the door at the top.
4 Close the door to the removal position
(approximately five degrees) which is halfway
between the broil stop position and fully
closed. If the position is correct, the hinge
arms will move freely.
a about 5°
5 Lift door up and out until the hinge arms are
clear of the slots.
Assembling Doors
1 Firmly grasp both sides of the door at the top.
2 With the door at the same angle as the
removal position, seat the indentation of the
hinge arms into the bottom edge of the hinge
slots. The notch in the hinge arms must be
fully seated into the bottom edge of the slots.