ENGLISH ESPAÑOL INSTALLATION MANUAL ELECTRIC CONVECTION BUILT-IN OVEN Please read these instructions thoroughly before installing and operating the oven. LSWS305ST LSWD305ST www.lg.
Part 1 SAFETY 1 BEFORE YOU BEGIN Remove all tape and packing materials before using the oven. Dispose all plastic bags after unpacking the oven. Never allow children to play with packing materials. You can download an Installation manual at http://www.lg.com. IMPORTANT SAFETY INSTRUCTIONS Read and follow all instructions before using your oven to prevent the risk of fire, electric shock, injury to person, or damage when using the oven. This guide does not cover all possible conditions that may occur.
Part 1 SAFETY This installation must be completed by a qualified installer or technician. • Please read the entire Installation Instructions prior to installation. • Remove all packing materials from the oven compartments before connecting the electrical supply to the oven. • Installer: please retain these instructions for local inspector’s reference, then leave them with the consumer.
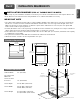
Part 2 INSTALLATION REQUIREMENTS 1 INSTALLATION DRAWINGS (FOR 30” SINGLE BUILT- IN OVEN) The first step of your installation should be to measure your current cutout dimensions and compare them to the cutout dimensions shown below. You may find little or no cabinet work will be necessary. IMPORTANT NOTE • The cabinet base platform must be able to support 190lbs (86Kg).
Part 2 INSTALLATION REQUIREMENTS The first step of your installation should be to measure your current cutout dimensions and compare them to the cutout dimensions shown below. You may find little or no cabinet work will be necessary. IMPORTANT NOTE • The cabinet base platform must be able to support 325lbs (147Kg). If the cabinet does not have a solid bottom, two braces or runners must be installed level with the bottom of the cutout to support the weight of the oven.
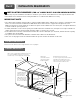
Part 2 INSTALLATION REQUIREMENTS 3 INSTALLATION DRAWINGS (FOR 30” SINGLE BUILT- IN OVEN UNDERCOUNTER) The first step of your installation should be to measure your current cutout dimensions and compare them to the cutout dimensions shown below. You may find little or no cabinet work will be necessary. IMPORTANT NOTE • The cabinet base platform must be able to support 190lbs (86Kg).
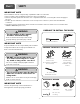
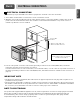
Part 2 INSTALLATION REQUIREMENTS The second step of your installation should be to remove any packing material from the oven before you install the oven. 1. Remove all tape from around the oven. 2. Open the oven door and remove packaging materials and oven racks inside the oven. 3. Door removal is not a requirement for installation of the oven, but is an added convenience. To remove the door, follow the steps below. Step. 1 Step. 3 Fully open the door. Slot Step.
Part 3 ELECTRICAL CONNECTIONS 1 ELECTRICAL CONNECTION REQUIREMENTS The third step of your installation should be to follow electrical connection requirements below. Dedicated circuit protection must be prepared as recommended in electrical connection requirements and the oven should be grounded properly. IMPORTANT NOTE Be sure your wall oven is installed and grounded properly by a qualified installer or service technician.
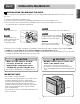
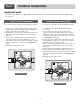
Part 3 ELECTRICAL CONNECTIONS The fourth step of your installation should be to prepare the electrical connection as follows: 1. Turn off the circuit breaker or remove fuses to the oven branch circuit. 2. With the oven positioned directly in front of the cabinet opening, connect the flexible conduit to the electrical junction box as shown below. Position the conduit in such a manner that it will lie on top of the oven in a natural loop when the oven is installed.
Part 3 ELECTRICAL CONNECTIONS IMPORTANT NOTE • You will need to purchase an appropriate conduit connector to complete the connection of the conduit to the junction box. 3-wire circuit connection 4-wire circuit connection To connect to a three-wire circuit, follow these steps: To connect to a four-wire circuit, follow these steps: 1. Connect the oven ground (green) wire and neutral (white) wire to the branch circuit neutral (white or gray in color) wire, using a wire nut. 2.
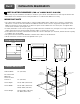
Part 4 INSTALL THE OVEN ENGLISH 1 CABINET INSTALLATION The fifth step of your installation should be to install the oven into the cabinet as follows: 1. Sliding the oven into the opening. a. Loop (do not tie) a 36” (91cm) string around the conduit before the oven is slid into place.This will keep the conduit from falling behind the oven. b. Lift oven into cabinet cutout using the oven opening as a grip. Carefully push against the oven front frame. Do not push against outside edges. c.
Part 5 OPERATION CHECKLIST 1 CHECKING OPERATION Each of the functions has been factory checked before shipping. However, it is suggested that you verify the operation of the oven once more. Refer to the Owner’s Manual. Follow the instructions for the basic check. 1. Turn on power supply. The initial signal sound will be heard and LG logo should be appear in the display. 2. Check the operation of the broil mode. When the oven is set to broil, the upper element in the oven should become red.
ESPAÑOL MANUAL DE INSTALACIÓN HORNO ELÉCTRICO DE CONVECCIÓN EMPOTRADO Tenga a bien leer estas instrucciones por completo antes de instalar y operar el horno. LSWS305ST LSWD305ST P/No.: MFL51224803 www.lg.
Parte 1 SEGURIDAD 1 ANTES DE COMENZAR Quite toda la cinta y materiales de empaque antes de utilizar el horno. Deseche todas las bolsas plásticas después de desempacar el horno. Nunca permita que los niños jueguen con los materiales de empaque. Usted puede descargar el manual de instalación en http://www.lg.com.
Parte 1 SEGURIDAD NOTA IMPORTANTE PREPARACIÓN PARA INSTALAR EL HORNO ADVERTENCIA • La información de este manual debe seguirse al pie de la letra. - Puede generarse un incendio o descarga eléctrica, lo que provocaría daños a la propiedad, lesiones personales o la muerte. Destornillador Phillips NOTA IMPORTANTE Una instalación adecuada es responsabilidad del instalador y la garantía NO cubre las fallas del producto debido a una instalación incorrecta.
Parte 2 REQUISITOS DE INSTALACIÓN 1 DIBUJOS DE INSTALACIÓN (PARA HORNO SIMPLE EMPOTRADO DE 30”) El primer paso de su instalación debe ser medir las dimensiones actuales de su abertura y compararlas con las dimensiones mostradas a continuación. Puede descubrir que será necesario realizar poco o nada de trabajo en los gabinetes. NOTA IMPORTANTE • La plataforma base del gabinete debe poder soportar 190 lbs (86 Kg).
Parte 2 REQUISITOS DE INSTALACIÓN 2 DIBUJOS DE INSTALACIÓN (PARA HORNO DOBLE EMPOTRADO DE 30”) El primer paso de su instalación debe ser medir las dimensiones actuales de su abertura y compararlas con las dimensiones mostradas a continuación. Puede descubrir que será necesario realizar poco o nada de trabajo en los gabinetes. • La plataforma base del gabinete debe poder soportar 325 lbs (147 kg).
Parte 2 REQUISITOS DE INSTALACIÓN 3 DIBUJOS DE INSTALACIÓN (PARA HORNO SIMPLE EMPOTRADO DE 30” BAJO MOSTRADOR) El primer paso de su instalación debe ser medir las dimensiones actuales de su abertura y compararlas con las dimensiones mostradas a continuación. Puede descubrir que será necesario realizar poco o nada de trabajo en los gabinetes. NOTA IMPORTANTE • La plataforma base del gabinete debe poder soportar 190 lbs (86 kg).
Parte 2 REQUISITOS DE INSTALACIÓN 4 PREPARACIÓN PARA TRASLADAR EL HORNO El segundo paso de su instalación debe ser quitar el material de empaque del horno antes de instalarlo. Paso 1 Paso 3 Abra la puerta por completo. Tome con firmeza ambos lados de la puerta de la parte superior. Bloqueo Ranura Desbloqueo Paso 2 Presione las trabas de la bisagra hacia abajo (Fig.1) en dirección del marco de la puerta hasta destrabarlas.
Parte 3 CONEXIONES ELÉCTRICAS 1 REQUISITOS DE LAS CONEXIONES ELÉCTRICAS El tercer paso de su instalación debe ser seguir los requisitos de las conexiones eléctricas incluidos a continuación. Debe prepararse una protección de circuito dedicado como se recomienda en los requisitos de las conexiones eléctricas y el horno debe contar una adecuada conexión a tierra. NOTA IMPORTANTE Verifique que un instalador o un técnico calificados instalen y conecten a tierra correctamente su horno de pared.
Parte 3 CONEXIONES ELÉCTRICAS 2 CONEXIÓN ELÉCTRICA El cuarto paso de su instalación debe ser preparar la conexión eléctrica de la siguiente manera: 5” Mín. Ubicación de la caja de conexiones 22” mín. para un horno simple de pared 42” mín. para un horno doble de pared La caja de conexiones debe estar embutida y el conector de conductos debe utilizarse en la caja de conexiones. 3.
Parte 3 CONEXIONES ELÉCTRICAS NOTA IMPORTANTE • Tendrá que comprar un conector de conductos apropiado para completar la conexión del conducto a la caja de conexiones. Conexión de circuito de 3 hilos Conexión de circuito de 4 hilos Para conectar a un circuito de tres hilos, siga los siguientes pasos: Para conectar a un circuito de cuatro hilos, siga los siguientes pasos: 1.
Parte 4 INSTALACIÓN DEL HORNO 1 INSTALACIÓN DEL GABINETE El quinto paso de su instalación debe ser instalar el horno dentro del gabinete de la siguiente manera: ADVERTENCIA PRECAUCIÓN • Deben utilizarse tornillos de montaje. • NO bloquee la salida de aire del horno ubicada en la parte inferior del horno. - Si no se hace, el horno puede caer del gabinete, lo que provocaría una lesión grave. - Bloquear la salida puede provocar daños en el gabinete y el mal funcionamiento del producto. 2.
Parte 5 LISTA DE CONTROL DE FUNCIONAMIENTO 1 VERIFICACIÓN DEL FUNCIONAMIENTO Todas las funciones se han controlado en la fábrica antes del envío. Sin embargo, se sugiere que verifique el funcionamiento del horno una vez más. Consulte el Manual del propietario. Siga las instrucciones para una verificación básica. 1. Encienda el suministro de energía. Se oirá la señal inicial y deberá parecer el logotipo de LG en la pantalla. 2. Verifique el funcionamiento en el modo broil (asar).
MEMO ESPAÑOL - 13 -
MEMO - 14 -
MEMO ESPAÑOL - 15 -
Printed in Korea