
Owner’s Manual


12
EN
4
Wall sleeve must be securely fastened in wall
before installing the Air Conditioner. Use the
nails or screws through sleeve into wall, if
needed. Repaint sleeve if needed.
5
Prepare the wall sleeve for installation of
the unit. If you plan to use your existing wall
sleeve, and it is not LGE, use procedure B or
C below.
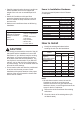
Procedure Brand
Depth(inches)
ALGE 16-23/32
White-Westinghouse
FrigidaireCarrier
16, 17-1/2
(52F series)
or 22
B
General Electric
16-7/8
/Hotpoint
Whirlpool 17-1/8or23
Carrier(51Sseries)
18-5/8
Fedders/Emerson
16-3/4
or 19-3/4
C
Emerson/Fedders15
Friedrich 16-3/4
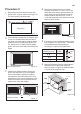
6
Install new unit into wall sleeve.
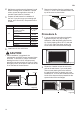
CAUTION
• When installation is completed, the
replacement unit MUST have a rearward slope
as shown. To achieve 1/4” slope, remove the
backing from the 11-13/16” shim strips and
attach them as shown below in Figure 4. Place
the higher portion of the shim to the front of the
rib on the base of the wall sleeve.
1/4"
Wall Sleeve
FRONT
UNIT
SHIM PLACEMENT UNIT INSTALLATION
1" high
3
/
4
" High
Shim
6" 6"
Figure 4
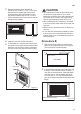
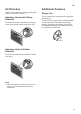
7
Remove the backing from the insulation strip
5-5/16” x 1-3/16” x 3/14” and attach that to the
top of the cover as show below.
Insulation
Cover
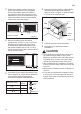
Procedure A
1
If you are using the new sleeve (optionally
supplied with your unit), skip to step 3.
Otherwise, install the plastic grille from the
kit. Cut the plastic grille to 25-1/2” wide and
15-1/4” high. Place the plastic grille to the
inside of the wall sleeve at the rear flange.
Figure 5
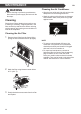
2
Fasten the 4 washer screws to secure the
grille to the wall sleeve. If you need plastic
nuts to mount plastic grille to the inside of
the wall sleeve, there are plastic nuts in the
installation kit. The nuts are installed from the
inside of the sleeve and are pressed into the
square holes of the rear flanges.
or
Figure 6