AIR CONDITIONER Please read this manual carefully before operating your set and retain it for future reference. TYPE : Highlander Ceiling Cassette Air Conditioner For Single Ceiling Cassette models MFL62865706 P/No : MFL62865706_v2 CUSTOMER CARE 1800-180-3575 (Toll Free) CALL 12 x 7 (9:00 AM – 9:00 PM) CLICK www.lg.com/in/support cac.service@lgepartner.com To know more about LG, visit www.lg.com For Corporate/Instutional enquiries, please write to enquiries@lgindia.com Regd.
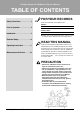
Ceiling Cassette Air Conditioner Owner’s Manual TABLE OF CONTENTS Safety Precautions.........................3 FOR YOUR RECORDS Write the model and serial numbers here: Model # Prior to Operation ..........................8 Serial # You can find them on a label on the side of each unit. Dealer's Name Introduction ....................................9 Date Purchased n Staple your receipt to this page in the event you need it to prove date of purchase or for warranty issues. Electrical Safety .........
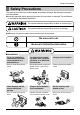
Safety Precautions Safety Precautions To prevent injury to the user or other people and property damage, the following instructions must be followed. n Incorrect operation due to ignoring instruction will cause harm or damage. The seriousness is classified by the following indications. This symbol indicates the possibility of death or serious injury. This symbol indicates the possibility of injury or damage. n Meanings of symbols used in this manual are as shown below. Be sure not to do.
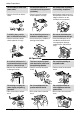
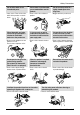
Safety Precautions Do not modify or extend the power cable. • There is risk of fire or electric shock. For installation, always contact the dealer or an Authorized Service Center. • There is risk of fire, electric shock, explosion, or injury. Do not install, remove, or re-install the unit by yourself (customer). • There is risk of fire, electric shock, explosion, or injury. Do not install the product on a defective installation stand. • It may cause injury, accident, or damage to the product.
Safety Precautions Do not allow water to run into electric parts. • It may cause There is risk of fire, failure of the product, or electric shock. Do not store or use flammable gas or combustibles near the product. • There is risk of fire or failure of product. Do not use the product in a tightly closed space for a long time. • Oxygen deficiency could occur. Gasolin When flammable gas leaks, turn off the gas and open a window for ventilation before turn the product on.
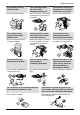
Safety Precautions When the product is not be used for a long time, disconnect the power supply plug or turn off the breaker. • There is risk of product damage or failure, or unintended operation. Take care to ensure that nobody could step on or fall onto the outdoor unit. • This could result in personal injury and product damage. n Installation Always check for gas (refrigerant) leakage after installation or repair of product. • Low refrigerant levels may cause failure of product.
Safety Precautions Do not block the inlet or outlet of air flow. • It may cause product failure. Use a soft cloth to clean. Do not use harsh detergents, solvents, etc. • There is risk of fire, electric shock, or damage to the plastic parts of the product. Do not touch the metal parts of the product when removing the air filter. They are very sharp! • There is risk of personal injury. x i r Wa Thnne Do not step on or put anyting on the product. (outdoor units) Always insert the filter securely.
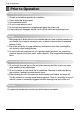
Prior to Operation Prior to Operation Preparing for operation 1. Contact an installation specialist for installation. 2. Plug in the power plug properly. 3. Use a dedicated circuit. 4. Do not use an extension cord. 5. Do not start/stop operation by plugging/unplugging the power cord. 6. If the cord/plug is damaged, replace it with only an authorized replacement part. Usage 1. Being exposed to direct airflow for an extended period of time could be hazardous to your health.
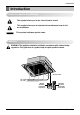
Introduction Introduction Symbols used in this Manual This symbol alerts you to the risk of electric shock. This symbol alerts you to hazards that could cause harm to the air conditioner. NOTICE This symbol indicates special notes. Features WARNING: This appliance should be installed in accordance with national wiring regulations. This guide acts as a guide to help to explain product features.
vius iqjkus midj.k dk fuiVku ¼bZ&vif’k"V fu;e ds vuqlkj½ Disposal of your old appliance (as per e-waste Rules) tc bl dkVs x;s ifg;s okys fcu dk fpº+u fdlh midj.k vkSj blds vksisjVj dh iqfLrdk ds lkFk layXu gksrk gSa rks bldk eryc gS fd bls "bZ&vif'k"V" ¼izca/ku vkSj gFkkyu½ fu;e 2011 ds vUrxZr lfEefyr fd;k x;k gS] vkSj bls uohuhdj.k] fo?kVu vkSj fuiVku ds fy, cuk;k x;k gSA 2. djsa& d& midj.k dks flQZ vf/kd`r iqu% uohuhdj.kdrkZ dks gh fuiVkj.k djus gsrq gLrkarfjr djsaA [k& tc midj.
Operating Instructions Operating Instructions Indoor Unit, Outdoor Unit Anti-bacteria Anti-bacteria Air Outlet Air Inlet Wired Remote Controller (Optional) 1 2 3 4 5 Wireless Remote Controller (Standard) 6 Operation Indication Lamps 1 Forced Operation : Operation procedures when remote control can't be used. 2 Defrost Mode : Lights up during defrost mode or hot start operation. (heat pump model only) 3 Timer : Lights up during timer operation.
Operating Instructions Operating Instructions 12 Ceiling Cassette Air Conditioner
Wireless Remote Controller (Standard) Owner's Manual 13
Operating Instructions Installer Setting - How to enter installer setting mode 14 Ceiling Cassette Air Conditioner
Operating Instructions Installer Setting - Installer Setting Code Table Owner's Manual 15
Operating Instructions Installer Setting - Setting Address of Central Control 16 Ceiling Cassette Air Conditioner
Operating Instructions Cooling Mode Owner's Manual 17
Operating Instructions Auto Operation Mode 18 Ceiling Cassette Air Conditioner
Operating Instructions Dehumidification Mode Owner's Manual 19
Operating Instructions Fan Mode 20 Ceiling Cassette Air Conditioner
Operating Instructions Temperature Setting/Room Temperature Checking Owner's Manual 21
Operating Instructions Airflow Setting 22 Ceiling Cassette Air Conditioner
Operating Instructions Plasma Purification (Optional) Owner's Manual 23
Operating Instructions Individual vane angle control 24 Ceiling Cassette Air Conditioner
Operating Instructions Timer Owner's Manual 25
Wide LCD Wired Remote Controller (Optional) 26 Ceiling Cassette Air Conditioner
Owner's Manual 27
Ceiling Cassette Air Conditioner
Installation instruction 3. Please fix remote controller upper part into the setup board attached to the surface of the wall, as the picture below, and then, connect with setup board by pressing lower part. - Please connect not to make a gap at the remote controller and setup board?s upper and lower, right and left part.
Installation instruction Group control 1. When installing more than 2 units of air conditioner to one wired remote controller, please connect as the right figure. • If it is not event communication indoor unit, set the unit as slave. • Check for event communication through the product manual. GND Signal wire 12V GND Signal wire When controlling multiple indoor units with event communication function with one remote controller, you must change the master/slave setting from the indoor unit.
Installation instruction Installer Setting - How to enter installer setting mode CAUTION Installer setting mode is to set the detail function of the remote controller. If the installer setting mode is not set correctly, it can cause problems to the product, user injury or property damage. This must be set by an certificated installer, and any installation or change that is carried out by a non-certificated person should be responsible for the results. In this case, free service cannot be provided .
Owner's instruction Owner's instruction Standard Operation - Standard Cooling It cools the room by comfortable and clean wind. 1 Press indoor. button to turn on the button to select 2 Press Cooling operation mode. the desired temperature 3 Adjust by pressing buttons. Press button to check the Room temperature. When setting the desired temperature higher than room temperature, only ventilation wind is blow out instead of cooling wind.
Owner's instruction Standard Operation - Power Cooling It makes the room cool using pleasant and fresh air quickly 1 Press indoor. button to trun on the button to select 2 Press cooling operation mode. button continuously 3 Press until 'Po' displayed. What is Power Cooling? • Desired temperature: Po (actually 18°C) • Wind flow: power wind • Wind direction: fix to air-cooling position } It make room temperature drop fast by running Partial product has no power air-cooling function.
Owner's instruction Standard Operation - Dehumidification Mode It removes humidity while air-cooling weakly. 1 Press indoor. button to turn on the button to select 2 Press Dehumidification mode. The temperature setting can not be adjusted during operation this mode. the button to select 3 Press airflow rate feeble weak medium strong automatic. (The initial wind powerfulness of humidity removal drive is 'weak'.
Owner's instruction Standard Operation - Auto Operation Mode 1 Press indoor. button to turn on the button to select 2 Press Artificial intelligence Mode. can adjust 3 You the temperature as the picture on the right for cooling and heating model. the case of 4 For cooling exclusive, as the picture on the right, you can adjust the temperature from hot to cold, from "-2" to "2" based on "00".
Owner's instruction Standard Operation - Temperature Setting/Room Temperature Check Temperature Setting can simply adjust the desired 1 We temperature. • Press the buttons to adjust the desired temperature. : Increase 1°C or 2°F per one time pressing : Decrease 1°C or 2°F per one time pressing • Room temp: Indicate the current room temperature. • Set temp: Indicate the temperature that user want to set. Depend on what kind of controller, the desired temperature can be adjusted at 0.5°C or 1°F.
Owner's instruction Standard Operation - Airflow Setting Wind powerfulness : You can simply adjust desired wind powerfulness. setup desired wind 1 Please powerfulness by wind powerfulness button. • Every time you press wind powerfulness, you can select the wind flow in order of ‘feeble weak weak medium ? medium medium strong strong ? power automatic’. • The menu item might not be partially selected according to product function. • Please refer to product manual for product’s detailed function.
Owner's instruction Sub function - Direct Wind / Indirect Wind It is the function to directly or indirectly control wind direction by body perception sensor. The method to setup direct/indirect wind 1 Please press button. icon of direct/indirect wind 2 The blinks on the display, and then, if pressing button, direct/indirect wind icon is fixed and the function is setup. direct wind indirect wind pressing 3 Ifsetup mode.
Owner's instruction The method to cancel direct/indirect wind 1 Please press button. icon of direct/indirect wind 2 The blinks on the display, and then, if pressing button, direct/indirect wind icon is removed and the function is cancelled. pressing 3 Ifsetup mode. button, it gets out of After setup, it automatically gets out of setup mode if there is no button input for 25 seconds. When exiting without pressing set button, the manipulated value is not reflected.
Owner's instruction Sub function - Plasma Purification Only products with humidifying function can use this. The method to setup cleaning air pressing 1 Repeat until icon flash. button or cancel Plasma 2 Operate Purification function by pressing ( button. icon appears/disappears on display part up to selection ) setting, press 3 After to exit. button After setup, it automatically gets out of setup mode if there is no button input for 25 seconds.
Owner's instruction Function setting - Child Lock It is the function to use preventing children or others from careless using. button repeatedly until 1 Press the is flashing. moving to 'setup' icon area by 2 Ifusing button, 'setup' icon blinks, and child lock function is setup if pressing button at that time. cancelling lock function, if moving 3 When to 'cancel' icon by pressing button and then, pressing button, child lock function is cancelled. button to exit.
Owner's instruction Function setting - Filter Sign Clear This function is to clear the indicator of indoor filter cleaning. 1 Press until the button repeatedly is flashing. the is flashing, press 2 When the to clear this display • When filter is covered by dust, it will reduce cooling/heating efficiency and accumulate more electric power. Therefore. do clean the filter whenever cleaning time is expired.
Owner's instruction Function setting - Elevation Grill This function is to move the indoor filter up/down for cleaning filter. button 1 Press Repeat pressing button until icon flash. to descent using button 2 Move and press button will display descent icon and the up/down grill will descent. up/down grill descents to the 3 When desired position, move to stop icon suing button and press to stop up/down grill.
Owner's instruction Function setting - Vane Angle Control This function is to adjust angle at which airflow is blow out. pressing 1 Repeat icon flash. button until button to select active vane : 2 Press 1 / 2 / 3 / 4 / All / Standard Select Vane number using buttons. Vane number : No. 1, 2., 3, 4, all, or standard - Selected vane is in operation. - Please verify the operating vane. - To set the angle of all the vanes, select 'all'. - To set as the factory default settings, select 'standard'.
Owner's instruction Function Setting - Change Temp Change temperature is the function to setup air-cooling and heating drive automatically changeable according to the temperature at artificial intelligence drive mode. 1 Repeaticonpressing flash. button until button to change. 2 Press Converting temp value : 1~7 button to complete 3 Press and active the setting process. button to exit or 4 Press system will automatically release without any input after 25 seconds.
Owner's instruction Function setting - Changing Current Time press function setup 1 Please button. If pressing function setup button repeatedly, it moves to time setup menu. ‘Time setup’ icon is indicated at that time and date blinks at current time indication area. Ex) Changing Current Time as 'Monday / AM 10:20'. 2 Press day. key to adjust the current key to move to AM/ PM setting 3 Press mode (the 'AM/ PM segment will flash). AM/ PM value by 4 Setting pressing button.
Owner's instruction button to move to 'Minute' 7 Press setting mode. (the 'Minute' segment will flash) Minute value by pressing 8 Setting button. 9 Press 10 button to finish. In the process, press button to release and exit from setting mode. (In case of exit with incomplete information, it will return to the previous setting) When exiting without pressing set button, the manipulated value is not reflected.
Owner's instruction Function setting - Auto Cleaning The method to setup Automatic Drying 1 Please press button. to automatic drying menu by 2 Move pressing button twice. 'Automatic Drying' icon will be displayed and the current status, 'DISABLE' will blink. to ‘ABLE’ icon area by using 3 If moving button, ‘ABLE’ icon blinks, and automatic dry function is setup if pressing button at that time.
Owner's instruction Programming - Simple Reservation You can set the reservation conveniently in the units of 1 hour from 1 hour to 7 hours. button to enter the 1 Press Programming mode. (the segment flashing) Ex) Setting Simple Reservation time as '3'. 2 Press time. 3 Press button to adjust reservation button to finish setting. button to exit. 4 Press After setup, it automatically gets out of setup mode if there is no button input for 25 seconds.
Owner's instruction Programming - Sleep Reservation Sleep reservation is the function of air-conditioner to run and stop after certain period of time at sleep mode before sleep. When connected to a ventilation product and set the sleep reservation, when it goes to the sleep mode, after the set time has elapsed. button to enter the 1 Press Programming mode. Ex) Setting Sleep Reservation time as '3'. pressing button to enter the 2 Repeat SLEEP reservation setting mode. ( segment flashing) 3 Press time.
Owner's instruction Programming - ON Reservation Automatically turned On at reserved time that you set. 1 Press button. Ex) Setting ON Reservation Time as 'AM 10:20'. pressing button to 2 Repeat enter the ON reservation setting mode. ( segment flashing) 3 Press setting. button to adjust AM/ PM button to Hour setting 4 Press mode. When the Hour icon flash, please setting time. The setting range is within 1~12. button to shift to Minute 5 Press setting mode.
Owner's instruction button to exit. 7 Press After setup, it automatically gets out of setup mode if there is no button input for 25 seconds. When exiting without pressing set button, the manipulated value is not reflected. - If reservation is set, 'turned on' indication shows up at the lower part of LCD screen, and air-conditioner product runs at the time that is set. - If reservation is cancelled, 'turned on' indication disappears.
Owner's instruction Programming - OFF Reservation Automatically turned Off at reserved time that you set. 1 Press button. Ex) Setting OFF Reservation Time as 'AM 10:20'. pressing button 2 Repeatedly to enter the OFF reservation setting mode. ( segment flashing) 3 Press setting. button to adjust AM/ PM button to shift to Hour 4 Press setting mode. When the Hour icon flash, please setting time. The setting range is within 1~12. button to shift to Minute 5 Press setting mode.
Owner's instruction button to exit. 7 Press After setup, it automatically gets out of setup mode if there is no button input for 25 seconds. When exiting without pressing set button, the manipulated value is not reflected. - If reservation is set, 'turned off' indication shows up at the lower part of LCD screen, and air-conditioner product runs at the time that is set. - If reservation is cancelled, 'turned off' indication disappears.
Owner's instruction Programming : Weekly Reservation You can set the daily reservation in weekly unit . Weekly reservation keeps operating until before you cancel it once you setup 1 Please move to reservation setup mode by pressing reservation button. You can setup two weekly reservations for one day, and up to fourteen reservations for a week. For example, to setup (Tuesday morning 11:30 turned on ~ afternoon 12:30 turned off), you setup in order below.
Owner's instruction move to 'AM/PM' setup part 10 Please of turning off by using button. - AM/PM setup is identical with turning on time setup. move to 'hour' setup part 11 Please of turning off by using Right button. - It is the part to reserve the time at which air-conditioner is turned off. - If 'hour' indication blinks, please setup 'hour'. Please setup 'hour' and 'minute' identically with the method to setup turning on time. finishing weekly reservation setup, please press setup/cancellation button.
Owner's instruction Programming : Holiday Reservation It automatically stops at reserved day that you set. press button. 1 Please It enters into reservation setup mode. move to 'holiday' by repeatedly 2 Please pressing button. move to 'date' that 3 Please you want to setup holiday by using button. or cancel holiday by using 4 Pleaseorappointbutton. For example, when you setup Monday/Friday to holiday - 'Monday', 'Friday' letter disappears. press 5 Please holiday setup.
Owner's instruction Ventilation Product User Manual - Interlinked Air conditioner and Ventilation 1. Control using remote controller where air conditioner indoor unit and the ventilation product is installed at the same time.
Owner's instruction Ventilation Product User Manual - Interlinked operation with general ventilation It is used when air conditioner is interlinked with ventilation product. It is a function that cools and refreshes indoor air using the ventilation product at the same time operating the air conditioning function. Ventilation interlinked operation button on the remote 1 Press controller control panel. - It is only used when air conditioner and general ventilation is interlinked.
Owner's instruction Manual Conversion - Pressing ‘Ventilation’ button in ventilation mode will manually convert It is a function to cool and refresh the indoor air using general ventilation product.. Ventilation single operation button on the remote 1 Press controller. button will change 2 Pressing the ventilation mode.
Owner's instruction Ventilation Product User Manual - Interlinked Operation with Direct Expansion Ventilation It can only be used when the air conditioner is interlinked with direct expansion ventilation product. Interlinked Operation with Direct Expansion Ventilation button on the remote 1 Press controller. - It is used only when air conditioner and the ventilation product are interlinked.
Owner's instruction Ventilation Product User Manual - Single Operation with Direct Expansion Ventilation Pressing It performs ventilation operation with cooling or heating at the same time using the heat exchanger inside the direct expansion type ventilation product. Direct expansion type ventilation single operation button on the remote controller. 1 It displays as the figure right side in the direct expansion type ventilation single operation. button will change the 2 Pressing ventilation mode.
Owner's instruction Ventilation Product Additional Operations - Fast / Power Saving It is a function to operate ventilation function more efficiently through the ventilation additional functions, fast / power saving settings. Fast : ventilates fast button in ventilation mode. 1 Press - It converts in the order of 'fast power saving' in ventilation mode. is blinking on the display, and pressing 2 'Fast'button will stabilize 'fast' icon, and the function is set. 3 Pressing settings.
Owner's instruction Different mode drive Different mode drive is a phenomenon taking place when indoor units' drive mode is different in the case that a few indoor units are set up at one AHU. (Different mode drive doesn't show up at cooling exclusive model.) a few indoor units are running air1 While cooling at one AHU, it doesn't operate heating drive if one indoor unit operates heating drive.
Owner's instruction Checkups before reporting breakdown Please first check the items below for product's defects before consulting to service center. Symptoms Check-up Management • Is air-conditioner's power on? • Please check up circuit breaker. • Please check up wire remote controller's setup condition. • Are air-conditioner and remote controller properly connected with cable? • Please connect air-conditioner and remote controller cable.
Maintenance and Service Maintenance and Service CAUTION Before performing any maintenance, turn off the main power to the system. Indoor Unit Grille, Case and Remote Control q Turn the system off before cleanining, To clean, wipe with a soft, dry cloth. Do not use bleach or abrasives. NOTICE Anti-biofilter Air Intake Supply power must be disconnected before cleaning the indoor unit.
Maintenance and Service When the air conditioner is not going to be used for a long time. When air conditioner is not going to be used for a long time. 1. Operate the air conditioner at the following settings for 2 to 3 hours. • Type of operation: Fan operation mode. • This will dry out the internal mechanisms. 2. Turn off the breaker. CAUTION Turn off the circuit breaker when the air conditioner is not going to be used for a long time. Dirt may collect and may cause a fire.
Maintenance and Service Troubleshooting Tips! Save time and money! Check the following points before requesting repairs or service.... If the fault persists, please contact your dealer or service center. Case Explanation See page The air conditioner does not operate. • Have you made a mistake in timer operation? 13~28 • Has the fuse blown or has the circuit breaker been tripped? - The room has a peculiar odor.
Maintenance and Service Troubleshooting Tips! Save time and money! Check the following points before requesting repairs or service.... If the fault persists, please contact your dealer or service center. Case The air conditioner does not operate. Explanation See page - • Has the fuse blown or has the circuit breaker been tripped? 21 • Have you made a mistake in timer operation? • Is the air filter dirty? See air filter cleaning instructions. Does not cool or heat effectively.
Maintenance and Service When the air conditioner is not going to be used for a long time. When air conditioner is not going to be used for a long time. 1. Operate the air conditioner at the following settings for 2 to 3 hours. • Type of operation: Fan operation mode. •This will dry out the internal mechanisms. 2. Turn off the breaker. CAUTION Turn off the circuit breaker when the air conditioner is not going to be used for a long time. Dirt may collect and may cause a fire.
Maintenance and Service Maintenance and Service CAUTION Before performing any maintenance, turn off the main power to the system. Indoor Unit Grille, Case and Remote Controller ❐ Turn the system off before cleanining, To clean, wipe with a soft, dry cloth. Do not use bleach or abrasives. NOTICE Supply power must be disconnected before cleaning the indoor unit.
32 Ceiling Cassette Air Conditioner
Installation 3) Evaluation of the per formance 1. Measure the temperature of the intake and discharge air. 2. Ensure the difference between the intake temperature and the discharge one is more than 8°C (Cooling) or reversely (Heating). Thermometer CAUTION After the confirmation of the above conditions, prepare the wiring as foll ows: 1) Never fail to have an individual power speciali zed for the air conditione r.
Installation 3. Once the desired vacuum is created. Disconnect the vacuum pump and open the liquid side valve stem by turning it to counter-clockwise direction with service valve wrench. 4. Open completely the gas side valve buy turning to counter-clockwise with service valve wrench. 5. Remove slowly the charge hose connected to the gas side service port (to release the pressure). 6. Replace back the flare nut and its bonnet on the gas side service port.
Installation Manual 29
28 Ceiling Cassette Air Conditioner
Installation HEAT INSULATION 1. Use the heat insulation material for the refrigerant piping which has an excellent heat-resistance (over 120°C). Fastening band (accessory) 2. Precautions in high humidity circumstance: This air conditioner has been tested according to the "KS Standard Conditions with Mist" and confirmed that there is not any default.
Installation CAUTION: Install certainly the decorative panel. Cool air leakage causes sweating. Water drops fall.
Installation Manual 25
Installation Installation of Decorative Panel The decorative panel has its installation direction. Before installing the decorative panel, always remove the paper template. 1. Remove the packing and take out air inlet grille from front panel. Front grille 2. Remove the Corner covers of the panel. Coner cover 3. Fit the panel on the unit by inserting hooks as shown in picture. Hook clip Hook 4. Insert two screws on diagonal corners of panel. Do not tighten the bolts completely.
Installation Piping Connection 1. Form the piping according to its routing. Avoid bending and bending back the same piping point more than three times. (This will result in hardening the pipe.) 2. After deforming the piping, align centers of the union fitting of the indoor unit and the piping, and tighten them firmly with wrenches. 3. Connect pipe to the service valve or ball valve which is located below the outdoor unit. 4.
Installation Connecting Pipes to the Indoor Unit • Preparation of Piping Main cause of gas leakage is defect in flaring work. Carry out correct flaring work in the following procedure. Copper tube 90° Slanted Uneven Rough 1) Cut the pipes and the cable. • Use the accessory piping kit or the pipes purchased locally. • Measure the distance between the indoor and the outdoor unit. • Cut the pipes a little longer than measured distance. • Cut the cable 1.5m longer than the pipe length.
Installation ELECTRICAL WIRING 1. All wiring must comply with LOCAL REGULATIONS. 2. Select a power source that is capable of supplying the current required by the air conditioner. 3. Feed the power source to the unit via a distribution switch board designed for this purpose. 4. The terminal screws inside the control box may be loose due to vibration during transport. Check the screws for loose connection. (Running the air conditioner with loose connection can overload and damage electrical components.) 5.
Installation Wiring Diagram for LT-C368NLF0/LT-C368NLF1/LT-C368NLF2 (3 tr) OUTDOOR WIRING DIAGRAM COMP T1 BLACK MOTOR 1 YELLOW T3 T2 RD WH BK BK ORANGE RD CAPACITOR 1 RD BK T3 T1 T2 L3 L1 L2 Magnetic Contactor A2 A1 18 15 3ø MONITORING RELAY L3 L2 L1 TERMINAL C BL YL RD BL YL RD RD BK RD BK GN/YL TERMINAL B TERMINAL A 1 R 2 S 7 3 T 8 9 L G N N 10 11 12 RD S To Indoor From Indoor (3Ø,415V) Power Supply (1Ø,230V) 3Ø 415V Power Supply RD LP SWITCH 3854A20396C Wiring Diag
Installation Wiring Diagram Indoor Diagram for all models LT-C186PLF1/F2/F3 (1.5tr), LT-C246PLF0 /LT-C246PLF1/F2 (2 tr) LT-C368NLF0 /LT-C368NLF1/ LT-C368NLF2 (3tr) LT-C488MLF1/LT-C488MLF2/LT-C488MLF3(4Tr) Outdoor Wiring Diagram for LT-C186PLF1/F2/F3 (1.
Installation Wiring Connection • Open the control box cover and connect the Remote controller cord and Indoor power wires.
Wide LCD Wired Remote Control Installation (Optional) Installation Manual 17
Operating Instructions Wide LCD Wired Remote Controller (Optional) 16 Ceiling Cassette Air Conditioner
Operating Instructions Wireless Remote Controller (Standard) Installation Manual 15
Installation The Indoor Unit Installation Ceiling Hanging bolt (W3/8 or M10) Nut (W3/8 or M10) Spring washer (M10) Keep the length of the bolt from the bracket to 40mm Flat washer for M10 (accessory) Ceiling board Flat washer for M10 (accessory) Nut (W3/8 or M10) • The following parts is option.
Installation Ceiling opening dimensions and hanging bolt location • The dimensions of the paper model for installing are the same as those of the ceiling opening dimensions. • Select and mark the position for fixing bolts and piping hole. • Decide the position for fixing bolts slightly tilted to the drain direction after considering the direction of drain hose. • Drill the hole for anchor bolt on the ceiling. • The hole size for four anchor bolts is Ø 14.5mm & 40mm depth.
Installation F). Outdoor Unit best location & piping. The heat exchanger coils and panel vents of the outdoor unit should be checked regularly. If clogged with dirt or soot, the heat exchanger and panel vents may be professionally steam cleaned. Note: Dirty or clogged coils will reduce the operating efficiency of the system and cause higher operating costs.
Installation 3) Piping length and the elevation Model LT-C186PLF1 LT-C186PLF2 LT-C186PLF3 LT-C246PLF0 LT-C246PLF1 LT-C246PLF2 LT-C368NLF0 LT-C368NLF1 LT-C368NLF2 LT-C488MLF0 LT-C488MLF1 LT-C488MLF2 LT-C488MLF3 Pipe Size mm(inch) Length A(m) Standard Max. Elevation B(m) 5 30 7.5 19.05(3/4") 9.52(3/8") 5 30 7.5 15.88 (5/8") 9.52(3/8") 7.5 15.88 (5/8") 6.35(1/4") 7.5 6.35(1/4") 12.7 (1/2") Liquid Gas 30 30 Standard 5 5 Outdoor unit Indoor unit A B Outdoor unit Max.
Installation Installation of Indoor, Outdoor Unit Selection of the best location 1) Indoor unit • There should not be any heat source or steam near the unit. • There should not be any obstacles to prevent the air circulation. • A place where air circulation in the room will be good. • A place where drainage can be easily obtained. • A place where noise prevention is taken into consideration. • Do not install the unit near the door way.
Wired (Optional) Wireless Remote (Standard)
Do not block the inlet or outlet of air flow. • It may cause product failure. Use a soft cloth to clean. Do not use harsh detergents, solvents, etc. • There is risk of fire, electric shock, or damage to the plastic parts of the product. Safety Precautions Do not touch the metal parts of the product when removing the air filter. They are very sharp! • There is risk of personal injury. x Wa Thinner Do not step on or put anyting on the product.
Safety Precautions When the product is not be used for a long time, disconnect the power supply plug or turn off the breaker. • There is risk of product damage or failure, or unintended operation. Take care to ensure that nobody could step on or fall onto the outdoor unit. • This could result in personal injury and product damage. Installation Always check for gas (refrigerant) leakage after installation or repair of product. • Low refrigerant levels may cause failure of product.
Do not allow water to run into electric parts. • It may cause There is risk of fire, failure of the product, or electric shock. Do not store or use flammable gas or combustibles near the product. • There is risk of fire or failure of product. Safety Precautions Do not use the product in a tightly closed space for a long time. • Oxygen deficiency could occur. Gasolin When the product is soaked (flooded or submerged), contact an Authorized Service Center. • There is risk of fire or electric shock.
Safety Precautions Do not install the product on a defective installation stand. • It may cause injury, accident, or damage to the product. For installation , always contact the dealer or an Authori zed Service Cente r. • There is risk of fire, electric shock, explosion, or injury. Do not install, remove, or reinstall the unit by yourself (customer). • There is risk of fire, electric shock, explosion, or injury. • There is risk of fire or electric shock. Do not modify or extend the power cable.
Safety Precautions Safety Precautions To prevent injury to the user or other people and property damage, the following instructions must be followed. Incorrect operation due to ignoring instruction will cause harm or damage. The seriousness is classified by the following indications. This symbol indicates the possibility of death or serious injury. This symbol indicates the possibility of injury or damage. Meanings of symbols used in this manual are as shown below. Be sure not to do.
Ceiling Cassette Air Conditioner Installation Manual TABLE OF CONTENTS Installation Requirements Required Parts Pipes: Gas side Liquid side Introduction ...................................8 Connecting cable Safety Precautions ........................ 3 Symbols used in this Manual.........8 Features.......................................8 Installation ......................................
INSTALLATION MANUAL AIR CONDITIONER Please read this installation manual completely before installing the product. Installation work must be performed in accordance with the national wiring standards by authorized personnel only. Please retain this installation manual for future reference after reading it thoroughly.