website e-mail http://www.lgservice.com http://www.lgeservice.com/techsup.html LG Window-Type Air Conditioner LG OWNER'S MANUAL MODELS: LWC182PLAB0, LWC182PLMM0 LWH182PLAB0, LWH182PLMM0 LWC242PLAB0, LWC242PLMM0 IMPORTANT Please read through this manual. It contains valuable information about your air conditioner. This manual may help save time and money by explaining proper air conditioner maintenance and preventing improper use.
F Your Records or Write the model and serial numbers here: Model # Serial # 1. 2. Safety Precautions Operating Instructions 3. Care and Maintenance You can find them on a label on the side of each unit. Dealer's Name Date Purchased 4. Hardware Installation 5. Common Issues R ead This Manual Inside you will find many 6. Basic Characteristics helpful hints on how to and maintain your air conditioner properly.
Safety Precautions Precautions To prevent injury and property damage, follow these instructions. Incorrect indicated operation due to ignoring instructions by the following symbols. will cause WARNING This symbol shows the CAUTION This symbol indicates the harm or possibility damage, of death possibility of the seriousness of which is or injury serious or injury. damage to property. Never Do This Do This Always The items following are classified by these symbols.
WARNING WARNING Ventilate before operating air conditioner Do not disassemble when gas goes out. ? It may cause modify products or randomly. explosion, fire, and burn. ? It may cause failure and electric shock. CAUTION CAUTION Never touch the metal of the unit when parts removing Do not clean the air Ventilate well when used conditioner with water. together with a stove, etc. the filter. ? They are sharp injury.
Safety Prior to Precautions Preparing for Operation operation 1 Contact 2 Plug 3 Do not share the 4 Do not use an 5 Do not start/stop operation by plugging/unplugging 6 If an installation in the power cord/plug is specialist for installation. plug properly. same outlet with other appliances extension cord. damaged, replace only with an the power cord. authorized part.
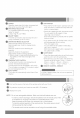
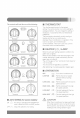
Operating Remote Control Instructions The remote control and control panel will look like 6 one of the Operations following pictures.
Remote Control 1 Operations 7 POWER Operation starts when this button is stops when you press the button 2 pressed again. AIR PURIFIER and ? button is For increased power while higher fan speed. 3 3 Low steps: High cooling, select a ? increments hourly (up to 12 stop Select saver ? room. mode for energy saving operation. Select fan mode for basic operation. Select dry mode for ventilating fan dry operation. 8 Select heFat mode for heating operation.
Operating Location and Function of Controls Instructions Controls The controls will look like of the one 5 following.
OPERATION HighCool( Low Cool ),MedCool( ( circulation and NOTE: If you )and ) provide cooling with different fan speeds. Med Fan ( ) or filtering without cooling. Off ( o ) turns the air conditioner off. move the switch from switching back to a cool a cool setting to off or to a fan Low Fan ( air ) provides wait at least 3 minutes before setting, setting.
Controls The controls will look like of the one THERMOSTAT following. Turn the thermostat control to the desired The control setting. is position a normal setting for average conditions. You can change this setting, if necessary, in accordance with your temperature preference. The thermostat heating, whenever the room FAN automatically controls cooling or runs continuously air conditioner is in operation.
Operating Adjusting Instructions the Air Flow Direction Vent Control For maximum CLOSE NOTE : CLOSE the vent. This will allow internal air circulation. cooling efficiency, OPEN the vent to discharge VENT stale air. Part A OPEN Before using the ventilation feature, position straight by pulling Part A out and snapping it into place. the vent lever Adjusting the Air Flow Direction Airflow can be adjusted by changing the cooling efficiency of the air conditioner.
Care and Care and Maintenance Maintenance Turn the power off and unplug the power plug before cleaning the air conditioner. Air Filter The air filter behind the inlet necessary) to maintain grille should be checked and cleaned optimal performance of the air conditioner. How to remove the air filter 1 2 The grille may be opened from the maintenance after installation.
Air The Air Purifying Purifying Filter (Optional) filter behind the air filter should be checked and cleaned once every 3 months or more often if necessary. 1 2 After removing the Air Purifying Filter, pull slightly forward to remove the Air Purifying Soak the Air mild Purifying Filter in water detergent for 20~30minutes. filter. mixed with 3 Dry the Air Purifying Filter in the shade for a day.(The moisture must be removed completely on this part.
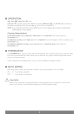
Hardware Hardware Installation Installation Product Features CAUTION This appliance should be installed in accordance guide to help to explain product features. with national wiring regulations. This guide acts as a 13 78 6 11 17 5 14 9 1 12 2 15 4 10 3 16 1. CABINET 9. CONTROL PANEL 2. FRONT GRILLE 10. POWER CORD 3. AIR FILTER 11. COMPRESSOR 4. AIR INTAKE 12. BASE PAN (INLET GRILLE) 5. AIR DISCHARGE 13. BRACE 6. VERTICAL AIR DEFLECTOR 14. CONDENSER 15.
Front Grille Attaching 1 Attach the front grille to the cabinet by inserting the grille into the tabs on the front of the cabinet. Push the grille in until it snaps into place. (See Fig.1) tabs 2 on the Lift the inlet through grille the front and secure How to Connect a a Fig. 3 Drain Hose Drain Hose a provided drain method at the rear of the air conditioner according to the Remove the hole rubber from the some a drain hose to the drain base-pan.
How to Install the Unit INSIDE OUTSIDE FENCE AWNING FOAM HEAT RADIATION 1/4 Bubble COOLED AIR 70~150cm Level 1 To avoid vibration and 2 Install the unit where the noise, make If the unit receives direct 3 There should be no sure the unit is installed sunlight does not shine directly on sunlight, build an awning to shade obstacle, like a fence, within 10~15mm Over 50cm securely and firmly. the unit. the cabinet. 50cm which might restrict heat radiation from the condenser.
Common Common Problems and Solutions Issues Before calling for service, The air conditioner is ? You hear please review the following list of common problems and solutions. operating normally pinging noise. This is caused humid conditions. This feature is ? ? ? when: by water being picked up by the condenser on rainy days or in highly to help remove moisture in the air and improve cooling efficiency. You hear the thermostat click. This is caused by the compressor cycle starting and stopping.
Basic Specification Characteristics MODEL and Serial Number LWC182PLAB0 LWC182PLMM0 LWH182PLAB0 LWH182PLMM0 LWC242PLAB0 LWC242PLMM0 18,000 18,000 18,000 18,000 24,000 24,000 220 220 220 220 220 220 60 60 60 60 60 60 8.8 8.8 9.0 9.0 11.5 11.
MEMO