@ LG Life's Good : iii NE Heller se read this guide thoroughly before operating keep it handy for reference at all Hines. Please i ang LWSZ0108T P/No.: MFLB1224507 www.lg.
INTRODUCTION A 7) IMPORTANT SAFETY INFORMATION Safety Precautions Electrical Safety... Safety During Use Child Safety. Safety When Cleaning. ® oro es TD PARTS AND FEATURES Parts And Features... 8 rr ns Control Panel Features ooo ID OPERATING INSTRUCTIONS @ 1 MAINTENANCE Cloak. Minimum & Maximum Default Settings. Timer ees Special | Features of your Oven Control. Bake ooo Baking ravel cakes Timed Cook Delayed Timed Cook Broil... Recommended Broil Roast... Convection Bake .. Crisp Convection .
IMPORTANT SAFETY INFORMATION Cm» READ ALL INSTRUCTIONS BEFORE USE This is the safety alert symbol. This symbol alerts vou to potential hazards that can Kill or hurt you and others. All safety messages will follow the safely alert symbol and ether the word WARNING or CAUTION.
IMPORTANT SAFETY INFORMATION Cm» READ ALL INSTRUCTIONS BEFORE USE @ SAFETY PRECAUTIONS ont) « Be certain all packing materials are removed from the appliance before operating. Keep plastics, clothes, and paper away from parts of the appliance that may become hot. « DO NOT force the door open. This can damage the automatic door locking system. Use care when opening the oven door after the self-cleaning cycle. Stand to the side of the oven when opening the door to allow hot air or steam to escape.
IMPORTANT SAFETY INFORMATION READ ALL INSTRUCTIONS BEFORE USE @i SAFETY DURING USE « Oven Racks. Always place oven racks in desired position while oven is cool. « Always use pot holders or oven mitts when removing food from the oven. You can be burned because cookware and plates will be hot. « Use caution with the TIMED BAKE or DELAYED TIMED BAKE features, Use the automatic timer when cooking cured or frozen meats and most fruits and vegetables.
IMPORTANT SAFETY INFORMATION Cm» READ ALL INSTRUCTIONS BEFORE USE @e SAFETY WHEN CLEANING « Do Not Clean Door Gasket. The door gasket is « Important Instruction. In the event the serif clean essential for a good seal. Care should be taken error code F is displayed, and error melody not to rub, damage, or move the gasket. sounds, the oven is malfunctioning in the self . Do Not Use Oven Cleaners. No commercial clean mode.
€00 PARTS AND FEATURES Control pane Model & serial number plate Spacer (2 egy One on each side i 307 (76.
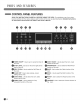
PARTS AND FEATURES @» CONTROL PANEL FEATURES READ THE INSTRUCTIONS CAREFULLY BEFORE USING THE OVEN. For satisfactory use of your oven, become familiar with the various features and functions of the oven as described below. Detailed instructions for each feature and function are listed in this Owner's Manual. rer ON/OFF : Use to set or cancel the timer of the oven, €3 OVEN LIGHT : Use to tum the Oven lights of the oven on and off. €) SELF CLEAN : Use to select the Leif Clean of the oven.
PARTS AND FEATURES €0 CONTROL PANEL FEATURES cont) COMMON FUNCTION & CLOCK : Use fo set the time of day. 8) SETTING : See page 12 and 18. oD COOK TIME : Use to set the length of the cook time. (Bake, Conn. Bake/Roast only) (0 START TIME : Use to set delay time. (Bake, Conn. Bake/Roast, Self clean only) 8) star T : Use to START all functions in the oven. To activate OVEN LOCK press and hold for 3 seconds. o NUMBER PADS : Use fo enter a temperature and all times.
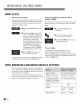
OPERATING INSTRUCTIONS TTETETETETETETETETETETETETETETEYS @b CLOCK How to set the Clock The clock must be set to the correct time of day for the autocratic oven timing functions to work properly. The time of day cannot be changed during a timed baking or Self Clean cycle. crock £8 Touch the CLOCK pad once to sel. £3 Touch the number pad to enter the time. Touch the number pad with the correct time of day. For example, to set 12:34, touch the number pad 1, 2, 3 and 4.
OPERATING INSTRUCTIONS TTETETETETETETETETETETETETEY @ TIMER ON/OFF iE The TIMER ON/OFF serves as an extra timer in the kitchen that will beep when the set time has run out. It does not start or stop cooking. The TIMER ON/OFF feature can be used during any of the other oven control functions. To set the Timer {example to set 5 minutes): 9 Touch TIMER ON/OFF twice. al 0:00 and HR inside will appear and TIMER will flash in the display. ne Hid 5 | Touch 5 in the number pad.
OPERATING INSTRUCTIONS (SET UP] OCTET @» SPECIAL FEATURES OF YOUR OVEN CONTROL Your new touch pad control has additional features that you may choose to use. The following pages @ 12 describe these features and how you may activate therm. The special feature modes can only be activated while the display is showing the time of day. They remain in the control's memory until the steps are repeated. When the display shows your choice, touch the TART pad.
OPERATING INSTRUCTIONS How to select language Your oven control is set to display in English but you may change this to display in Spanish or French. SETTING 9 Touch the SETTING pad 8 times, “Lng” will appear in the display. & Touch the #1 pad for English, or ouch the # 2 pad for Spanish, ar touching the # 3 pad for French. € Touch the START pad to accept i ane the change. hE How to adjust beeper volume The beeper volume feature allows you to adjust the volumes to a more acceptable volume.
OPERATING INSTRUCTIONS @0 BAKE The oven can be programmed to bake at any temperature from 170°F (80°C) to 580°F (288°C). Default @ 14 temperature is 350°F (177°C). To set the oven to BAKE and temperature to 375°F FEE 0 outtake Sot the oven temperature {Touch 8, 7 and 5). Sl] © Touch START. TS The word PREHEATING and 100°F will be displayed. As the oven preheats the temperature is displayed in 5 degree increments. Once the oven reaches the desired temperature, a tone will sound.
OPERATING INSTRUCTIONS TTETETETETETETETETETETETETETETEYS @® BAKING LAYER CAKES Baking results will be better if baking pans are cents rad in the oven as much as possible. If baking with more than one pan, place the pans so gate has at least 2” to of air space around it. If cooking on multiple racks place the oven racks in positions B and D (For 2 racks). Place the cookware as shown in Fig. 1, 2. Position 1)
OPERATING INSTRUCTIONS TTETETETETETETETETETETETETETETEYS @p TIMED CONK The vane will turn on immediately and cook for a selected length of ime. At the end of the cooking time, the aver will turn off automatically. To set the oven to begin cooking immediately and shut off automatically: {example to set bake at 300°F for 30 minutes.) €) Be sure the clock is set for the correct ime of day. € Touch BAKE, 350°F will appear in the display. € Sot the oven temperature {Touch 3, 0 and 0). € Touch COOK TIME.
OPERATING INSTRUCTIONS TTETETTTETETETETETETETETETEY @» DELAYED TIMED COOK The automatic timer of the Delayed Timed Cook will turn the oven ON and OFF at the time you select in advance iE To set the oven for a Delayed Start. {example to set BAKE at 300°F for 30 minutes and start operating the bake mode at 4:30pm} 0) Be sure that the clock is set with the correct time of day. € Arrange interior oven rack(s) and place the food in the oven. € Touch BAKE. 350°F will appear in the display.
OPERATING INSTRUCTIONS TTETETETETETETETETETETETETETETEYS @0 BROW Broiling uses an intense, radiant heat to cook food Both the inner and outer broil elements heat during full broiling, Only the inner broil element heats during center broiling. The element(s) cycle on and off in intervals to maintain the oven temperature. The meat probe cannot be used with this mode, IMPORTANT NOTE: Your oven is designed for CLOSED DOOR Broiling. To set the oven to Broil. € Place your food on the broiling pair grid.
OPERATING INSTRUCTIONS TTETETETETETETETETETETETETEY @0 RECOMMENDED BROILING GUIDE cont) Guiltily mdi oe Shelf Ibidem Sec] Pele Fores Ths Boats | Tos in Teen) OD Ground Beef! 1 1b. (4 patties) Dork 87 4-5 Space evenly. Up to 8 patties may be Well Done | 1/2 to 3/4” thick broiled at once. Beef Steaks Steaks less than 17 thick cook through Rare 17 thick D 8 2-3 before browning. Medium 10 1-12 Ibs. D 7 2-3 Pan frying is recommended. Remove fat.
OPERATING INSTRUCTIONS GD ROAST @ 20 The vane can be programmed to roast. To set the Roast feature (example for Meats to cook af 375°F): ROAST Touch ROAST. €8 Set the oven temperature {Touch 3, 7 and 8) € Touch START. Ci NOTE: After any cooking cycle has been completed cooling fans will operate to protect the control panel. This is normal. To change the Temperature while cooking (example changing from 375°F to 425°F): ROAST € Touch ROAST. ) Set the oven temperature {Touch 4, 2 and §) Touch START.
OPERATING INSTRUCTIONS TTETETETETETETETETETETETETEY @D CONVECTION BAKE Benefits of Convection Bake: § Some foods cook faster, saving ime and energy. @ Multiple rack baking. €) No special pans or bake ware needed. Convection baking uses a fan io circulate the ovens heat evenly and continuously within the oven. This improved heat distribution allows for even cooking and excellent results using multiple racks at the same time.
OPERATING INSTRUCTIONS TTETETETETETETETETETETETETETETEYS GED CRISP CONVECTION Benefits of Crisp Convection: This crisp convection feature is best for light colored and delicate baked goods like cakes, tarts, cookies, puff pastries, scones, muffins, biscuits, free from yeast breads ete. The fan circulated hot air continually distributes heat more evenly than the natural movement of air in a standard thermal oven.
OPERATING INSTRUCTIONS TTETETETETETETETETETETETETEY GED CONVECTION ROAST This Convection Roast feature is designed to give optimum cooking performance for roasting meats and poultry. Preheating is not necessary for meats and poultry. Heated air circulates around the food from all sides, sealing in juices and flavors. Foods are crispy brown on the outside while staying moist on the inside. Convection Roast is especially good for large tender cuts of meat. The meat probe may be used in this feature.
OPERATING INSTRUCTIONS @ WARM @ 24 The WARM function will maintain an oven temperature of less than 200°F. This function should not be used to reheat cold food. The Warm function will keep cooked food warm for serving up to 3 hours after cooking has finished After 3 hours the WARM function will shut the oven OFF automatically.
OPERATING INSTRUCTIONS TTETETETETETETETETETETETETEY GD PROOF The Proof feature maintains a warm environment for rising yeast leavened products before baking. To avoid lowering the oven temperature and lengthening proofing time, do not open the oven door unnecessarily. Check bread products sarky to avoid over-proofing.
OPERATING INSTRUCTIONS @> CONTROL LOCK FEATURE The START pad controls the Control Lockout feature. The Control Lockout feature automatically locks mast oven controls from being turned ON. It does not disable the clock, timer or the interior oven light. Activate the lock out feature: Deactivate normal oven operation: 9 Touch and hold START pad for 3 9 Touch and hold START pad for 3 seconds. seconds. Unlock melody will sound. CONTROL LOCKOUT will € Lock melody will sound, disappear.
OPERATING INSTRUCTIONS TTETETETETETETETETETETETETEY @D SELF-CLEAN The self-clean cycle uses above normal cooking temperatures to clean the oven’s interior automatically. It is normal for smoking to occur during cleaning if the vane is heavily soiled. It is better to clean the oven regularly rather than to wait until there is a heavy build-up of doll in the oven. During the cleaning process, the kitchen should be well ventilated to get rid of normal odors associated with cleaning.
OPERATING INSTRUCTIONS TTETETETETETETETETETETETETETETEYS €00 SELF-CLEAN (cont) The SELF CLEAN pad is used to start a Self Clean cycle. When used with START TIME pad, a delayed Self Clean cycle may also be programmed. The Self Clean function has cycle times hours. NOTE: Before running a self-clean cycle be sure to remove all racks and accessories.
MAINTENANCE €00 SELF-CLEAN (cont) if it becomes necessary to stop or interrupt a self cleaning cycle due to excessive smoke or fire in the oven: ni € Touch CLEAR OFF. After the oven has cooled down, the DOOR LOCK will automatically release allowing you to open the oven door. NOTE: When using the self-clan feature: « A self-clean cycle cannot be started if Control Lock feature is active. « Once the SELF CLEAN is set, the oven door will lack automatically.
MAINTENANCE @» CARE & CLEANING Changing the Oven Light The oven light is a standard 10-watt halogen bulb for ovens. To replace lamps located on the side wall: « Make sure oven and bulb are cool. 1. Unplug oven or disconnect power. 2. Remove oven racks. 3 . Slide a flat blade screwdriver between the housing and the glass light cover. 4. Support the glass light cover with two fingers to prevent the cover from falling to the bottom of the oven. 5.
MAINTENANCE @0 CARE & CLEANING cont) Broiler Pan and Grid Do not clean the broiler pan or grid in a self cleaning mode. After broiling, remove the broiler pan from the oven. Overmaster the grid from the pan. Carefully pour out the grease from the pan into a proper container. Wash and rinse the broiler pan and grid in hot water with a soap-filled or plastic scouring pad. If food has burned on, sprinkle the grid with cleaner while hot and cover with wet paper towels or a dishcloth.
MAINTENANCE @» REMOVING & REPLACING THE LIFT-OFF OVEN DOOR 4, CAUTION « BO NOT use harsh abrasive cleaners or sharp metal scrapers to clean the oven door glass since they can scratch the surface. may result in shattering of the glass. To remove the door: Step. 1 Open the door fully. Step. 2 Pull the hinge locks down toward the door frame to the unlocked position. Step. 3 Firmly grasp both sides of the door at the top. about 20° Step.
MAINTENANCE TTETETETETETETETETETETETETEY @m» BEFORE CALLING FOR SERVICE Before you call for service, review this list. It may save you time and expense. The list includes common occurrences that are not the result of defective workmanship or materials in this appliance. Problem Possible Causes / Solutions Oven control beeps and displays any F code error + Electronic control has detected a fault “Code | CAUSE condition. Press CLEAR OFF to clear the F-3 | Key held down too long or display and stop beeping.
TROUBLESHOOTING TTETETETETETETETETETETETETETETEYS @D BEFORE CALLING FOR SERVICE (cont) Problem Possible Causes / Solutions Food does not bake or roast properly + Oven controls improperly set. See the using the oven section. + Rack position is incorrect or the rack is not level. See the using the oven section. » incorrect cookware or cookware of improper size being used See the using the oven section. + Oven sensor needs to be adjusted See the adjusting your oven temperature in option section.
TROUBLESHOOTING TTETETETETETETETETETETETETEY @0 BEFORE CALLING FOR SERVICE cont) Problem Possible Causes / Solutions Oven not clean after a self clean cycle = Oven controls not properly set See the self-clean section, page 27-29. = Oven was heavily soiled Clean up heavy spillovers before starting the clean cycle. Heavily soiled ovens may need to serif-clean again or for a longer period of time.
LG ELECTRIC OVEN LIMITED WARRANTY ~ LSA LG Electronics Inc. will repair or replace your product, at LG's option, if it proves to be defective in material or workmanship under normal use, during the warranty period set forth below, effective from the date of original consumer purchase of the product. This Invited warranty is good only to the original purchaser of the product and effective only when used in U.S.A.