ENGLISH OWNER’S MANUAL ELECTRIC CONVECTION BUILT-IN OVEN Please read this guide thoroughly before operating and keep it handy for reference at all times. LWS3063ST LWS3063BD www.lg.
TABLE OF CONTENTS TABLE OF CONTENTS 3 8 IMPORTANT SAFETY INFORMATION PRODUCT OVERVIEW 8 Accessories 9 Oven Overview 10 Control Panel Overview 12 FEATURES 12 Clock 13 Timer On/Off 14 Special Oven Control Settings 16 14 Setting Convection Auto Conversion 14 Adjusting the Oven Temperature 15 Selecting the Display Language 15 Adjusting the Preheat Alarm 15 Adjusting the Beeper Volume 15 Selecting Fahrenheit or Celsius USING THE OVEN 16 Bake 17 Multi-Rack Baking 18 T
IMPORTANT SAFETY INFORMATION 3 Read and follow all instructions before using your oven to prevent the risk of fire, electric shock, personal injury, or damage when using the oven. This guide does not cover all possible conditions that may occur. Always contact your service agent or manufacturer about problems that you do not understand. Download this owner’s manual at http://www.lg.com. This is the safety alert symbol. This symbol alerts you to potential hazards that can kill or hurt you and others.
IMPORTANT SAFETY INFORMATION SAFETY PRECAUTIONS (CONT.) ••Keep Oven Vent Ducts Unobstructed. The oven vent could become hot during oven use. Never block this vent and never place plastic or heat-sensitive items on or near the vent. Metal bottom trim (Vent) NOTE: For proper operation vent trim must be installed. WARNING ••NEVER use your appliance for warming or heating the room. ••DO NOT use water on grease fires. Should an oven fire occur, leave the oven door closed and turn the oven off.
IMPORTANT SAFETY INFORMATION 5 •• Protective Liners. Do not use aluminum foil or any other material to line the oven bottom. Improper installation of these liners may result in a risk of electric shock or fire. ••Do Not allow aluminum foil or the meat probe to contact heating elements. WARNING No aluminum foil ••DO NOT place aluminum foil directly on the oven bottom. ••DO NOT line the oven walls, racks, bottom, or any other part of the oven with aluminum foil or any other material.
IMPORTANT SAFETY INFORMATION CHILD SAFETY WARNING ••Children should be kept away from the oven. ••Accessory parts will become hot when the broiler is in use. CAUTION ••Children should not be left alone or unattended in the area where the appliance is in use. Children should never be allowed to sit or stand on any part of the appliance. • • DO NOT leave small children unattended near the appliance. During the selfcleaning cycle, the outside of the oven can become very hot to the touch.
IMPORTANT SAFETY INFORMATION WARNING This product contains chemicals known to the State of California to cause cancer and birth defects or other reproductive harm. Wash hands after handling.
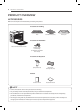
PRODUCT OVERVIEW PRODUCT OVERVIEW ACCESSORIES Make sure that all parts are included after purchasing this product. Accessories for Cooking Grid Standard racks (2 ea) Broiler pan Accessories for Installation electric convection built-in oven 6 Wood Screws For Mounting (4 needed for installation and 2 extras) Accessories for EasyClean® Spray bottle (1ea) Non scratch Scouring Pad (1ea) Manuals Owner’s manual Installation manual NOTE •• Contact LG Customer Service if any accessories are missing.
PRODUCT OVERVIEW ENGLISH OVEN OVERVIEW Make sure to understand the name and function of each part. * Throughout this manual, the features and appearance may vary depending on your model.
PRODUCT OVERVIEW CONTROL PANEL OVERVIEW READ THE INSTRUCTIONS CAREFULLY BEFORE USING THE OVEN. For satisfactory use of the oven, become familiar with the various features and functions of the oven as described below. Detailed instructions for each feature and function are listed in this owner's manual. 5 6 7 8 9 10 11 12 13 14 15 1 2 3 4 Name 16 17 20 18 19 21 Description 1 OVEN LIGHT Use to turn the Oven lights of the oven on and off. 2 SETTING See page 14 and 15.
PRODUCT OVERVIEW Description 18 START TIME Use to set delay time. (Bake, Conv. Bake/Roast, Self clean only) 19 CLEAR OFF Use to stop cooking, cancel settings of the oven. 20 SMART FEATURES The Tag On icon, for use with Smart Features. 21 SMART DIAGNOSIS™ Use with the Smart Diagnosis feature. NOTE If F– and a number appear in the display and the oven control signals, this indicates a function error code. See page 37. •• Touch the CLEAR OFF pad. Allow the oven to cool for one hour.
FEATURES FEATURES CLOCK The clock must be set to the correct time of day for the automatic oven timing functions to work properly. The time of day cannot be changed during a timed baking or Self Clean cycle. Setting the Clock Power Outage If the colon in the time is flashing in the display, you have experienced a power failure. Resetting the Clock 1. Press CLOCK. 2. Press the numbers to enter the correct time of day. 3. Press START. 1. Press CLOCK once. Minimum & Maximum Default Settings 2.
FEATURES 13 The TIMER ON/OFF serves as an extra timer in the kitchen that will beep when the set time has run out. It does not start or stop cooking. The TIMER ON/OFF feature can be used during any of the other oven control functions. Setting the Timer (example to set 5 minutes): 1. Press TIMER ON/OFF once. 0:00 with HR inside appears and TIMER flashes in the display. 4. When the set time has run out, End shows in the display. The indicator tones sound every 6 seconds until TIMER ON/OFF is pressed.
FEATURES SPECIAL OVEN CONTROL SETTINGS Adjusting the Oven Temperature The oven has additional settings which can be accessed and adjusted using the Setting button. These additional settings can only be activated while the display is showing the time of day. They remain in the control’s memory until changed. The settings also remain in memory after a power failure.
FEATURES 15 Selecting Fahrenheit or Celsius The oven control is set to display in English but can be changed to display in Spanish or French. The oven is set to display the Fahrenheit temperature scale. Follow these instructions to set the display to the Celsius scale. 1. Press SETTING four times or until Lng appears in the display. 1. Press SETTING seven times or until UNIT appears in the display. 2. Press 1 for English, 2 for Spanish, or 3 for French. 3. Press START to accept the change. 2.
USING THE OVEN USING THE OVEN BAKE The oven can be programmed to bake at any temperature from 170°F (80°C) to 550°F (288°C). Default temperature is 350°F (177°C). Setting the Oven to Bake at 375°F 1. Press BAKE. 2. Set the oven temperature. (Press 3, 7, and 5.) 3. Press START. The word PREHEATING and 100°F appear in the display. As the oven preheats the temperature is displayed in 5 degree increments. Once the oven reaches the desired temperature, a tone sounds.
USING THE OVEN 17 NOTE •• Preheating is necessary for good results when baking cakes, cookies, pastries and breads. After the oven has reached the desired temperature, the preheat melody sounds once. •• The heating elements turn off immediately when the door is opened. They will turn on again approximately 5 seconds after the door is closed. If the oven door is left open for more than 30 minutes, all settings are canceled. •• Press CLEAR OFF to cancel BAKE at any time. •• The oven has 5 rack positions.
USING THE OVEN TIMED COOK The oven turns on immediately and cooks for a selected length of time. At the end of the cooking time, the oven turns off automatically. Setting Immediate Cook and Automatic Shutoff (example to set bake at 300°F for 30 minutes.) 1. Set the clock for the correct time of day. 2. Press BAKE, 350°F appears in the display. 3. Set the oven temperature. (Press 3, 0, and 0.) 4. Press COOK TIME. TIMED flashes. BAKE, 0:00 and 300°F appear in the display. 5.
USING THE OVEN 19 The automatic timer of the Delayed Timed Cook function turns the oven ON and OFF at the time selected. Setting the Oven for Delayed Start (for example, to Bake at 300°F for 30 minutes starting at 4:30 p.m.) 1. Set the clock for the correct time of day. 2. Arrange interior oven rack(s) and place the food in the oven. 3. Press BAKE. 350°F appears in the display. 4. Set the oven temperature. (Press 3, 0, and 0.) 5. Press COOK TIME. 6. Set the desired baking time. (Press 3 and 0.
USING THE OVEN BROIL RECOMMENDED BROILING GUIDE Broiling uses an intense, radiant heat to cook food. Both the inner and outer broil elements heat during full broiling. Only the inner broil element heats during center broiling. The element(s) cycle on and off at intervals to maintain the oven temperature. The meat probe cannot be used with this mode. The size, weight, thickness, starting temperature, and your preference of doneness will affect broiling times.
USING THE OVEN 21 Shelf Position First Side Time (min.) Second Side Time (min.) 1 lb. (4 patties) 1/2 to 3/4” thick E 4–6 3–4 1” thick 1 to 1-1/2 lbs. D D D 6 7 8 2–3 2–3 3–4 Rare Medium Well Done 1-1/2” thick 2 to 2-1/2 lbs. D D D 10 12 14 4–6 6–8 8–10 Chicken 1 whole cut up 2 to 2-1/2 lbs., split lengthwise 2 Breasts C 20 6–8 C 20 6–10 Lobster Tails 2–4 10 to 12 oz. each C 12-14 Do not turn over.
USING THE OVEN ROAST CONVECTION BAKE Use the Roast feature to cook large cuts of meat. Benefits of Convection Bake Setting the Oven to Roast (for example, to cook meat at 375°F) 1. Press ROAST. •• Some foods cook up to 25 to 30% faster, saving time and energy. •• Multiple rack baking. •• No special pans or bakeware needed. 2. Set the oven temperature. (Press 3, 7 and 5.) 3. Press START. NOTE After any cooking cycle has been completed cooling fans operate to protect the control panel.
USING THE OVEN 23 1. Press CONV. BAKE. The display flashes 350 °F. 2. Set the oven temperature. (Press 3, 7 and 5.) 3. Press START. The display shows CONV BAKE and the converted temperature starting at 100°F. As the oven preheats, the display shows increasing temperatures in 5 degree increments. Once the oven reaches the desired adjusted temperature, a tone sounds.The display shows the auto converted oven temperature 350 °F, CONV BAKE and the fan icon. 4.
USING THE OVEN Setting the Oven to Crisp Convection Setting the Oven to Convection Roast 1. Press CRISP CONV. The display flashes 350 °F. 1. Arrange oven racks and place food in oven. 2. Set the oven temperature. (Press 3, 7 and 5.) 2. Press CONV. ROAST. The display flashes 350 °F. 3. Press START. The display shows CONV and the converted temperature starting at 100°F. As the oven preheats, the display shows increasing temperatures in 5 degree increments.
USING THE OVEN 25 PROOF The WARM function maintains an oven temperature of less than 200°F. This function should not be used to reheat cold food. The Warm function keeps cooked food warm for serving up to 3 hours after cooking has finished. After 3 hours the WARM function shuts the oven OFF automatically. The Warm feature can be used alone or after the Timed Cook or Delayed Timed Cook modes. The Proof feature maintains a warm environment for rising yeast leavened products before baking.
USING THE OVEN TURNING ON/OFF THE OVEN LIGHT The oven light automatically turns ON when the door is opened. The oven light may also be manually turned ON or OFF by pressing LIGHT. NOTE The oven light cannot be turned on if the self clean feature is active. CONTROL LOCK FEATURE The Control Lock feature automatically locks most oven controls and prevents them from being turned ON. The feature is applied to the upper and lower ovens simultaneously.
SMART FEATURES 27 ENGLISH SMART FEATURES BEFORE USING TAG ON The Tag On function allows you to conveniently use the LG Smart Oven application to communicate with your appliance right from your own smart phone. To use the Tag On function: 1. Download the LG Smart Oven application to your smart phone. 2. Turn on the NFC (Near Field Communication) function in your smart phone.
SMART FEATURES If the app is not able to show a target range, try positioning the center back of the smart phone over the Tag On icon on the appliance. If the connection is not made immediately, move the smart phone very slightly in a widening circular motion until the application verifies the connection. THE NFC ANTENNA POSITION Because of the characteristics of NFC, if the transmission distance is too far, or if there is a metal sticker or a thick case on the phone, transmission will not be good.
MAINTENANCE 29 SELF-CLEAN The self-clean cycle uses above normal cooking temperatures to clean the oven’s interior automatically. It is normal for smoking to occur during cleaning if the oven is heavily soiled. It is better to clean the oven regularly rather than to wait until there is a heavy buildup of soil in the oven. Before a Self-Clean Cycle Open a window or use a fan or ventilation hood to keep the kitchen ventilated during the first self-clean cycle.
MAINTENANCE Press SELF CLEAN to start a self-clean cycle. Use with the START TIME button to program a delayed self-clean cycle. The Self- Clean function has cycle times of 3, 4, or 5 hours. NOTE Before running a self-clean cycle be sure to remove all racks and accessories. 1. Set the clock to the correct time of day, remove everything from both ovens, and close the oven door. 2. Press SELF CLEAN once for a 4-hour clean time, twice for a 5-hour clean time, or 3 times for 3-hour clean time.
MAINTENANCE 31 1. Press CLEAR OFF. 2. The door lock automatically releases once the oven has cooled down. NOTE When using the self-clean feature: •• A self-clean cycle cannot be started if Control Lock feature is active. •• Once the SELF CLEAN is set, the oven door will lock automatically. You will not be able to open the oven door until the oven has cooled. The lock releases automatically. •• Once the door has been locked the DOOR LOCKED indicator light will stop flashing and remain on.
MAINTENANCE EasyClean® LG’s new oven with EasyClean® enamel technology provides two cleaning options for the oven interior. The EasyClean® feature takes advantage of LG’s new enamel to help lift soils without harsh chemicals, and it runs using ONLY WATER for just 10 minutes in low temperatures to help loosen LIGHT soils before hand-cleaning. While EasyClean® is quick and effective for small and LIGHT soils, the Self Clean feature can be used to remove HEAVY built up soils.
MAINTENANCE 33 1. Remove oven racks and accessories from the oven. 2. Scrape off and remove any burnt-on debris with a plastic scraper. Suggested plastic scrapers: •• Hard plastic spatula •• Plastic pan scraper •• Plastic paint scraper •• Old credit card 3. Fill a spray bottle with 1¼ cups (10 oz or 300 ml) of water and use the spray bottle to thoroughly spray the inside surfaces of the oven. 7. A tone will sound at the end of the 10-minute cycle. Press CLEAR/OFF to clear the display and end the tone.
MAINTENANCE CHANGING THE OVEN LIGHT The oven light is a standard 10-watt halogen bulb for ovens. Replacing Lamp on Side Wall • Make sure oven and bulb are cool. 8. Plug in oven or reconnect power. Glass Light Cover Clip Flat Blade Screwdriver 1. Unplug oven or disconnect power. 2. Remove oven racks. 3. Slide a flat blade screwdriver between the housing and the glass light cover. Flat Blade screwdriver 4.
MAINTENANCE 35 4. Repeat as necessary. NOTE If a mineral oil-based stainless steel appliance cleaner has been used before to clean the appliance, wash the surface with a mild soap and water prior to using the Stainless Steel Appliance Cleaner or polish. Oven Cavity DO NOT use oven cleaners. NEVER wipe a warm or hot porcelain surface with a damp sponge; it may cause chipping or crazing (tiny hairlike cracks). Food spills should be cleaned when the oven cools.
MAINTENANCE REMOVING AND REPLACING THE LIFT-OFF OVEN DOOR CAUTION •• Be careful when removing and lifting the door. •• DO NOT lift the door by the handle. −− The door is very heavy. Replacing the Door 1. Firmly grasp both sides of the door at the top. 2. With the door at the same angle as the removal position, seat the indentation of the hinge arm into the bottom edge of the hinge slot. The notch in the hinge arm must be fully seated into the bottom of the slot. Removing the Door 1.
TROUBLESHOOTING 37 ENGLISH TROUBLESHOOTING FAQs My new oven doesn’t cook like my old one. Is there something wrong with the temperature settings? No, Your oven has been factory tested and calibrated. For the first few uses, follow your recipe times and temperatures carefully. If you still think your new oven is too hot or too cold, you can adjust the oven temperature yourself to meet your specific cooking needs.
TROUBLESHOOTING Soils on my oven walls are not coming off. How can I get my walls clean? Soils on the side and rear walls of your oven may be more difficult to fully soak with water. Try repeating the EasyClean® process with more than the ¼ cup (2 oz or 50 ml) spray recommended. Will EasyClean® get all of the soils and stains out completely? It depends on the soil type. Sugar-based and certain grease stains are especially hard to clean.
TROUBLESHOOTING 39 Before you call for service, review this list. It may save you time and expense. The list includes common occurrences that are not the result of defective workmanship or materials in this appliance. Problem Oven control beeps and displays any F code error. Oven will not work Possible Causes / Solutions •• Electronic control has detected a fault condition. Press CLEAR OFF to clear the display and stop beeping. Reprogram oven. If fault reoccurs, record fault number.
TROUBLESHOOTING Problem Food does not broil properly Possible Causes / Solutions •• Oven controls improperly set. −− Make sure you press the BROIL pad. •• Improper rack position being used. −− See the Broiling Guide, page 20. •• Cookware not suited for broiling. −− Use the broiling pan and grid that came with your oven. •• Aluminum foil used on the broiling pan and grid has not been fitted properly and slit as recommended. −− See the Using the Oven section.
SMART DIAGNOSIS™ 41 ENGLISH SMART DIAGNOSIS™ Should you experience any problems with your oven, it has the capability of transmitting data to your smart phone using the LG Smart Oven Application or via your telephone to the LG call center. Smart Diagnosis™ cannot be activated unless your oven is turned on by pressing the Power button. If your oven is unable to turn on, then troubleshooting must be done without using Smart Diagnosis™.
WARRANTY WARRANTY (USA) LG Electronics Inc. will repair or replace your product, at LG’s option, if it proves to be defective in material or workmanship under normal use, during the warranty period set forth below, effective from the date of original consumer purchase of the product. This limited warranty is good only to the original purchaser of the product and effective only when used in U.S.A.
LG Customer Information Center 1-800-243-0000 USA, Consumer User 1-888-542-2623 CANADA Register your product Online! www.lg.