To contact LG Electronics 24 hours a day, 7 days a week: 1-800-243-0000 (U.S.A.) 1-888-542-2623 (Canada) Or visit us on the Web at: us.lge.com (U.S.A) or ca.lge.com (Canada) m Para comunicarse con LG Electronics 24 horas al dfa, 7 dfas a la semana: 1-800-243-0000 (EE.UU.) 1-888=542=2623 (Canada) O visRenos en ia Web en: ELECTRIC CONVECiION BUI[FINOVEN us.lge.com (EE.UU.) o ca.lge.
INTRODUCTION IMPORTANT SAFETY INFORMATION Safety Precautions ....................................................... 3-4 Electrical Safety .............................................................. 4 Safety During Use ........................................................... 5 Child Safety .................................................................... 5 Safety When Cleaning .................................................... 6 PARTS AND FEATURES Parts And Features ..........................
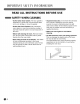
IMPORTANTSAFETY INFORMA|ION READ ALL INSTRUCTIONS I BEFORE USE This symbol will alert you to hazards or unsafe practices which could cause serious bodily harm or death. ",., CAUTION This symbol will alert you to hazards or unsafe practices which could cause bodily injury or property damage. SAFETY PRECAUTIONS • Be certain your appliance is properly grounded by a qualified technician. installed and ,, Do not repair or replace any part of the appliance unless specifically recommended in the manual.
iMPORTANTSAFETYiNFORMATiON READ ALL INSTRUCTIONS BEFORE USE SAFETYPRECAUTIONS(cont.) Be certain all packing materials are removed from the appliance before operating. • DO NOT use a steel-wool pad. It will SCRATCH the surface. Keep plastics, clothes, and paper away from parts of the appliance that may become hot. . DO NOT force the door open. This can damage the automatic door locking system. Use care when opening the oven door after the self-cleaning cycle.
IMPORTANTSAFETY INFORMA|ION READ ALL INSTRUCTIONS BEFORE uSE SAFETY DURING USE oven Racks. Always place oven racks in desired position while oven is cool. Always use pot holders or oven mitt when removing food from the oven. You can be burned because cookware and plates will be hot. Use caution with the TIMED BAKE or DELAYED TIMED BAKE features. Use the automatic timer when cooking cured or frozen meats and most fruits and vegetables.
iMPORTANTSAFETYINFOP MATION READ ALL INSTRUCTIONS BEFORE uSE SAFETY WHEN CLEANING DO Not clean Door Gasket. The door gasket is essential for a good seal. Care should be taken not to rub, damage, or move the gasket. Do Not Use Oven Cleaners. No commercial oven cleaner or oven liner protective coating of any kind should be used in or around any part of the oven. Before self cleaning the oven. Remove broiler pan, all oven racks, meat probe and any other utensils from the oven cavity.
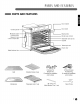
PARTSAND FEATURES PARTSAND FEATURES Door switch Door latch Control panel Model & serial number plate Meat probe Broiler pan & Grid Spacer (2 ea) - One on each side Standard racks (2 ea) Gasket Telescopic rack Oven door Metal bottom trim Grid Standard racks (2 ea) 6 Screws For Bottom Trim (3 needed for installation and 3 extras) Broiler pan Telescopic rack (1 ea) 30" (76.
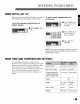
PARTSAND FEATURES CONTROLPANELFEATURES READ THE iNSTRUCTiONS CAREFULLY BEFORE USING THE OVEN. For satisfactory use of your oven, become familiar with the various features and functions of the oven as described below. D OVEN LIGHT: Use to turnthe oven lights on and off. D Bake: Use to select the normal bake mode. D START: Use to start all oven features. Activate the CONTROL LOCK for 4 seconds holding. B TIMER ON/OFF: Use to set or cancel the timer. Q Broil: Use to set the variable broil mode.
OPERATING INSTRUCTIONS INITIAL SET UP When theoven isfirst powered ON, theoven needs to be programmed forthelanguageand timeofday. To set the clock (example below for for 3:30 pm): Set u p To set the language (example below for English display) Set up 0 Touch English. Then OK. Touch 12HR to use a 12-hour clock. Then touch OK. ') Select am/pro. Touch 3 3 0 to set the time of day to 3:30. Then touch OK. X>Selectlanguage. Set u p O Touch prn. Then touch OK. # Sel_t an_pm.
OPERAIINc INSIRUclIONS/S[! UP) The following options can be found by touching SET UP on the main menu. LANGUAGESELECTION (ENGLISH, ESPANOL OR FRANCAIS) English, French or Spanish can be set as the display language. To set language selection 0 1_ Touch Set Up. O Touch 1 for language selection. ___ O Touch English, Espafiol (Spanish) or Franqais (French). __ O Touch OK to accept the change or touch Back to return to the Set Up menu.
OPEtAjinc inSjtucjiOnS ISE! UP1 SOUND VOLUME (MUTE, NORMAL OR LOUD) The sound volume feature allows you to adjust the volumes to a more acceptable volume. There are three possible volume levels. To set sound volume 0 Touch Mute or Normal or Loud. e Touch Set Up. O Touch 4 for changing sound volume. O Touch OK to accept the change or touch Back to return to the Set Up menu. CONVECTION AUTO CONVERSION (ENABLE ORDISABLE) This feature allows you to Enable or Disable the Auto Conversion option.
UP) OP[RA|ING INS|RUC|IONS (S[| TEMPERATURE ADJUSTMENT The oven cavity temperature can be adjusted if it is running too hot or too cool. Touch Set Up. If needed, the temperature can be adjusted +/- 35 degrees. Touch 6 for temperature adjustment. To increase the temperature, touch + until the display shows the desired change. To decrease the temperature, touch - until the display shows the desired change.
OPERATING INSTRUCTIONS TIMER ON/OFF The TIMER ON/OFF serves as an extra timer in the kitchen that will beep when the set time has run out. It does not start or stop cooking. The TIMER ON/OFF feature can be used during any of the other oven control functions. To set the timer (example for 5 minutes): O Touch TIMER ON/OFF. NOTE: 1. If you touch TIMER ON/OFF once, it allows you to set the time in seconds. O Touch the number pad to set the desired time in the display (touch 5 0 0).
OPERATINGINSTRUCTIONS TELESCOPICRACK The sliding shelf telescopic rack can be used in any rack position. Open Position Installing the Telescoping Rack Step. 1 Start with the rack in the "Closed" position. Place one hand in the front near the center, and place your other hand near the right rear corner. B Step. 2 Carefully insert rack between the rack guides, to the back of the oven until the shelf slides into place. A guides A. Telescopic rack B. Frame Closed and Engaged Step.
OPERATING INSTRUCTIONS BAKE The oven can be programmed to bake at any temperature from 170°F (77°C) to 550°F (288°C). Default temperature is 350°F (177°C). To change the Bake Temperature while cooking (example changing from 375°F to 425°F): _ Touch Options. To set the Bake Temperature to 375°F _ Touch Temp. O Touch CLEAR/OFF. The display will show the main menu. Touch 4, 2, and 5. Touch Bake. 350°F will appear in the display.
OPERATINGiNSTRUCTIONS TIMED BAKE The oven will turn on immediately and bake for a selected length of time. At the end of the cooking time, the oven will turn off automatically. To set the oven to begin cooking immediately and shut off automatically: (example below to bake at 375°F for 30 minutes): O Touch CLEAR/OFF. The display will show the main menu. O Touch Bake. 350°F will appear in the display.
OPERATING INSTRUCTIONS DELAYED TIMED BAKE The automatic timer of the Delayed Timed Bake will turn the oven ON and OFF at the time you select in advance. To set the oven for a Delayed (example for baking and starting at 375°F Start. for 30 minutes at 4:30 pm): O Be sure that the clock is set with the correct time of day. The heating elements turn off immediately when the door is opened. They will turn on again in approximately 5 seconds after the door is closed.
OPERATINGiNSTRUCTIONS BROIL Broiling uses an intense, radiant heat to cook food. Both the inner and outer broil elements heat during full broiling. Only the inner broil element heats during center broiling. The element(s) cycle on and off in intervals to maintain the oven temperature. The meat probe cannot be used with this mode. IMPORTANT NOTE: IMPORTANT NOTE: Your oven is designed for CLOSED DOOR Broiling.
OPERATING INSTRUCTIONS RECOMMENDED BROILING GUIDE ccont. Ground Beef Well Done 1 lb. (4 patties) 1/2 to 3/4" thick Beef Steaks Rare Medium Well Done 1"thick 1 to 1-1/2 Ibs. 5-7 4-5 D D D 6 7 8 2-3 2-3 3-4 1-1/2" thick 2 to 2-1/2 Ibs. D D D 10 12 14 4-6 6-8 8-10 1 whole cut up 2 to 2-1/2 Ibs., split lengthwise 2 Breasts C 2O 6-8 C 20 6-10 Lobster Tails 2-4 10 to 12 oz. each C 12-14 Do not turn over. Fish Fillets 1/4 to 1/2" thick D or E 5-6 3-4 Handle and turn very carefully.
OPERATINGiNSTRUCTIONS ROAST The oven can be programmed to roast. The meat probe may be used in this feature. To set the Roast feature (example to cook at 375°F): To change the Temperature while cooking (example changing from 375°F to 425°F): for Meats I0) Touch Options. Touch Temp. I0) Touch CLEAR/OFF. O Touch 4, 2, and 5. O Touch Roast. O Touch OK to accept the change or touch Clear to reset the temperature you input. _) Touch 3, 7, and 5. O Touch START.
OPERATING INSTRUCTIONS CONVECTION BAKE Benefits of Convection Bake: To set the oven for Convection O Some foods cook up to 25 to 30% faster, saving time and energy. O Multiple rack baking. Bake 375°F: Touch CLEAR/OFF. Conv. Touch Cony. Bake. _) No special pans or bakeware needed. O Touch 3, 7, and 5. O Touch START. The display will show 350°F. The preheat (If Convection Auto Conversion is Enabled) melody will sound when the oven temperature reaches adjusted temperature.
OPERATINGiNSTRUCTIONS CRISPCONVECTION Benefits of Crisp Convection: This crisp convection feature is best for light colored and delicate baked goods like cakes, tarts, cookies, puff pastries, scones, muffins, biscuits, free from yeast breads etc. The fan circulated hot air continually distributes heat more evenly than the natural movement of air in a standard thermal oven. This To set the oven for Crisp Convection 375°F: O Touch CLEAR/OFF.
OPERATING INSTRUCTIONS CONVECTIONROAST This Convection Roast feature is designed to give optimum cooking performance for roasting meats and poultry. Preheating is not necessary for meats and poultry. Heated air circulates around the food from all sides, sealing in juices and flavors. Foods are crispy brown on the outside while staying moist on the inside. Convection Roast is especially good for large tender cuts of meat. The meat probe may be used in this feature.
OPERATINGINSTRUCTIONS RECIPE BANK The Recipe bank features 100 recipes, with 10 categories, for the at home chef. Preset cooking cycles are available on many of these recipes. To set the Recipe Bank feature only (example Guacamole): Touch Recipe Bank. To set the Recipe Bank feature for an automatic cooking (example Black Bean and A vocado Crostini): Redpe Bank .......... @ Touch 1 Appetizer. O Touch Recipe Bank. Cony. Bake N Touch Select next to 1 Guacamole. 11_5am Touch 1 Appetizer.
OPERATING INSTRUCTIONS PROOF The proof feature maintains a warm environment useful for rising yeast-leavened products. The proof feature automatically provides the optimum temperature for the proof process, and therefore does not have a temperature adjustment. Touch START without touching the numeric keys if you don't want to set a specific proofing time. How to Set the Oven For Proofing (example for I hour): O Touch CLEAR/OFF. Touch Proof/Warm. Warm i Touch Proof.
OPERATINGiNSTRUCTIONS HEALTHIER ROAST OA This Healthier Roast feature is designed to give cooking results of low fat, low calorie for roasting meats and poultry. Healthier Roasting can reduce the fat up to 20% compared to regular roasting. Fat reduction rate may vary according to the kinds or cuts of meat. This test results based on roast beef by a certified organization. Preheating is not necessary for meats and poultry.
OPERATING INSTRUCTIONS MY MENU My Menu feature is used to record and recall your favorite recipe settings. This feature may store and recall up to 10 different settings. The My Menu setting may be used with Timed Bake feature. This feature will not work with any other function including Delay Timed Cook feature. m To set the My Menu feature during setting: O Touch Bake. Touch Options. Touch Add to my menu. To set the My Menu feature (example recording for Crisp Conv.
OPERATINGiNSTRUCTIONS COOK& WARM The Cook & Warm feature can only be used with Timed Cook or Delayed Timed Cook feature. This feature is not designed to reheat cold foods. This feature will maintain an oven temperature of 170°F. This feature will keep cooked foods warm for serving up to 3 hours. After 3 hours, the Cook & Warm feature will shut the oven off automatically. O To turn Cook & Warm OFF, touch Options then touch Cook & Warm.
OPERATING INSTRUCTIONS MEAT PROBE (cont.) To change the Meat Probe temperature during cooking: RECOMMENDATION TEMPERATURE CHART FOR PROBE O Touch Options. O Touch Probe Temp. O Set the probe temperature Touch START. IMPORTANT NOTE: Beef, Lamb and Veal Rare Medium Rare Medium Well Done Pork Well Done 140°F 145°F 160°F 170°F (60°C) (63°C) (71°C) (77°C) 170°F ___ Poultry Breast, Well Done Thigh, Well Done 170°F (77°C) 180°F (82°C) Touch CLEAR/OFF to cancel Meat Probe at any time.
OPERATINGiNSTRUCTIONS SELF-CLEAN The self-clean cycle uses above normal cooking temperatures to clean the oven's interior automatically. It is normal for smoking to occur during cleaning if the oven is heavily soiled. It is better to clean the oven regularly rather than to wait until there is a heavy build-up of soil in the oven. During the cleaning process, the kitchen should be well ventilated to get rid of normal odors associated with cleaning.
OPERATING INSTRUCTIONS SELF'CLEAN(cont.) This SELF-CLEAN key is used to start a self-clean cycle. When used with Start Time key, a delayed selfclean cycle may also be programmed. The self-clean function has cycle times of 2 (Light), 3 (Normal) or 4 (Heavy) hours. To start an immediate shut off automatically To set a delay start time of 12:00 am Be sure the clock is set with the correct time of day, the oven is empty and the oven door is closed. self-clean cycle and O Touch CLEAR/OFF. O Touch CLEAR/OFF.
OPERATINGiNSTRUCTIONS SELF'CLEAN(cont.) To change the setting during of this self-clean feature: the operation li_ Touch Options. When the self-clean • It will not be possible to open the oven door until oven temperature has cooled. After the self-clean 0 Touch Light for light soil or Normal for average soil or Heavy for heavy soil. 0 Touch START to confirm the change. NOTE: When using the self-clean feature: • A self-clean cycle cannot be started if Control Lock feature is active.
MAINIENANCE CARE & CLEANING Changing the Oven Light Glass Light Cover Clip Housing The oven light is a standard lO-watt halogen bulb for ovens. To replace lamps located on the side wall: • Make sure oven and bulb are cooL 1. Unplug oven or disconnect power. 2. Remove oven racks. 3. Slide a flat blade screwdriver between the housing and the glass light cover. 4. Support the glass light cover with two fingers to prevent the cover from falling to the bottom of the oven. 5.
MAINTENANCE CARE & CLEANING (cont.) Broiler Pan and Grid Oven Do not clean the broiler DO NOT use oven cleaners. pan or grid in a selfcleaning mode. NEVER wipe a warm or hot porcelain surface with a damp sponge; it may cause chipping or crazing (tiny hairlike cracks.) Food spills should be cleaned when oven cools. At high temperature, foods react with porcelain and a permanent dull spot can result. When cleaning a spot, use only non-abrasive cleaners or scrubbers.
MAINIENANCE REMOVING & REPLACINGTHE LIFT-OFF OVEN DOOR To replace CAUTION Step, 1 • Be careful when removing and lifting the door. • DO NOT lift the door by the handle. - The door is very heavy. To remove the door: Firmly grasp both sides of the door at the top. Step. 2 With the door at the door: the same angle as the removal Step. 1 Open the door fully. position, seat the indentation of the Slot Step. 2 hinge arm into the bottom edge of the hinge slot.
TROUBlESHOOTiNG BEFORE CALLINGFOR SERVICE Before you call for service, review this list. It may save you time and expense. The list includes common occurrences that are not the result of defective workmanship or materials in this appliance. Oven control beeps and displays any F code error. Oven will not work • Electronic control has detected a fault condition. Press CLEAR/OFF to clear the display and stop beeping. Reprogram oven. If fault reoccurs, record fault number.
TROUBlESHOOTiNG BEFORE CALLINGFOR SERVICE (cont.) Food does not bake or roast properly Food does not broil properly • Oven controls improperly set. - See the using the oven section. • Rack position is incorrect or the rack is not level. - See the using the oven section. • Incorrect cookware or cookware of improper size being used. - See the using the oven section. • Oven sensor needs to be adjusted. - See the adjusting your oven temperature in option section. • Oven controls improperly set.
TROUBlESHOOTiNG BEFORE CALLINGFOR SERVICE (cont.) Oven not clean after a self clean cycle DOOR LOCKED icon are on when • Oven controls not properly set. - See the self-clean section, page 30-32. • Oven was heavily soiled. - Clean up heavy spillovers before starting the clean cycle. Heavily soiled ovens may need to self-clean again or for a longer period of time. you want to cook • The oven door is locked because the temperature inside the oven has not dropped below the locking temperature.
LG Electronics Inc. will repair or replace your product, at LG's option, if it proves to be defective in material or workmanship under normal use, during the warranty period set forth below, effective from the date of original consumer purchase of the product. This limited warranty is good only to the original purchaser of the product and effective only when used in U.S.A.
LG Electronics Inc. will repair or replace your product, at LG's option, if it proves to be defective in material or workmanship under normal use, during the warranty period set forth below, effective from the date of original consumer purchase of the product. This limited warranty is good only to the original purchaser of the product and effective only when used in Canada.
LG Electronics Inc.