ABANS-LX-D5230_ENG-83L DVD Micro Home Theater System Owner's Manual MODEL : LX-D5230 LX-D5230A/D/X, LXS-D5230V, LXS-D5230C, LXS-D5230T, Please read this manual carefully before operating your set. Retain it for future reference. Designs and notice for specifications improvement.
Safety Precautions CAUTION NOTES ON COPYRIGHTS: It is forbidden RISK OF ELECTRIC SHOCK DO NOT OPEN CAUTION: TO REDUCE THE RISK OF ELECTRIC SHOCK DO NOT REMOVE COVER (OR BACK) NO USER-SERVICEABLE PARTS INSIDE REFER SERVICING TO QUALIFIED SERVICE PERSONNEL.
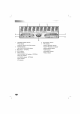
Table of Contents Introduction .25-27 OperationwithDVDandVideoCD. PlayingaDVDandVideoCD...............25 . SafetyPrecautions.........................2 TableofContents..........................3 BeforeUse..............................4-5 PlayableDiscs...........................4 Precautions.............................5 NotesonDiscs..........................5 AboutSymbols..........................5 FrontPanelandRearPanel..................6 RemoteControl............................7 DisplayWindow........
Before Use Playable Discs ote on DTS-encoded CDs When DVD (8cm/12cmdisc) playing back such discs, adjust the volgradually, and keep the volume level low. To enjoy DTS Digital SurroundTM playback, an external 5.1 channel DTS Digital SurroundTM decoder system must be connected to the digital output of the unit.
Before Use (Continued) Storing Precautions After Handling the unit shipping the unit original shipping carton and packing materials come in handy. For maximum protection, re-pack the unit as it was originally packed at the factory. When The setting up the unit The picture and sound of a nearby TV, VCR, or radio may be distorted during playback. In this case, position When the unit away from the TV, VCR, unit after removing the disc.
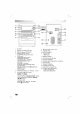
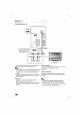
Front Panel and Rear Panel 1 13 12 2 11 3 4 10 56 9 7 8 20 19 14 18 15 17 16 1. CD DOOR 2. POWER 3. STANDBY indicator 4. FUNCTION SELECT buttons ( STANDBY/ON) button (OPTIONAL) 8. PUSH EJECT 9. VOLUME KNOB ? ? ? ? ? ? ? ? ? ? ? ? 7. ? ? ? ? ? ? ? ? 6 ? (SURR.) button 13. CD OPEN/CLOSE EQUALIZER (EQ) button PLAY MODE button : OPTIONAL PROGRAM/MEMORY button SET button RDS button : OPTIONAL COUNTER RESET 15. VOLTAGE SELECTOR SWITCH 16. POWER CORD 17.
Remote Control 1. POWER button 2. NUMBER buttons FUNCTION SELECT buttons 3. 1 18 2 (TUNER, DVD/CD, TAPE, AUX) 4. XDSS button 5. TAPE FUNCTION buttons - - 3 17 4 - - 16 - PLAY 15 REVERSE PLAY STOP (F: optional) (x) RECORD/ RECORD PAUSE (For use in highlighting a 8. ? 13 7 ? (Use the TITLE button to included on 12 DVD video display the title discs.) screen (FF/GG)/ (A-B) / CLEAR buttons REV./FWD buttons 11. MARKER/ SEARCH/ SLEEP buttons 12.
Display Window 1 TITLE PROG 2 CHP/TRK 1 ALL 3 RDS PS ST PTY RT 4 4 MP3 7 PL II D REC SLEEP DTS 6 1. ? ? ? 2. ? ? PROGRAM (PROG) indicator CHAPTER/ TRACK ? ? ? 8 ? ? RDS indicator ? ? FM STEREO RECEIVING indicator LEVEL indicator ? (CHP/TRK) indicator PLAY/PAUSE indicator ? 4. ? 7. REPEAT indicator 3. 5. 6.
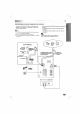
Connections Connecting ? to External Equipment or Antenna Connect the AUX IN AUDIO OUT using (L/R) jacks on the unit to the (L/R) jacks on the VCR, LD player, etc the audio cables. ?Connect the supplied FM/AM antennas for listening - Connect the AM loop antenna to the AM antenna connector. otes - To prevent noise pickup, keep the AM loop antenna away from the unit and other component. Be sure to fully extend the FM wire antenna.
Connections Connecting to a TV If the TV has input, an S-VIDEO connect the unit with S-VIDEO cable. Make the one of the following connections, depending capabilities of your existing equipment. on on your TV and other equipment you wish to connect, there are various ways you could connect player. Use one of the connections described TV using jack S-VIDEO IN sure the unit is connected Select the correct AV directly to the TV. input your TV.
Connections Connecting to Optional Equipment PREATION Connecting to an amplifier equipped with two channel digital stereo (PCM) or to an Audio/ Video receiver equipped with a multi-channel decoder (Dolby DigitalTM, MPEG 2 or DTS) jack on the unit to the amplifier .Use an optional Connect the OPTICAL OUT OPTICAL IN jack on your audio cable.
Connections Speaker System Connection Connect the speakers using the supplied speaker cords. To obtain the best possible surround sound, adjust the speaker parameters (volume, distance, etc.). If you feel lack of bass Connect an frequency active sub woofer to the SUB WOOFER OUT connector using monaural audio cord a (not supplied).
Before Audio Operation Adjustment Volume Speaker Positioning In the case of normal position use the 6 speakers (2 speakers, center speaker, 2 rear speakers and subwoofer). If you want to play the excellent bass sound or Dolby Digital surround, you should connect a subwoofer. level, front ? ? ? ? height.
Before Mini Operation Glossary for Audio Stream & Sound Mode Surround mode BYPASS You Allows you to enjoy 5.1(or 6) discrete channels of high quality tal audio from DTS program sources such as discs, DVD and digi- Digital Surround delivers up to 6 channels of transparent audio(which means identical to the original masters) and results in exceptional clarity throughout a true 360 degree sound field. The term DTS is a trademark of DTS Technology, LLC.
Before Setting 1 Operation the Clock Sleep Timer Function sleep timer is set, the unit automatically specified time has elapsed. Press CLOCK. When the (If the clock requires setting, press and hold CLOCK for more than 2 seconds.) The hours display begins to blink. off after the - Select either the 12 hour 2. cycle by PRESET (-/+) on cycle or the 24 hour the front panel. 1 To specify the time delay before the turns power is turned off, press SLEEP.
Before Operation Timer Function With the TIMER function you can have the radio receprecording, CD or tape playing turned on and tion and off at the time desired. minutes time pressing PRESET on minutes 'OFF TIME' indicator appears for about 0.5 display window and then seconds in the If you don't set clock, timer function doesn't work. Press TIMER to enter the timer 2 TUNER-CD-TAPE flash in the setting mode.
Before General This manual Operation Press 1/2 to can operating the require specific operation or allow only limited operation during playback. When this occurs, the symbol appears on the TV screen, indicating that the operation is not permitted by the Unit or gives basic instructions for numbers Unit. Some DVDs is not available on On-Screen General screen. playback On-screen 1 can displayed changed on the be on Press 3/4 to select an will be item. number). For some setting.
Before Initial You can Operation (Continued) Language Settings set your own Personal Preferences on the Unit. Disc Language Select Initial 1 Settings General Operation The setup Subtitle. original language set for the disc is selected. language, press number buttons to corresponding 4-digit number according to the lancode list on page 33. If you enter the wrong language Original Press SETUP. Other menu appears.
Before Operation (Continued) Others The DRC, Vocal, PBC and Auto Play settings can be changed. Press 3/4 to select the desired item and press SELECT/ENTER. The setting of the selected item is changed between On and Off.
Before Operation (Continued) Parental Control Country Code Rating Enter the code of Movies DVD DVDs may contain scenes not suitable for children. Therefore, discs may contain Parental Control on information that certain applies to the complete disc the disc. These scenes on or scenes are to Disc Menu are Rating Country TV 5.1 Disc Menu 6 Country TV 3 Aspect Menu 1 4 Code 1 Speaker Setup Select Country Code using the the setup Change Others 3/4 buttons on menu.
Before Operation (Continued) Size Speaker Setup Adjust the following settings for the built-in 5.1 channel surround decoder. Front Speaker (L/R) Disc Audio Center Disc Subtitle R Disc Menu Country TV Code Sub Woofer Volume 0dB Size Aspect Menu R Front L Rating Large Distance Language Speaker Rear Surround Speaker (L/R) 1 ft Since the the speaker settings settings.
Operation Presetting You can with RADIO the radio stations Listening Before tuning, make sure that you have turned the voldown to the minimum level. ume Press TUNER/BAND (or TUNER) to show either FM or AM in the display window. Every time you press this button, AM and FM 1 2 Press TUNING on the volume -/+ Tuning To listen to (-/+) for more than 0.5 second.
Operation with RADIO RDS Function Programme Search (PTY) OPTIONAL - This unit is Amajor benefit of RDS is its ability to encode broadcasts with Programme Type (PTY) codes that indicate the type of material being broadcast. The following list which shows the abbreviations used to indicate each PTY About RDS equipped with RDS (Radio Data System), brings a wide range of information from FM radio.
with TAPE Operation Basic To Playback Press TAPE to select tape function. ("NO TAPE appears in the display 1 " cassette deck by pushing 2 Open PUSH EJECT position. window.) STOP 3 4 Press G (or F : remote control. Press COUNTER RESET the front panel Playing or To unit stops automatically. You can pressing : Play Rewind FF/GG on " in display window.
Operation Playing a with DVD and Video CD DVD and Video CD Playback Setup Turn on DVD VCD2.0 General Features VCD1.1 the TV and select the video input ote Unless stated otherwise, all operations described the remote control. Some features may also be source connected to the unit. available Audio system: Turn on the audio system and select input source connected to the unit. on the Setup use menu. the 1 Moving Press OPEN/CLOSE to open the disc tray.
Operation with DVD and Video CD General Features Still Picture and VCD2.0 DVD 1 player will Repeat A-B A* AB Frame-by-frame playback VCD1.1 To repeat Press PAUSE/STEP The (continued) now during playback. go into PAUSE mode. " A " appears con- play, press PLAY. VCD2.0 DVD Press SLOW m VCD1.1 1 Press DISPLAY is not Repeat CHAPT VCD2.0 DVD TITLE TRACK - Playback the TV screen.
with DVD and Video CD Operation General Features Zoom VCD2.0 DVD Press ZOOM during playback or still playback repeatedly, steps. the to acti- 2 Use the 1 /2/3/4 buttons to move zoomed the through picture. 3 Press CLEAR to the level magnification normal resume playback or the contents of DVD Video Checking discs: Menus vate the Zoom function. If you press ZOOM increases up to six return to paused image. DVDs may offer menus that allow you to access special features.
Operation with Audio CD and MP3/WMA Disc Playing an Audio CD and MP3/WMA Disc CD MP3 The unit Notes WMA MP3/WMA compressed by using the layer-3 file-coding scheme. We call files that have the ".mp3" file extension "MP3 files". The player can not read an MP3 file that has a file extension other than ".mp3". can Insert a disc and close the tray. Audio CD; Audio CD menu appears on MPEG1 audio About WMA the TV go to step 4. MP3/WMA disc; The MP3/WMA-JPEG choice menu appears on the TV screen.
Operation CD Pause 1 2 with Audio and MP3/WMA Disc MP3 WMA Repeat Press PAUSE/STEP during playback. To return to playback, press PLAY or press PAUSE/STEP again. To repeat 1 Moving CD to another Track WMA or > Press PREV./NEXT . twice the previous track. briefly during or to return to the briefly step back to to In case of audio CD, to go directly to any track, enter the track number using the numbered buttons (0-9) during playback. Repeat Track/All/Off CD MP3 CD sequence.
Operation Viewing This unit a with JPEG Disc JPEG disc Moving JPEG play discs with JPEG files and Kodak picture CD. Before playing JPEG recordings, read the notes on JPEG Recordings on right. 1 to another File Press PREV./NEXT . can Insert disc and close the tray. The MP3/WMA-JPEG choice menu appears TV screen. on the > during viewing a previous file. once Still Picture 1 Press PAUSE/STEP a or to advance to the next file or to the picture The will during slide show.
Programmed Playback CD VCD2.0 with Audio CD Programmed Playback VCD1.1 MP3 WMA with Video CD Programmed Playback and MP3/WMA Disc The Program function enables you to store your favorite tracks from any disc in the player memory. Program can contain 30 tracks. during playback or in the Program Edit mode. Press PROGRAM 1 mode to enter the stop mark will appear to the right of the word the right side of the menu screen.
Troubleshooting Check the following guide for the possible cause of a problem before contacting service. Cause Symptom No power. ? Correction The power cord is disconnected. ?P lug the power cord into the wall outlet securely. The power is on, but the unit does not work. No ? No disc is inserted. ? ?T he TV is not set to receive DVD picture. signal out- ? put. ? The video cable is not connected securely. ? Insert a disc.
Language Code List Enter the appropriate code number for the initial settings "Disc Audio", "Disc Subtitle" and/or "Disc Menu" (See page 18).
Code List Country Enter the appropriate code number for the initial setting "Country Code" (See page 20).
Specifications Power [Genral] Power FM AM [Amplifer] TAPE 6.43kg External dimensions [Video] (MW) (W x H x D) 161 255 x x 268 mm Laser Semiconductor laser, Frequency response (audio) Signal-to-noise ratio (audio) Signal-to-noise ratio (video) Dynamic range (audio) Harmonic distortion (audio) 40 Video output 1.0 V S-video output (Y) (C) wavelength 650 nm 18000 Hz - More than 70 dB More than 70 dB More than 70 dB 0.2 % (1 kHz) (p-p), 75 Ω, negative 1.0 V (p-p), (p-p), 0.
P/NO : 3828R-A083L