MOSCOW_LX-W550/W250/U550/U250_ENG_85T MICRO HI-FI SYSTEM OWNER'S MANUAL MODEL: LX-U550 (LX-U550A/D/X, LXS-U550) LX-U250 (LX-U250A/D/X, LXS-U250) LX-W550 (LX-W550A/D/X, LXS-W550) LX-W250 (LX-W250A/D/X, LXS-W250) Please read this manual carefully before operating your set. Retain it for future reference. Designs and notice for The of specifications improvement. working purchase.
CAUTION CAUTION concerning the Power Cord Most RISK OF ELECTRIC SHOCK DO NOT OPEN CAUTION: THESE SERVICING INSTRUCTIONS ARE FOR USE BY QUALIFIED SERVICE PERSONNEL appliances recommend they be placed upon a dedicated circuit; That is, a single outlet circuit which powers only that appliance and has no additional outlets or branch circuits. Check the specification page of this owner's manual to be certain. ONLY. Do not overload wall outlets.
Contents 1Introduction..................4-6 .4 SymbolsUsedinthisManual NotesonTapes....................4 . . . . . . . . . NotesonDiscs....................4 Handlingdiscs..................4 Storingdiscs...................4 Cleaningdiscs..................4 Front/RearPanel..................5 RemoteControl....................6 Remote Control Remote Control battery installation Operation Range . . . . .6 . .6 2Installation.....................7 .
1.Introduction To proper use of this product, please read this owner 's manual carefully and retain for ensure future reference. Notes on on Discs Handling discs Do not touch the This manual the operation and maintenance of your CD player. Should the unit require service, contact an authorized service location and information provides to (refer on the disc by the playback side of the disc. Hold edges so that fingerprints do not the surface. Never stick paper the disc.
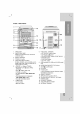
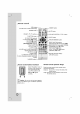
Front // Rear Panel Introducin 1 15 2 34 20 5 14 6 AUX 13 7 16 19 12 8 LL 18 11 RR 9 10 1. TAPE DOOR 2. PROTECTION TAPE 17 8. (Before you operate protection tape.) the unit, remove the ? RDS button ? SET ? CD PAUSE ? COUNTER RESET button : OPTIONAL (CLOCK/ TIMER) button (CD[]) 3. DISPLAY WINDOW ? MODE/RIF button 4. POWER ? PLAY MODE button 5. FUNCTION SELECT buttons ? CD SYNC. button 6.
Remote Control Control USB button (LX-U550 and LX-U250 model DIMMER button only) DIMMER POWER button MUTE button USB PRESET / ( ) buttons VOLUME CONTROL FUNCTION / ( ) button FUNCTION button SLEEP button CD FUNCTION buttons ? PLAY/PAUSE ? ? (. TUN.+ button (B/[]) STOP(x) CD TUN.- PROGRAM/MEMO button button D.SKIP CD SKIP/SEARCH bb/BB ? buttons ? RECORD/ RECORD PAUSE button buttons ? BACKWARD PLAY button REPEAT button (b) ? FORWARD PLAY button >) TUN.
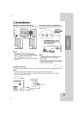
2.Installation Connection Connection speaker cords to the speaker Speaker System Connect the terminal. Antenna Connections (Aerial) (Aerial) Connections Connect the supplied FM/AM antennas for listen- to the radio. ing LL Red RR Black Left Right speaker Instal ion speaker otes Be ? sure to match the speaker appropriate terminal and If the cords -- to --. on the are cord to the components: + to + reversed, the sound will be distorted and will lack base.
3.Operation Setting Setting the the SURROUND voltage (OPTIONAL) voltage (OPTIONAL) If your set is equipped with a voltage selector at the back side, be sure to set it to your local power before supplied Audio HALL the VOLUME CONTROL KNOB clockwise level, Using the remote CONTROL ( ) Headphone Connect t CINEMA t t EALA VOCAL t t TUNNEL CHURCH t t SURR OFF...
Auto Function Selection Selection ? If you press PLAY/PAUSE (B/[]) on the remote control during radio receiving or CASSETTE play, ? the the Using Using CD will be operated automatically. If you press TUNER on the front panel during CD or CASSETTE play, radio function will be operated. When the matically elapsed. sleep timer is Function used, the power is turned off after the specified window you for about 5 seconds. This the the Clock Clock auto- time has 1.
imer Timer 7. Set the minute to switch PRESET With the TIMER function you can have the radio reception and recording, CD play, tape play turned and off at the time desired. on 8. Press CLOCK to check the current time. don't set (If you work.) 2. 9. you want to correct the previous memorized TIMER setting, press and hold the TIMER button - The previous more than 2 seconds. memorized timer on TIMER indicators appear in the 3. Set the hour to switch off setting (If time and display.
RDS Function - Programme Search (PTY) OPTIONAL OPTIONAL A This unit is with RDS equipped System), which brings (Radio that indicate the Data wide range of information to FM radio. Now in use in many countries, a for station call system transmitting signs or network information, a description of station programme type text message about the station or a specifics of musical selection and the correct time.
Presetting the the Radio Stations Stations Listening You 50 stations for FM and AM. 1. preset can Before 1. make Press TUNER that you have turned down the volume to the minimum. tuning, Press TUNER FUNCTION the sure on the front panel frequency (AM FM) or FUNCTION the Select station you want a 2. the remote on by pressing - - Tuning - Press 3. in Press PROGRAM/MEMO and repeatedly. 4.
Tape Playback Tape Tape Recording Tape Use Wind the tape Use normal Basic 1. normal only tapes. Press TAPE ("NO (or FUNCTION) to select tape TAPE" appears in the Open Insert upside 4. To by pushing position. cassette with the tape side 2. (B or Open to the 1. After Rewind pressing (COUNT.RESET) time appears "TP 2. the remote control.
CD CD Playback Basic 1. Skipping Playback Press CD/MP3 (or FUNCTION) no Press the . bb/BB > button to go to the next track. ? When the . bb/BB > button is button to once disc is loaded then "NO DISC" is Press Z OPEN/ CLOSE and into the disc place tray. Searching After an 8cm circle of the 3. (3 inch) disc, put it onto the inner tray. on is skipped and holding . bb/BB > the remote control then release at the point during playback, you want. ote compartment.
About MP3/WMA Program Play You arrange the order of the tracks on the discs and create your own program. The program can contain up to 20 tracks. 1. can Press PROGRAM/MEMO control 2. on the on An MP3 file is audio data compressed by using the MPEG1 audio layer-3 file-coding scheme. We call files that have the ".mp3" file ? the remote stop mode. extension "MP3 files". Press . bb/BB > to select the track. EX) MP3 "04 P-01" will be shown in the Program The unit ? display. number ".
USB USB Function (LX-U550/U250 (LX-U550/U250 model only) only) otes ? ? Don't remove a while playing Don't add playing MP3 player the memory card when using a multi card reader. or remove the USB by Numbers of file available ? Be ? ? ? to memory card the USB. ? sure or save are maximum 999 EA. file in the memory card after formatting. No cladding hard disc is supported. The MP3 player requiring installation of a drive is not supported.
4.Maintenance and Service Service Service the the Unit Unit Shipping Shipping The original shipping carton and packing materials can come in handy. For maximum protection, re-pack the unit as it was originally packed at the factory if you need to ship it. Cleaning Cleaning Use a the the Unit Unit extremely dirty, use a lightly moistened with a mild detergent zine, problems the next page to solve any before calling for service. on soft, dry cloth when cleaning the player.
T roubleshooting Troubleshooting Symptom Cause Correction No power. ? The power cord is disconnected. ? the power cord into the wall outlet securely. No sound. ? The power of the external equipment is switched off. ? Switch The unit does not start playback. ? No disc ? An ? The disc is or disc or tape placed upside on the external source equipment. is inserted. tape unplayable source Plug is inserted. down.
5.Reference Specifications Specifications LX-U550A/D/X LX-U250A/D/X LX-W550A/D/X LX-W250A/D/X MODEL SECTION [Genral] Power supply Power consumption Mass External dimensions Frequency [CD] FM [Tuner] (MW) (WxHxD) ratio 5.5kg 4.4kg 18000 Hz - 70 dB range 108.0 MHz Tuning Range Intermediate 10.7 MHz Frequency to Noise Ratio - or 65 74 87.
P/NO : 3834RH0085T