DEILAMI_LX-V340 (ENG)-42X VCD Micro Hi-Fi System Owner's Manual MODEL : KR-320MV VIDEO CD Please read this manual carefully Retain it for future reference. before operating your set.
PAGE 2 INTRODUCTION Precautions CAUTION Use of controls procedures RISK OF ELECTRIC adjustments or performance of specified herein may result in hazardous radiation exposure. SHOCK DO NOT OPEN CAUTION:TO REDUCE THE RISK OF ELECTRIC SHOCK DO NOT REMOVE COVER or other than those (OR BACK) Laser component in this product is capable of emitradiation exceeding the limit for Class 1. ting NO USER SERVICEABLE PARTS INSIDE.
PAGE 3 INTRODUCTION Ta ble of Contents INTRODUCTION CD/VCD OPERATION Precautions.............................2 BasicPlayback..........................15 TableofContents.........................3 BasicPlaybackSetup....................15 .4 ToPausePlay..........................15 SafetyPrecautions..........................4 ToStopPlay...........................15 NotesonDiscs.............................4 ToSkipaTrackorscene..................15 Notes(Discs,RemoteControl,Tape). . . . . . .
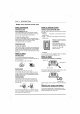
PAGE 4 INTRODUCTION Notes (Discs, Remote Control, Tape) Safety Precautions Handling When Notes the unit shipping Remote control ?D istance: remote ? keep the surface clean use volatile liquids, such as the unit. Do not leave rubber near contact with the unit for They will leave marks Cleaning on insecticide spray, plastic products or long period a : remote sensor. . in Remote control use thinner, these as might damage batteries with and aligned correctly.
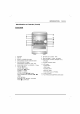
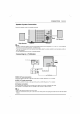
PAGE 5 INTRODUCTION Identification of Controls (Cont'd) Front Panel 14 12 13 3 12 1. CD DOOR 2. DISPLAY 3. POWER 4. OAO 5. 4 11 567 10 9 8 9. ( STANDBY/ON) (Orientation Acoustic button Optimizer) button HEADPHONE SOCKET 7. ? SET/CD ? COUNT. RESET button ? ) REC/PAUSE PHONES) 12 3.
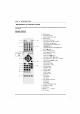
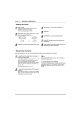
PAGE 6 INTRODUCTION Identification of Controls (Cont'd) You will find instructions for each of the remote control functions in the sections of this instruc- appropriate tion manual. Remote Control 1. POWER button 2. Function select buttons 3. Numeric buttons (CD/VCD, BAND, AUX, TAPE) 1 15 4. 2 3 ? BACKWARD PLAY ? FORWARD PLAY ? FAST REWIND/FAST FORWARD PLAY 5. OPTIONAL 5 6. 13 7.
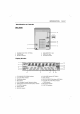
INTRODUCTION PAGE 7 Identification of Controls Rear Panel 6 OPTIONAL 54 1 3 2 1. VOLTAGE SELECTOR 4. AUXILIARY INPUT Jack 2. POWER Cord 5. VIDEO OUT Jack 3. SPEAKER Terminal 6. ANTENNA Terminal : OPTIONAL Display Window 1 15 kHZ CDSYNC. MHZ 2 STEREO REPEAT PROG 3 1 ALL SLEEP MEMO REC 4 5 MUTE 6 7 89 10 1. CD SYNCHRO RECORDING indicator 10. PLAY MODE indicator 2. CD PLAY/ PAUSE indicator 11. MUTE indicator 3. PROGRAM indicator 12.
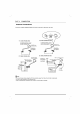
PAGE 8 CONNECTION Antenna Connections Connect the (1) supplied AM(MW)/FM(SW:OPTIONAL) 2 BAND For the (FM/AM) antennas for (2) 3 AREA listening BAND to the radio.
CONNECTION Speaker System Connect the speaker PAGE 9 Connection cords to the speaker terminals. Red Black Left Speaker Red Right Speaker otes ? Be sure to match the speaker cord to the appropriate terminal on the components: + to + and -- to --. If the cords are reversed, the sound will be distorted and will lack bass. ? If you put ? use to the front speakers speakers.
PAGE 10 BEFORE OPERATION Setting 1 Press CLOCK. (If the clock CLOCK for - 2. the Clock The hours requires setting, press and more than 2 seconds.) display begins to blink. Select either the 24 hour cycle by pressing (24HR) or Press SET to confirm the selected hour Sleep Timer When the 1 the 12 hour To sleep cycle. the time delay automatically display before the power is window you about 5 seconds. This means turns off after 90 minutes.
BEFORE OPERATION PAGE 11 Timer Functions With the TIMER function you at the time desired. 1 can have the radio reception Press CLOCK to check the current time. and 2 TUNER-CD-TAPE flash in the disappears TIMER more -The previous memorized press and hold the TIMER button than 2 seconds. memorized timer previous " " for On setting indicators appear in the minutes time. Set the turn off hour time 10 Press SET. 11 Set the turn off minutes 12 Press SET.
PAGE 12 Audio Volume ? BEFORE OPERATION Adjustment MUTE Adjustment On unit, turn VOLUME CONTROL KNOB clockwise to increase the sound level, or counterclockwise to decrease it. ? You On remote, level, Press MUTE to turn off the sound, press VOLUME use or use VOLUME - + to increase the sound to decrease it on the the remote again to restore. can mute your unit in telephone, order, for example, to "MUTE" indicator flashes in the answer display window. control.
RADIO OPERATION Presetting You can Radio Stations preset 50 stations for FM and AM (SW OPTIONAL). Before tuning, make : that you have sure turned the volume down to the minimum level. Press TUNER/BAND (or BAND on the control) to show either FM or AM (SW : AL) in the display window. 1 2 remote OPTION- And then every time you press TUNER/BAND (or BAND on the remote control), FM and AM (SW : OPTIONAL) change alternately.
CASSETTE DECK OPERATION PAGE 14 Tape Operation Basic 1 2 3 4 To Playback Press TAPE on the front panel remote control or STOP( to select TAPE function. ("NO TAPE" appears in the Open cassette door display window.) PUSH EJECT by pushing STOP( )/CLEAR on the front panel or TAPE ) on the remote control during playback. Tape Counter Playing Insert cassette with the tape side to the bottom and then close cassette door. Press (or : OPTIONAL) the front on panel remote control.
CD/VCD OPERATION Basic Playback To Search Preparation In of case Tu rn using a TV Press the TV and select the video on pictures from this unit. In case of using an amplifier Tu rn on the amplifier and select the can so input so that you view the that you Basic can (When CD track / a desired or scene repeatedly during playback.
PAGE 16 CD/VCD OPERATION Advanced Last Scene Playback (Continued) Memory Function Multiplex The unit memorizes the point you stopped a VIDEO CD and you can resume playback from that point. It is not available during playing an audio CD. You can select the sound from the right or left channel and listen to the sound of the selected channel both the and left right through In this case, the sound speakers. loses the stereo effect. 1 2 Press STOP ( ) during playback.
OPERATION CD/VCD Advanced Playback (Continued) Disc Digest Playback You otes ? ? Basic You can 1 Press NUMERIC button 2. During playing a VIDEO picture of the ? shows still pictures following at you want time on the TV by observing or scene one appears on 1.INTRO 2.DISC 3.TRACK 4.EXIT the TV screen. each track or scene on 10 seconds the 4 7 6 5 the TV scenes screen of tracks 1 beginnings of 2 ). The TV ( 9.
PAGE 18 CD/VCD OPERATION Advanced Playback (Continued) Program Play Setup Repeat Playback NOTE: The repeat play does not work in PBC ON status of the VIDEO CD with PBC function To play one track Press REPEAT - "REPEAT 1" (Version 2.0). You repeatedly play one disc Press REPEAT - play - all disc 1 repeat play "repeat indicator" 3 4 5 Press PROG./MEMO once during program play. "REPEAT 1" appears in the display window. (One track repeat) Press REPEAT program play.
CD/VCD OPERATION Advanced MP3 Playback Playback otes ? 1 Load an MP3 disc. The ROOT directory menu is displayed on the TV ? screen. The directory English. and file name If you select another file FOLDER TRACK_1 TRACK_3 TRACK_5 TRACK_7 TRACK_9 To TRACK_2 TRACK_4 TRACK_6 TRACK_8 ? Press PREV./NEXT(/) to select the directory where MP3 files that you want to play ? located and then press SELECT. MP3 FILE : ? MUSIC_2 MUSIC_4 MUSIC_6 MUSIC_4 MUSIC_5 ? directory on the disc.
PAGE 20 ADVANCED OPERATION KARAOKE Karaoke Function To You You can play KARAOKE(singing along) with VCD by connecting a microphone to the unit. You can enjoy KARAOKE with a stereo-recorded disc, even if it is a non-karaoke disc, by reducing the singer's Adjust ECHO Volume can give microphone. ? an Press ECHO echo effect to the sound from the repeatedly to adjust the of strength echo. voice. ECHO-1, ECHO-2 or ECHO-3 is displayed in the display window.
PAGE 21 REFERENCE Selection System You ? ? ? can NTSC enjoy or (NTSC/PAL) PAL discs by using the NTSC/PAL button to choose the appropriate system. If you try to play back PAL disc with NTSC-TV. The unit will not play back the disc. When the system of your unit does not coincide with the system of your TV, normal color picture may not be displayed. When you play back NTSC disc with PAL-TV, some discs may produce black bands at the top and bottom of the screen.
PAGE 22 REFERENCE Troubleshooting Check the following guide for the possible cause of a problem before Cause Symptom Possible Solution No power. ? The power cord is disconnected. No ? The TV is not set to receive VCD picture. signal ? the power cord into outlet securely. ? Select the output. Plug on the TV The video cable is not connected ? securely. There is no sound or very low-level sound is heard. only The is poor.
REFERENCE Specifications Refer to the back Pow er 80W Supply Consumption Weight (Approx.) [Genral] [VCD/ ] External Dimensions AM SW (option) [Amp] x H x D) (1 kHz) (1 kHz) 70 dB Video output 1.0 Tuning Range Intermediate Frequency Signal-to-Noise Ratio Frequency Response Tuning Range Intermediate Frequency Signal-to-Noise Ratio Frequency Response Tuning Range Intermediate Frequency Output Power 87.5 V, 75 Ω, RCA jack T.H.D 0.
P/NO :3834RH0042X