H.POINT_MCV902_MCD502_ENG_MFL32702810 MINI Hi-Fi SYSTEM OWNER’S MANUAL MODEL: MCV902 MCV902-A0U/D0U/X0U, MCS902F, MCS902S, MCS902AW, MCS902W MCD502 MCD502-A0U/D0U/X0U, MCS502F Before connecting, operating or adjusting this product, please read this instruction booklet carefully and completely.
Safety Precaution CAUTION RISK OF ELECTRIC SHOCK DO NOT OPEN CAUTION: TO REDUCE THE RISK OF ELECTRIC SHOCK DO NOT REMOVE COVER (OR BACK) NO USER-SERVICEABLE PARTS INSIDE REFER SERVICING TO QUALIFIED SERVICE PERSONNEL. This lightning flash with arrowhead symbol within an equilateral triangle is intended to alert the user to the presence of uninsulated dangerous voltage within the product’s enclosure that may be of sufficient magnitude to constitute a risk of electric shock to persons.
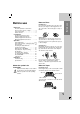
Contents Before use About the Symbols for instruction / Notes on Discs / Notes on Tapes . . . . . . . .3 Front / Back Panel . . . . . . . . . . . . . . . . . .4 Remote Control . . . . . . . . . . . . . . . . . . . . .5 Notes on Discs Before use Before use Handling discs Do not touch the playback side of the disc. Hold the disc by the edges so that fingerprints do not get on the surface. Never stick paper or tape on the disc. Connections Speaker System Connections . . . . . . . . .
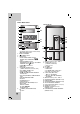
Front / Back Panel MCV902 Model 1 2 3 9 10 4 5 6 7 8 1. • DISC SKIP button • CD SELECT buttons (DISC1, DISC2, DISC3) • Z OPEN/CLOSE button 2. DISPLAY WINDOW 3. / ] (POWER) button 4. • XDSS button • AUTO TUNING DOWN/UP button bb/B BB) REWIND/ FAST FORWARD (b button • PRESET DOWN/UP button b) button : OPTIONAL BACKWARD PLAY (b B) button FORWARD PLAY (B • STOP (x)/ CLEAR button • OAO button 5. • FUNCTION SELECT buttons [ TUNER, TAPE, CD, AUX / AV, USB ] • PLAY MODE (DEMO) button • PROG. MEMO.
Before use Remote Control LINK button (MCV902 model) WOOFER POWER button (MCV902 model) POWER button PRESET/FOLDER( / ) buttons MUTE button • USB button • FUNCTION button VOLUME ( / ) buttons SLEEP button DIMMER button CD FUNCTION buttons PLAY/PAUSE (B B/[]) button • CD STOP(x) button • CD SKIP/SEARCH • BB >) buttons (. bb/B TUN.(-/+) buttons • REPEAT button • D.SKIP button EQ PATT. • (EQUALIZER PATTERN) button XDSS button • SURR.
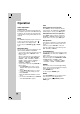
Connections Speaker System Connections MCV902 Model subwoofer(A) Surround speaker (Left) Wire band color: Blue Front speaker (Left) subwoofer(B) Surround speaker (Right) Gray Front speaker (Right) Orange Notes: • Do not place the surround/ subwoofer speakers by TV. • If TV screen becomes discolored do not place front speakers within 30cm from TV. White Red Connection of the front speakers Connect the speaker cables to the front speaker terminals.
Antenna (Aerial) Connections Optional Equipment Connections Connect the supplied FM/AM antennas for listening to the radio. Connection of the TV/Monitor, Video Game or DVD, etc. 1. Connect the video/audio output connector of a auxiliary device to the GAME LINK (VIDEO IN, AUDIO L/R) connector.
Operation XDSS (Extreme Dynamic Sound System) Audio Adjustment Headphone jack Connect a stereo headphone plug ( 6.3mm) into the headphone jack to listen to the sound through headphones. The speakers are automatically disconnected when you plug in the headphones (not supplied). MUTE Press MUTE to temporarily stop the sound such as when you answer the telephone. The “ ” indicator flashes in the display window. To cancel it, press VOLUME ( again.
Using Microphone - OPTIONAL You can sing to a music source by connecting a microphone to the unit. 1. Connect your microphone (not supplied) to the MIC jack. “ ” will be shown in the display window. 2. Play a music you want. 3. Sing along with the accompaniment. Adjust the microphone volume by turning MIC VOLUME KNOB. Notes: • When not using the microphone, set the MIC volume knob to minimum or turn off the MIC and remove the microphone from the MIC jack.
Timer Function With the TIMER function you can have the radio reception, CD play, TAPE play and USB play turned on and off at the desired time. 1. Press CLOCK to check the current time. (If you don’t set clock, the timer function doesn’t work.) 2. Press TIMER to enter the timer setting mode. If you want to correct the previously memorized TIMER setting, press and hold the TIMER for more than 2 seconds. - The previous memorized time and “ ” indicator appear in the display window. 3.
You can preset 50 stations for FM and AM. Before tuning, make sure that you have turned down the volume to the minimum. 1. Press TUNER on the front panel or FUNCTION on the remote control to select the frequency (AM or FM) you want. 2. Select a station you want by using AUTO TUNING DOWN/ UP or MULTI JOG on the front panel. Or press the TUN. (-/+) on the remote control. Tuning in automatically - Press AUTO TUNING DOWN/ UP on the front panel. Or press TUN. (-/+) on the remote control for more than 0.5 second.
RDS Function - OPTIONAL About RDS This unit is equipped with RDS (Radio Data System), which brings a wide range of information to FM radio. RDS, now in use in many countries, is a system for transmitting station call signs or network information, a description of station programme type text message about the station or specifics of musical selection and the correct time.
Tape Recording Use only normal tapes. Wind the tape to the point recording starts. Use only normal tapes. AUTO REVERSE DECK (TAPE2)- OPTIONAL You can select the direction of the cassette you want by pressing PLAY MODE. Display Function After the cassette TAPE 2 plays the front or reverse (backward play) side, stops automatically. After the cassette TAPE 2 plays the front and reverse side, stops automatically.
CD Playback Basic Playback 1. Press CD (or FUNCTION) to select CD function. If no disc is loaded then “NO DISC” is displayed. 2. Press Z OPEN/ CLOSE and place the disc into the disc tray. The disc on the left (DISC 1) is played first. DISC 1 With the label side up Note: To load an 8cm (3 inch) disc, put it onto the inner circle of the tray. 3. Press Z OPEN/ CLOSE to close the disc compartment.
2. Press D.SKIP, DISC SKIP or CD SELECT (DISC 1/2/3) to select the disc. 3. Press . bb/BB > to select the track. Or use MULTI JOG. 4. Press PROGRAM/ MEMO on the remote control (or PROG. MEMO. on the front panel). Repeat the steps 1 - 4 above. B) on the front panel or Press PLAY (B PLAY/ PAUSE (B B/[[]) on the remote control. 5. 6. To check program contents Press PROGRAM/ MEMO on the remote control (or PROG. MEMO. on the front panel) on stop mode.
About MP3/WMA MP3/WMA Disc compatibility with this unit is limited as follows: 1. Sampling Frequency 8 - 48kHz(MP3), 32 - 48kHz(WMA) 2. Bit rate 8 - 320kbps(MP3), 48 - 320kbps(WMA) 3. CD-R physical format should be “ISO 9660” 4. If you record MP3/WMA files using the software which cannot create a FILE SYSTEM, for example “Direct-CD” etc., it is impossible to playback MP3 files. We recommend that you use “Easy-CD Creator”, which creates an ISO 9660 file system. 5.
USB Function To Remove the USB from the unit You can enjoy the media files such as tunes (MP3/WMA) saved in an MP3 player or USB memory by connecting the storage device to the USB port of this unit. 1. Choose the other functions except USB function in order to remove the USB. 2. Remove the USB from the unit. Note: Besides Basic Playback, if you want to operate other functions, see the CD Playback section. Moving to other cards Operation When you use an MP3 player or a memory card, press D.
Reference Troubleshooting Symptom Cause • The power cord is disconnected. Correction • Plug the power cord into the wall outlet No power securely. • The audio cables (or SYSTEM connector • Connect the audio cable (or SYSTEM jack) are not connected securely. connector jack) into the jacks securely. • The power of the external source • Turn on the equipment connected with No sound equipment is switched off. the audio cable.
Specifications FM AM (MW) [Subwoofer] [Speakers] [TAPE] [Amp] [Tuner] [CD] [General] SECTION Power supply Power consumption Net Weight External dimensions (WxHxD) Frequency response Signal-to-noise ratio Dynamic range Tuning Range Intermediate Frequency Signal to Noise Ratio Frequency Response Tuning Range Intermediate Frequency Signal to Noise Ratio Frequency Response Output Power T.H.D Frequency Response Signal-to-noise ratio Tape Speed Wow Flutter F.
P/NO : MFL32702810