OWNER’S MANUAL Mini Hi-Fi System Please read this manual carefully before operating your set and retain it for future reference. MODEL MDS715 (MDS715, MDS715V/S/C/W) P/NO : MFL63284656 MDS715-A0P_DIDNLLK_ENG_4656.indd 1 Reg. No. I.3.LG1.00905.
1 Safety Information Safety Information 1 Safety Information CAUTION RISK OF ELECTRIC SHOCK DO NOT OPEN CAUTION: TO REDUCE THE RISK OF ELECTRIC SHOCK DO NOT REMOVE COVER (OR BACK) NO USERSERVICEABLE PARTS INSIDE REFER SERVICING TO QUALIFIED SERVICE PERSONNEL.
Safety Information in installation such as a bookcase or rack unless proper ventilation is provided or the manufacturer's instruction have been adhered to. Safe way to remove the battery or the battery from the equipment: Remove the old battery pack, follow the steps in reverse order than the assembly. To prevent contamination of the environment and bring on possible threat to human and animal health, the old battery or the battery put in the appropriate container at designated collection points.
Contents Contents Enjoying audio from an external source and selecting the function 1 19 Safety Information 2 18 2 3 CAUTION Copyrights AUDIO (PORT.
Contents Maintenance 31 Changing subtitle code page 32 AUTO DJ playback 32 Viewing a PHOTO file 40 Notes on Discs 33 Options while viewing a photo 40 Handling the Unit 33 Sleep Timer Setting 33 Dimmer 33 Turn off the sound temporarily 33 1.
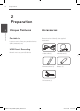
Preparation 2 Preparation 2 Preparation Unique Features Accessories Portable In Please check and identify the supplied accessories. Listens to music from your portable device. (MP3, Notebook, etc) USB Direct Recording Records music to your USB device. Video cable (1) AM antenna (1) Remote control (1) Battery (1) FM antenna (1) MDS715-A0P_DIDNLLK_ENG_4656.
Preparation Introduction Playable Discs DVD-VIDEO (8 cm / 12 cm disc) Discs such as movies that can be purchased or rented. Symbol Used in this Manual All discs and file listed below ALL MP3 files MP3 DVD and finalized DVD±R/RW DVD WMA files WMA DivX files DivX Audio CDs ACD JPG files JPG NOTE Indicates special notes and operating features.
Preparation Playable file Requirement 2 MP3/ WMA music file requirement Preparation MP3/ WMA file compatibility with this unit is limited as follows : • Sampling frequency : within 32 to 48 kHz (MP3), within 32 to 48 kHz (WMA) • Bit rate : within 32 to 320 kbps (MP3), 40 to 192 kbps (WMA) • Support Version : v2, v7, v8, v9 • Maximum files : Under 999 • File extensions : “.mp3”/ “.
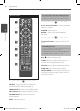
Preparation Remote control Remote control 9 OPEN/CLOSE : Opens and closes the disc Drawer. SLEEP : Sets the system to turn off automatically at a specified time. (Dimmer : The display window will be darken by half.) INFO/DISPLAY : Accesses On-Screen Display. a HOME: Displays the [Home] menu. 2 b • • • • • • • • • • b • • • • • • • • • U/u/I/i (up/ down/ left/ right): Used to navigate on-screen displays. Preparation DISC MENU : Accesses the menu on a DVD disc.
Preparation Remote control a Put the battery into the remote control. Make sure for the + (plus) and – (minus) on the batteries to be matched on the remote control. • • • • • • • • • • e • • • • • • • • • 0 to 9 numerical buttons : Selects numbered options in a menu. 2 MARKER : Marks play list. Preparation b REPEAT : Selects a play mode. (Repeat/ Random) • • • • • • • • • • f • • • • • • • • • c TV Control buttons : Controls the TV.
Preparation 11 Rear panel 2 Preparation c a d e f b g a Speaker terminal c VIDEO OUT connector b Cooling fan d ANTENNA (FM, AM) e OUT PUT (COMPONENT VIDEO) connector f IN PUT (AUX) connector g Power cord. MDS715-A0P_DIDNLLK_ENG_4656.
Preparation Front panel 2 29 Preparation a u b c t d s e r y v q f p g h x i z w 28 o 27 n j k m l MDS715-A0P_DIDNLLK_ENG_4656.
Preparation s O PEN/CLOSE b 1/ ) (Power) ET t S Confirms the setting. CD SYNC. From CD to TAPE Synchronized Recording Starts playback. ./ TUNING - (CD FB/Prev.,TAPE REW) PRESET -/ n (TAPE reverse play) PRESET +/ N (CD play, TAPE FW play) >/ TUNING + (CD FF/NEXT, TAPE FF) x STOP c Display window d T IMER With the TIMER function you can turn CD, USB play and TUNER reception on or off at a desired time. LOCK e C For setting the clock and checking the time. SER EQ f U Controls sound register.
Installation 3 Installation Attaching the speakers to the unit 3 Installation To connect the cable to the unit, press each plastic finger pad to open the connection terminals on the unit. Insert the wire and release the finger pad. CAUTION • Be careful to make sure children not to put their hands or any objects into the *speaker duct. *Speaker duct: A hole for plentiful bass sound on speaker cabinet (enclosure).
Installation Positioning the system A Front left speaker (L)/ B Front right speaker (R): Place the front speakers to the sides of the monitor or screen and as flush with the screen surface as possible. The following illustration shows an example of positioning the system. Note that the illustrations in these instructions differ from the actual unit for explanation purposes.
Installation Connections to Your TV Component Video Connection Make one of the following connections, depending on the capabilities of your existing equipment. You can hear the sound through the system’s speakers. Connect the COMPONENT VIDEO OUTPUT (PROGRESSIVE SCAN) jacks on the unit to the corresponding input jacks on the TV using component cables.
Installation Video Connection Connect the VIDEO OUT jack on the unit to the video in jack on the TV using a video cable. You can hear the sound through the system’s speakers. Video Connection 17 Optional Equipment Connection AUX In Connection Connect an Output of auxiliary device to the AUX (L/R) INPUT Connector. AUX IN Connection 3 Installation Yellow TV Red White To the audio output jacks of your component (TV, VCR, etc.
Installation USB Connection Connect the USB port of USB Memory (or MP3 player, etc.) to the USB port on the front of the unit. USB device requirement • Devices which require additional program installation connected to a computer, are not supported. • Do not extract the USB device while in operation. • For a large capacity USB, it may take longer than a few minute to be searched. • To prevent data loss, back up all data.
Installation AUDIO (PORT. IN) In Connection Connect an output of portable device (MP3 or PMP etc) to the AUDIO (PORT. IN) input connector. AUDIO IN Connection 19 Antenna Connection Connect the supplied FM/AM antenna for listening to the radio. Connect the AM Loop antenna to the AM antenna connector. (A) Connect the FM wire antenna to the FM antenna connector. (F) Antenna Connection 3 Installation MP3 player, etc...
Installation Adjust the setup settings By using the Setup menu, you can make various adjustments to items such as picture and sound. You can also set a language for the subtitles and the Setup menu, among other things. For details on each Setup menu item, see pages 20 to 24. 3 Installation OSD Initial language settings Optional During the first use of this unit, the initial language setup menu appears on your TV screen. You must complete initial language selection before using the unit.
Installation Language Menu Language Select a language for the Setup menu and then on screen display. Disc Audio / Disc Subtitle / Disc Menu Select the language you prefer for the audio track (disc audio), subtitles, and the disc menu. [Original] Refers to the original language in which the disc was recorded. [Off (for Disc Subtitle)] Turn off Subtitle. Display Display Mode The Display Mode setting works only when the TV Aspect mode is set to 4:3.
Installation Audio 5.1 Speaker Setup (MDS 715) Make the following settings for the built-in 5.1 channel surround decoder. 1. Select [5.1 Speaker Setup] on the [Audio] menu. 2. Press ENTER. The [5.1 SPEAKER] appears. [Speaker] Select a speaker that you want to adjust. NOTE Certain speaker settings are prohibited by the Dolby Digital licensing agreement. [Size] Since the speaker settings are fixed, you cannot change the settings. [Volume] Adjust the output level of each speaker.
Installation DRC (Dynamic Range Control) Make the sound clear when the volume is turned down (Dolby Digital only). Set to [On] for this effect. Vocal Select [On] to mix karaoke channels into normal stereo. This function is effective for multi-channel karaoke DVDs only. Semi Karaoke [On] When you finished singing a score will appear on the screen. [Off] Fanfare and score do not appears on the screen. NOTE • DVD, DVD Karaoke discs with more than 2 tracks are available discs for this function.
Installation Password You can enter or change password. 1. Select [Password] on the [Lock] menu and then press i. 2. Press ENTER. 3. Input a password and press ENTER. To change the password, press ENTER when the [Change] option is highlighted. Input a password and press ENTER. Enter it again and press ENTER to verify. 4. Press HOME to exit the menu. 3 Installation NOTE If you forget your password, you can clear it using the following steps: 1. Select the [Setup] menu on the [Home] menu. 2.
Operation 25 4 Operation Using the Home Menu 1. Press HOME. Displays the [Home] menu. Basic Operations CD/ USB Operations 1. Insert the disc by Pressing OPEN/CLOSE or connect the USB device to the USB port. 2. Press HOME. Displays the [Home] Menu. 3. Press ENTER then select option menu. [Music] – Displays [MUSIC] menu. [Movie] – Start video media’s playback or displays the [MOVIE] menu. [Photo] – Displays [PHOTO] menu. [Setup] – Displays the [Setup] menu. 3. Select an option by using I i.
Operation To Stop Press x. Playback Press B. Pause Frameby-Frame playback 4 Do this Press PAUSE. Press PAUSE/STEP repeatedly to play title Frame-by-Frame. (DVD, DivX only) Operation During playback, press or rotate; (1) to go to the next track/ file or to return to the beginning of current track/file: Skipping to -O n the remote control: the next/ . or > previous -O n the unit: MULITI JOG chapter/ track/ DIAL or .
Operation Playing the iPod Button 1. Connect the iPod firmly. iPod Connection 27 Do this ON REMOTE SET/CD II B /X Pause or restart ./ > ./ > Skip ./ > (press and hold) m/M (press and hold) Search - REPEAT To select a desired repeat mode: Track ( ), All ( ), Off (No display). - U/u/I/i Selects an option in the menu. B B, ENTER Starts playback. 4 Operation ON UNIT If you turn this unit on, your iPod is automatically turned on and recharging starts.
Operation Compatible iPod • We recommend installing the latest software version. • The unit supports the models as follows, iPod nano, 1G, 2G, 3G, 4G/ iPod classic/ iPod 4G, 5G/ iPod touch 2G. For some models, the unit may not operate depending on the firmware version. • • Depending on your iPod’s software version, it may not be possible to control your iPod from the player. Unsupported iPod models are recognized as an USB device when connected.
Operation Enjoying iPod on the screen 1. Connect the iPod firmly. 2. Press [Music] or [Movie]. If you connected the other device (CD or USB), select the iPod on the menu and ENTER. 29 TAPE Operation Listening to cassette tapes Cassette tapes can be played back in this unit. 1. Open the tape door by pressing PUSH EJECT. 2. Insert the tape. 3. Select a content using U/u/I/i, and press ENTER. 3. Close the tape door by pressing PUSH EJECT. 4.
Operation Other Operations Displaying Disc Information on-screen You can display various information about the disc loaded on-screen. 1. Press INFO/DISPLAY to show various playback information. The displayed items differ depending on the disc type or playing status. 2. You can select an item by pressing U u and change or select the setting by pressing I i. 4 Title – Current title number/ total number of titles. Operation Chapter – C urrent chapter number/ total number of chapters.
Operation Marked Playback ACD MP3 NOTE WMA The mark function enables you to store your favourite files from any disc or USB device in the unit memory. 1. Select [Music] on the [Home] menu. Music menu Moving to the previous or next file list. Returning to the previous folder. (MP3/ WMA only) File information will be displayed according to the ID3TAG information on the appropriate music file. 31 If you want to select all files on the list, select [Select All] and press ENTER. To delete a Marker 1.
Operation AUTO DJ playback ACD MP3 JPG WMA You can view photo files using this player. Auto DJ blends the end of one song into the beginning of another for seamless playback. it equalizes volume across tracks for uninterrupted playback. 1. Select [Photo] on the [Home] menu and press ENTER. Press AUTO DJ on the remote control or unit repeatedly, the display changes as followings. order, RANDOM (AUTO DJ RANDOM) -> (AUTO DJ SEQUENTIAL) -> (AUTO DJ OFF).
Operation About help menu in the full screen. Menu Buttons Operation Menu INFO/ DISPLAY Displaying the Option menu. I/i Moving to another file RETURN Returning to the [Photo] menu. b/B Prev./ Next O Close Sleep Timer Setting Press SLEEP one or more times to select delay time between 10 and 180 minutes, after the unit will turn off. To check the remaining time, press SLEEP.
Operation Screen Saver VOCAL FADER The screen saver appears when you leave the unit in Stop mode for about five minutes. You can enjoy the function as karaoke, by reducing singer vocal of music in the various source. (MP3/ WMA/ CD/ etc.) Press the VOCAL FADER, and “FADE ON” will appear in display window. To cancel it, press VOCAL FADER again. The quality of the VOCAL FADER may be different depending on the recording conditions of music files. This function is available only when MIC is connected.
Operation Radio Operations 35 5. Press ENTER. The station is stored. 6. Repeat steps 2 to 5 to store other stations. Be sure that both FM and AM aerials are connected. (Refer to the page 19) Listening to the radio 1. Press RADIO&INPUT until FM or AM appears in the display window. The last received station is tuned in. 2. Press and hold TUNING (-/+) for about two seconds until the frequency indication starts to change, then release. Scanning stops when the Unit tunes in a station.
Operation Setting the USER EQ You can listen to music with the desired sound effect by adjusting the BASS, MIDDLE and TREBLE. 1. Press USER EQ. “USER EQ” is displayed. 2. Press SET/CD SYNC. to enter the USER EQ. 3. Select the BASS, MIDDLE or TREBLE sound effect you want by using n PRESET - / N PRESET +. 1. Turn the power on. 2. Press TIMER. Each functions flashes. 3. Press SET/CD SYNC. when the function you want to be woken by is showing. 4. “ON TIME” will be displayed.
Operation Sound adjustment On Display This system has a number of pre-set surround sound fields. You can select a desired sound mode by using SOUND EFFECT. You can change the SOUND EFFECT using I i arrow key while the sound effect information is displayed on. The displayed items for the equalizer maybe different depending on sound sources and effects. On Display Description During playback, reinforce the treble, bass and surround sound effect. LOUDNESS Improves the bass and treble sound .
Operation Advanced Operations Recording to TAPE You can record a various sound source to TAPE. Listening to music from your portable player or external device The unit can be used to play the music from many types of portable player or external devices. (Refer to the page 19) 1. Connect the portable player to the PORT.IN(PORTABLE IN) connector of the unit. Or Connect the external device to the AUX connector of the unit. 4 2. Turn the power on by pressing POWER. Operation 3.
Operation Recording to USB You can record a various sound source to USB. 1. Connect the USB device to the unit. 2. Select a function in which you want to record. 3. Playback a sound source first. 4. Press on the unit or REC on the remote control. > The display is changed in the following order, “USB REC” <-> “TAPE REC” 5. Press the on the unit or REC on the remote control button once more when “USB REC” is displayed. > Recording starts. [All tracks/ files recording] Record to USB in stop or play mode. 6.
Maintenance 5 Maintenance Notes on Discs Handling the Unit Handling Discs When shipping the unit Please save the original shipping carton and packing materials. If you need to ship the unit, for maximum protection, re-pack the unit as it was originally packed at the factory. Never stick paper or tape on the disc. After playing, store the disc in its case. Do not expose the disc to direct sunlight or sources of heat and never leave it in a parked car exposed to direct sunlight.
Troubleshooting 41 6 Troubleshooting PROBLEM No power No picture There is little or no sound CAUSE The DVD picture The disc is dirty. quality is poor No disc is inserted. An unplayable disc is inserted. A DVD/CD will not play The disc is inserted upside down. There is a parental lock which prevents the playback of DVDs with a certain rating. The antenna is positioned or connected poorly. The signal strength of the radio station is too weak.
Appendix 7 Appendix Language Codes Use this list to input your desired language for the following initial settings: Disc Audio, Disc Subtitle, Disc Menu.
Appendix 43 Area Codes Choose a area code from this list.
Appendix Trademarks and Licenses Specifications General • Power requirements: MDS715 : Refer to main label Dolby and the double-D symbol are registered trademarks of Dolby Laboratories. “DVD Logo” is a trademark of DVD Format/Logo Licensing Corporation. • Power consumption: MDS715 : Refer to main label • Dimensions (W x H x D): MDS715 : 273 x 333 x 339 mm without foot • Net Weight (Approx.): MDS715 : 5.
Appendix Tuner Speakers • FM Tuning Range: 87.5 to 108.0 MHz or 87.50 to 108.00 MHz • Front speaker Type: Impedance : Rated Input Power: Max.
PT. LG ELECTRONICS INDONESIA Kawasan Industri MM2100 Blok G Cikarang Barat, Bekasi, Jawa Barat 17520 INDONESIA MDS715-A0P_DIDNLLK_ENG_4656.